Binary Xen rpm repositories for EL6
Take a look at these repositories:
Michael Young's EL6 Xen rpm repository (also includes xen dom0 capable kernel based on rhel6 2.6.32 kernel):http://xenbits.xen.org/people/mayoung/EL6.xen/http://xenbits.xen.org/people/mayoung/testing/Gitco.de repository is based on this tutorial, but contains xen dom0 capable kernel rpm based on the xen/kernel.org kernel (not rhel6 kernel):http://www.gitco.de/linux/x86_64/centos/6/http://www.gitco.de/linux/x86_64/centos/6/gitco-centos6-x86_64.repo
Additional repositories:
Fedora xendom0 kernel rpms by Michael Young:http://repos.fedorapeople.org/repos/myoung/dom0-kernel/http://wiki.alteeve.com/files/an-cluster/rhel6/
Red Hat Enterprise Linux 6 Xen 4.0 tutorial
This tutorial explains how to install and configure RHEL6 to run as Xen dom0 (host), running Xen hypervisor 4.0. Note that this is unsupported by Red Hat! See the end of this wiki page for more information about RHEL6 Xen binary rpm yum repository. This tutorial explains how to compile Xen and dom0 kernel from sources/srpms.
As a default RHEL6 does NOT:
RHEL6 does not ship Xen hypervisor or tools.RHEL6 does not ship Xen dom0 capable kernel.
As a default RHEL6 DOES:
RHEL6 runs as Xen PV (paravirtual) domU using the pvops framework in the default kernel.RHEL6 runs as Xen HVM (fully virtualized) guest.RHEL6 ships with optimized Xen PV-on-HVM drivers for RHEL6 Xen HVM guests.
Topics in this tutorial:
How to install and configure RHEL6 system for running as Xen dom0 (host).How to get Xen src.rpm from Fedora and rebuild and install it on RHEL6.How to install upstream Xen dom0 capable kernel on RHEL6.How to update the dom0 kernel to a newer version from the upstream git tree.How to use libvirt and virt-manager to manage Xen on RHEL6.Binary rpm repositories for EL6.More information and links.
TODO list for this tutorial:
Fix the src.rpm compilation examples, shouldn't build as root.Make sure everything works with SElinux enabled, and leave it enabled.
RHEL6 installation and configuration
Installation:
Download "rhel-server-6.0-x86_64-dvd.iso" from Red Hat Network (RHN).Burn it to DVDR, or if you have a server with remote management, use virtual media ISO mapping.Boot from the DVD.Install as usual.Choose "Basic Server" install.Disk Partitioning: Create /boot partition as primary, make it ext3 and at least 2 GB in size. Create LVM PV (Physical Volume) and VG (Volume Group) to fill the rest of the disk space. Create root as LVM volume, make it ext4, and at least 36 GB in size. Create swap as LVM volume, make it at least as big as the amount of RAM in your server.IMPORTANT! Make sure you leave FREE space in the LVM volume group. You can use that free space later to create LVM volumes for Xen VM virtual disks.In this tutorial the hostname is set to "el6.localdomain".
Screenshot of disk partitioning: 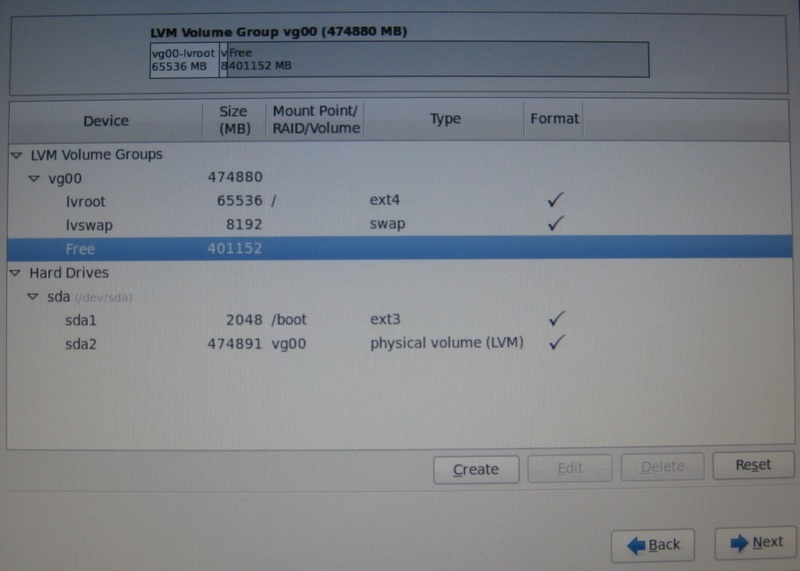
Configuration after installation:
First fix networking by editing "/etc/sysconfig/network-scripts/ifcfg-ethX", usually "ifcfg-eth0", and make it look like:
[root@el6 ~]# cat /etc/sysconfig/network-scripts/ifcfg-eth0 DEVICE="eth0" HWADDR="00:11:22:33:44:55" NM_CONTROLLED="no" ONBOOT="yes" BOOTPROTO="dhcp"
ie. make sure NM_CONTROLLED="no" and ONBOOT="yes". Then run "ifup eth0" to activate networking.
Make sure network service is set to start automatically:
[root@el6 ~]# chkconfig --list network
Make sure your Internet connection works OK at this point! Next make sure "/etc/hosts" file has an entry for your hostname:
[root@el6 ~]# cat /etc/hosts 127.0.0.1 localhost localhost.localdomain localhost4 localhost4.localdomain4 ::1 localhost localhost.localdomain localhost6 localhost6.localdomain6 127.0.0.1 el6 el6.localdomain
Full FQDN hostname in this example is "el6.localdomain".
Disable SElinux by editing "/etc/selinux/config" and make it have:
SELINUX=disabled
Then it's time to register your system to RHN, so you can fetch updates and install additional packages using yum.
Run "rhn_register" and fill in your RHN username and password. When registration is OK, there's an important extra step do!
You need to login to RHN website and:
Click "Manage Entitlements & Subscriptions".Click the correct (newly added) system.Click "(Alter Channel Subscriptions)".Select ""RHEL Server Optional (v. 6 64-bit x86_64)" channel.Click "Change Subscriptions".
Some required packages are only available in the "RHEL Server Optional (v. 6 64-bit x86_64)" channel. Failing to add that channel means you won't be able to install some required packages later on.
When you're done with RHN update the system and install latest (security) fixes:
[root@el6 ~]# yum update
Then install some commonly used tools:
[root@el6 ~]# yum install screen vim wget tcpdump ntp ntpdate man smartmontools links lynx ethtool xorg-x11-xauth
Then increase grub timeout from grub.conf, and comment out "hiddenmenu" option:
[root@el6 ~]# cat /boot/grub/grub.conf # grub.conf generated by anaconda # # Note that you do not have to rerun grub after making changes to this file # NOTICE: You have a /boot partition. This means that # all kernel and initrd paths are relative to /boot/, eg. # root (hd0,0) # kernel /vmlinuz-version ro root=/dev/mapper/vg00-lvroot # initrd /initrd-[generic-]version.img #boot=/dev/sda default=0 timeout=10 splashimage=(hd0,0)/grub/splash.xpm.gz #hiddenmenu title Red Hat Enterprise Linux Server (2.6.32-71.7.1.el6.x86_64) root (hd0,0) kernel /vmlinuz-2.6.32-71.7.1.el6.x86_64 ro root=/dev/mapper/vg00-lvroot rd_LVM_LV=vg00/lvroot rd_LVM_LV=vg00/lvswap rd_NO_LUKS rd_NO_MD rd_NO_DM LANG=en_US.UTF-8 SYSFONT=latarcyrheb-sun16 KEYBOARDTYPE=pc KEYTABLE=fi crashkernel=auto rhgb quiet initrd /initramfs-2.6.32-71.7.1.el6.x86_64.img title Red Hat Enterprise Linux (2.6.32-71.el6.x86_64) root (hd0,0) kernel /vmlinuz-2.6.32-71.el6.x86_64 ro root=/dev/mapper/vg00-lvroot rd_LVM_LV=vg00/lvroot rd_LVM_LV=vg00/lvswap rd_NO_LUKS rd_NO_MD rd_NO_DM LANG=en_US.UTF-8 SYSFONT=latarcyrheb-sun16 KEYBOARDTYPE=pc KEYTABLE=fi crashkernel=auto rhgb quiet initrd /initramfs-2.6.32-71.el6.x86_64.img
At this point you should reboot the system to the newest kernel.
Installing required packages to compile Xen rpms
Install packages that are required to rebuild Xen src.rpm (all on one line):
[root@el6 ~]# yum groupinstall "Development tools" "Additional Development" "Debugging Tools" "System administration tools" "Compatibility libraries" "Console internet tools" "Desktop Platform Development"
This is around 212 MB of downloads.
Then install some additional packages that are required to build Xen with all features enabled:
[root@el6 ~]# yum install transfig wget texi2html libaio-devel dev86 glibc-devel e2fsprogs-devel gitk mkinitrd iasl xz-devel bzip2-devel pciutils-libs pciutils-devel SDL-devel libX11-devel gtk2-devel bridge-utils PyXML qemu-common qemu-img mercurial texinfo libuuid-devel
This is around 82 MB of downloads.
And finally 32bit version of glibc-devel is required aswell:
[root@el6 ~]# yum install glibc-devel.i686
Now you have all the basic tools, libraries and headers installed.
Rebuilding and installing Xen src.rpm
Fedora xen-4.0.1-6 rpm package includes some additional patches and fixes backported from upstream Xen 4.0.2-rc*.
[root@el6 ~]# mkdir /root/src && cd /root/src [root@el6 src]# wget http://ftp.funet.fi/pub/mirrors/fedora.redhat.com/pub/fedora/linux/releases/14/Everything/source/SRPMS/xen-4.0.1-6.fc14.src.rpm [root@el6 src]# rpm -i xen-4.0.1-6.fc14.src.rpm [root@el6 src]# cd /root/rpmbuild/SPECS [root@el6 SPECS]# rpmbuild -bb xen.spec
After a while you should see output like:
Wrote: /root/rpmbuild/RPMS/x86_64/xen-4.0.1-6.el6.x86_64.rpm Wrote: /root/rpmbuild/RPMS/x86_64/xen-libs-4.0.1-6.el6.x86_64.rpm Wrote: /root/rpmbuild/RPMS/x86_64/xen-runtime-4.0.1-6.el6.x86_64.rpm Wrote: /root/rpmbuild/RPMS/x86_64/xen-hypervisor-4.0.1-6.el6.x86_64.rpm Wrote: /root/rpmbuild/RPMS/x86_64/xen-doc-4.0.1-6.el6.x86_64.rpm Wrote: /root/rpmbuild/RPMS/x86_64/xen-devel-4.0.1-6.el6.x86_64.rpm Wrote: /root/rpmbuild/RPMS/x86_64/xen-licenses-4.0.1-6.el6.x86_64.rpm Wrote: /root/rpmbuild/RPMS/x86_64/xen-debuginfo-4.0.1-6.el6.x86_64.rpm
Try installing the rpms:
[root@el6 SPECS]# cd /root/rpmbuild/RPMS/x86_64/ [root@el6 x86_64]# rpm -Uvh xen*4.0.1-6*.rpm error: Failed dependencies: /usr/bin/qemu-nbd is needed by xen-runtime-4.0.1-6.el6.x86_64
So what's happening here? It seems RHEL6 does not have "qemu-common" rpm available, which includes "qemu-nbd" binary. So we need to grab qemu src.rpm from Fedora and rebuild it for RHEL6 to get the required "qemu-common" rpm.
Verify the version of "qemu" in RHEL6:
[root@el6 x86_64]# rpm -qa | grep qemu qemu-img-0.12.1.2-2.113.el6.x86_64
Ok, so it's version 0.12.x. Fedora 13 has qemu 0.12.5, so it's close enough:
[root@el6 x86_64]# cd /root/src [root@el6 src]# wget http://ftp.funet.fi/pub/mirrors/fedora.redhat.com/pub/fedora/linux/updates/13/SRPMS/qemu-0.12.5-1.fc13.src.rpm [root@el6 src]# rpm -i qemu-0.12.5-1.fc13.src.rpm [root@el6 src]# cd /root/rpmbuild/SPECS [root@el6 SPECS]# rpmbuild -bb qemu.spec
After a while you'll see:
Wrote: /root/rpmbuild/RPMS/x86_64/qemu-0.12.5-1.el6.x86_64.rpm Wrote: /root/rpmbuild/RPMS/x86_64/qemu-kvm-0.12.5-1.el6.x86_64.rpm Wrote: /root/rpmbuild/RPMS/x86_64/qemu-img-0.12.5-1.el6.x86_64.rpm Wrote: /root/rpmbuild/RPMS/x86_64/qemu-common-0.12.5-1.el6.x86_64.rpm Wrote: /root/rpmbuild/RPMS/x86_64/qemu-user-0.12.5-1.el6.x86_64.rpm Wrote: /root/rpmbuild/RPMS/x86_64/qemu-system-x86-0.12.5-1.el6.x86_64.rpm Wrote: /root/rpmbuild/RPMS/x86_64/qemu-system-ppc-0.12.5-1.el6.x86_64.rpm Wrote: /root/rpmbuild/RPMS/x86_64/qemu-system-sparc-0.12.5-1.el6.x86_64.rpm Wrote: /root/rpmbuild/RPMS/x86_64/qemu-system-arm-0.12.5-1.el6.x86_64.rpm Wrote: /root/rpmbuild/RPMS/x86_64/qemu-system-mips-0.12.5-1.el6.x86_64.rpm Wrote: /root/rpmbuild/RPMS/x86_64/qemu-system-cris-0.12.5-1.el6.x86_64.rpm Wrote: /root/rpmbuild/RPMS/x86_64/qemu-system-m68k-0.12.5-1.el6.x86_64.rpm Wrote: /root/rpmbuild/RPMS/x86_64/qemu-system-sh4-0.12.5-1.el6.x86_64.rpm Wrote: /root/rpmbuild/RPMS/x86_64/qemu-kvm-tools-0.12.5-1.el6.x86_64.rpm Wrote: /root/rpmbuild/RPMS/x86_64/qemu-debuginfo-0.12.5-1.el6.x86_64.rpm
So now we have the required "qemu-common" rpm. Let's install it to satisfy the package dependencies:
[root@el6 SPECS]# cd /root/rpmbuild/RPMS/x86_64 [root@el6 x86_64]# rpm -Uvh qemu-common-0.12.5-1.el6.x86_64.rpm Preparing... ########################################### [100%] 1:qemu-common ########################################### [100%]
Now we can also install Xen rpms:
[root@el6 x86_64]# rpm -Uvh xen*4.0.1-6*.rpm Preparing... ########################################### [100%] 1:xen-licenses ########################################### [ 13%] 2:xen-libs ########################################### [ 25%] 3:xen-hypervisor ########################################### [ 38%] 4:xen-runtime ########################################### [ 50%] 5:xen ########################################### [ 63%] 6:xen-devel ########################################### [ 75%] 7:xen-doc ########################################### [ 88%] 8:xen-debuginfo ########################################### [100%]
Now you're done installing Xen hypervisor, tools and libraries.
Installing upstream Xen dom0 capable kernel
Note that we're installing upstream *Xen* kernel here, which is based on the long-term maintained kernel.org Linux 2.6.32.x kernel. This kernel is different from the RHEL6 kernel. Many drivers are newer versions in Red Hat's kernel, and Red Hat's kernel might have more features than the kernel.org kernel. Due to the driver version differences you might experience problems on some hardware, for example on servers using LSI/DELL RAID adapters. You might need to manually update driver versions to fix these problems on affected systems. See the end of this wiki page for more information about kernel versions.
Clone the kernel git repository from kernel.org and check out the "xen/stable-2.6.32.x" long-term maintained branch.
[root@el6 x86_64]# mkdir /root/kernel && cd /root/kernel [root@el6 kernel]# git clone git://git.kernel.org/pub/scm/linux/kernel/git/jeremy/xen.git linux-2.6-xen [root@el6 kernel]# cd linux-2.6-xen [root@el6 linux-2.6-xen]# git checkout -b xen/stable-2.6.32.x origin/xen/stable-2.6.32.x
Now you have the kernel ready to be configured and compiled. Reference config-file used is for version "2.6.32.25". It should work with newer version aswell, "make oldconfig" takes care of that.
NOTE! The reference .config file has various debugging options enabled, so don't use this kernel config for performance benchmarks!
[root@el6 linux-2.6-xen]# wget -O .config http://pasik.reaktio.net/xen/kernel-config/config-2.6.32.25-pvops-dom0-xen-stable-x86_64 [root@el6 linux-2.6-xen]# make oldconfig [root@el6 linux-2.6-xen]# make -j4 bzImage && make -j4 modules && make modules_install
Then let's install the kernel and generate initrd (initramfs) image for the new kernel. Kernel version in this example is "2.6.32.25":
[root@el6 linux-2.6-xen]# depmod -a 2.6.32.25 [root@el6 linux-2.6-xen]# cp -a arch/x86/boot/bzImage /boot/vmlinuz-2.6.32.25 [root@el6 linux-2.6-xen]# cp -a System.map /boot/System.map-2.6.32.25 [root@el6 linux-2.6-xen]# cp -a .config /boot/config-2.6.32.25 [root@el6 linux-2.6-xen]# cd /boot [root@el6 boot]# dracut initramfs-2.6.32.25.img 2.6.32.25
NOTE! If you're using a system with LSI and/or Dell RAID adapters (using megaraid_sas driver) you need to manually update the driver version at this point! Linux 2.6.32.25 ships with too old driver version, and it wont' work (disks won't get enabled on system startup). See this email for information about updating the driver version:http://lists.xensource.com/archives/html/xen-devel/2010-11/msg00250.html .
Then it's time to modify "grub.conf" and add an entry for the Xen+dom0 combination:
[root@el6 ~]# cat /boot/grub/grub.conf # grub.conf generated by anaconda # # Note that you do not have to rerun grub after making changes to this file # NOTICE: You have a /boot partition. This means that # all kernel and initrd paths are relative to /boot/, eg. # root (hd0,0) # kernel /vmlinuz-version ro root=/dev/mapper/vg00-lvroot # initrd /initrd-[generic-]version.img #boot=/dev/sda default=0 timeout=10 splashimage=(hd0,0)/grub/splash.xpm.gz #hiddenmenu title Red Hat Enterprise Linux Server (2.6.32-71.7.1.el6.x86_64) root (hd0,0) kernel /vmlinuz-2.6.32-71.7.1.el6.x86_64 ro root=/dev/mapper/vg00-lvroot rd_LVM_LV=vg00/lvroot rd_LVM_LV=vg00/lvswap rd_NO_LUKS rd_NO_MD rd_NO_DM LANG=en_US.UTF-8 SYSFONT=latarcyrheb-sun16 KEYBOARDTYPE=pc KEYTABLE=fi crashkernel=auto rhgb quiet initrd /initramfs-2.6.32-71.7.1.el6.x86_64.img title Red Hat Enterprise Linux (2.6.32-71.el6.x86_64) root (hd0,0) kernel /vmlinuz-2.6.32-71.el6.x86_64 ro root=/dev/mapper/vg00-lvroot rd_LVM_LV=vg00/lvroot rd_LVM_LV=vg00/lvswap rd_NO_LUKS rd_NO_MD rd_NO_DM LANG=en_US.UTF-8 SYSFONT=latarcyrheb-sun16 KEYBOARDTYPE=pc KEYTABLE=fi crashkernel=auto rhgb quiet initrd /initramfs-2.6.32-71.el6.x86_64.img title Xen 4.0 with Linux 2.6.32.25 dom0 root (hd0,0) kernel /xen.gz dom0_mem=1024M loglvl=all guest_loglvl=all module /vmlinuz-2.6.32.25 ro root=/dev/mapper/vg00-lvroot rd_LVM_LV=vg00/lvroot nomodeset module /initramfs-2.6.32.25.img
Then let's disable KSM services, those don't work with Xen currently:
[root@el6 ~]# chkconfig ksm off [root@el6 ~]# chkconfig ksmtuned off
And then it's time to reboot into Xen ! Remember to choose the Xen entry from grub:
[root@el6 ~]# reboot
Verifying Xen after reboot
[root@el6 ~]# xm list Name ID Mem VCPUs State Time(s) Domain-0 0 1024 4 r----- 93.9 [root@el6 ~]# xm info host : el6.localdomain release : 2.6.32.25 version : #1 SMP Sun Nov 14 21:50:39 EET 2010 machine : x86_64 nr_cpus : 4 nr_nodes : 1 cores_per_socket : 4 threads_per_core : 1 cpu_mhz : 2826 hw_caps : bfebfbff:20100800:00000000:00000940:0008e3fd:00000000:00000001:00000000 virt_caps : hvm total_memory : 8190 free_memory : 7070 node_to_cpu : node0:0-3 node_to_memory : node0:7070 node_to_dma32_mem : node0:3259 max_node_id : 0 xen_major : 4 xen_minor : 0 xen_extra : .1 xen_caps : xen-3.0-x86_64 xen-3.0-x86_32p hvm-3.0-x86_32 hvm-3.0-x86_32p hvm-3.0-x86_64 xen_scheduler : credit xen_pagesize : 4096 platform_params : virt_start=0xffff800000000000 xen_changeset : unavailable xen_commandline : dom0_mem=1024M loglvl=all guest_loglvl=all cc_compiler : gcc version 4.4.4 20100726 (Red Hat 4.4.4-13) (GCC) cc_compile_by : root cc_compile_domain : cc_compile_date : Sun Nov 14 21:41:09 EET 2010 xend_config_format : 4 [root@el6 ~]# uname -a Linux el6.localdomain 2.6.32.25 #1 SMP Sun Nov 14 21:50:39 EET 2010 x86_64 x86_64 x86_64 GNU/Linux
From the output above we can see we're running Xen hypervisor version 4.0.1 (xen_major, xen_minor, xen_extra) with Linux 2.6.32.25 dom0 kernel.
Updating the dom0 kernel
Linux 2.6.32.x is the long-term supported and maintained kernel from both kernel.org and xen.org, so it gets pretty frequent updates. Here are the steps to update your kernel tree so you don't have to clone the whole tree again.
Clean up and update the git tree, then check the changelog for the recent changes:
[root@el6 ~]# mkdir /root/kernel/linux-2.6-xen [root@el6 linux-2.6-xen]# make clean [root@el6 linux-2.6-xen]# git pull [root@el6 linux-2.6-xen]# git log | less
And then follow the steps in the previous chapters to build and install the new kernel version.
Online changelog for the "xen/stable-2.6.32.x" branch of the kernel git tree is located here: http://git.kernel.org/?p=linux/kernel/git/jeremy/xen.git;a=shortlog;h=xen/stable-2.6.32.x .
Using libvirt and virt-manager with Xen
Install libvirt and virt-manager:
[root@el6 ~]# yum install libvirt virt-manager xorg-x11-xauth
The default version of libvirt in RHEL6 is not compiled with Xen support. You can verify this by using ssh with X11 forwarding from your laptop/desktop to your dom0, and trying to run "virt-manager":
[root@el6 ~]# virt-manager & [1] 2867 Unable to open connection to hypervisor URI 'xen:///': no connection driver available for xen:/// Traceback (most recent call last): File "/usr/share/virt-manager/virtManager/connection.py", line 992, in _try_open None], flags) File "/usr/lib64/python2.6/site-packages/libvirt.py", line 111, in openAuth if ret is None:raise libvirtError('virConnectOpenAuth() failed') libvirtError: no connection driver available for xen:///
This can be fixed by rebuilding libvirt rpms with Xen support enabled.
NOTE! Before rebuilding libvirt src.rpm you need to boot into non-Xen environment! This is because some of the automated RHEL6 libvirt Xen-specific tests seem to fail in Xen dom0 environment, but work OK in baremetal.
Verify libvirt version in RHEL6:
[root@el6 ~]# rpm -qa | grep libvirt
RHEL 6.0 seems to have libvirt version 0.8.1.
Let's download the src.rpm from Red Hat ftp server, patch the spec file to enable Xen support, and try rebuilding it.
[root@el6 ~]# cd /root/src [root@el6 src]# wget ftp://ftp.redhat.com/pub/redhat/linux/enterprise/6Server/en/os/SRPMS/libvirt-0.8.1-27.el6.src.rpm [root@el6 src]# rpm -i libvirt-0.8.1-27.el6.src.rpm [root@el6 src]# wget http://pasik.reaktio.net/xen/patches/libvirt-spec-rhel6-enable-xen.patch [root@el6 src]# cd /root/rpmbuild/SPECS [root@el6 SPECS]# cp -a libvirt.spec libvirt.spec.orig [root@el6 SPECS]# patch -p0 < ~/src/libvirt-spec-rhel6-enable-xen.patch patching file libvirt.spec [root@el6 SPECS]# rpmbuild -bb libvirt.spec error: Failed build dependencies: libnl-devel >= 1.1 is needed by libvirt-0.8.1-27.el6.x86_64 xhtml1-dtds is needed by libvirt-0.8.1-27.el6.x86_64 libudev-devel >= 145 is needed by libvirt-0.8.1-27.el6.x86_64 libpciaccess-devel >= 0.10.9 is needed by libvirt-0.8.1-27.el6.x86_64 yajl-devel is needed by libvirt-0.8.1-27.el6.x86_64 libpcap-devel is needed by libvirt-0.8.1-27.el6.x86_64 avahi-devel is needed by libvirt-0.8.1-27.el6.x86_64 parted-devel is needed by libvirt-0.8.1-27.el6.x86_64 device-mapper-devel is needed by libvirt-0.8.1-27.el6.x86_64 numactl-devel is needed by libvirt-0.8.1-27.el6.x86_64 netcf-devel >= 0.1.4 is needed by libvirt-0.8.1-27.el6.x86_64
Ok, so we need more packages installed:
[root@el6 SPECS]# yum install libnl-devel xhtml1-dtds libudev-devel libpciaccess-devel yajl-devel libpcap-devel avahi-devel parted-devel device-mapper-devel numactl-devel netcf-devel
After that let's try again:
[root@el6 SPECS]# rpmbuild -bb libvirt.spec
After a while you'll see:
Wrote: /root/rpmbuild/RPMS/x86_64/libvirt-0.8.1-27.el6.x86_64.rpm Wrote: /root/rpmbuild/RPMS/x86_64/libvirt-client-0.8.1-27.el6.x86_64.rpm Wrote: /root/rpmbuild/RPMS/x86_64/libvirt-devel-0.8.1-27.el6.x86_64.rpm Wrote: /root/rpmbuild/RPMS/x86_64/libvirt-python-0.8.1-27.el6.x86_64.rpm Wrote: /root/rpmbuild/RPMS/x86_64/libvirt-debuginfo-0.8.1-27.el6.x86_64.rpm
Then let's install the xen-enabled rpms (note you need to use --force because the same version of libvirt is already installed):
[root@el6 ~]# cd /root/rpmbuild/RPMS/x86_64/ [root@el6 x86_64]# rpm -Uvh --force libvirt-0.8.1-27.el6.x86_64.rpm libvirt-client-0.8.1-27.el6.x86_64.rpm libvirt-python-0.8.1-27.el6.x86_64.rpm Preparing... ########################################### [100%] 1:libvirt-client ########################################### [ 33%] 2:libvirt ########################################### [ 67%] 3:libvirt-python ########################################### [100%]
Now make sure "libvirtd" is set to automatically start on boot:
[root@el6 ~]# chkconfig --list libvirtd libvirtd 0:off 1:off 2:off 3:on 4:on 5:on 6:off
Then it's time to reboot back to Xen !
Verifying libvirt with Xen
[root@el6 ~]# virsh list Id Name State ---------------------------------- 0 Domain-0 running [root@el6 ~]# xm list Name ID Mem VCPUs State Time(s) Domain-0 0 1024 4 r----- 52.8
So it seems to work. Now you're also able to use graphical "virt-manager" to manage Xen on RHEL6.
Bridge problems and errors with custom dom0 kernel
# brctl show bridge name    bridge id              STP enabled    interfaces virbr0         /sys/class/net/virbr0/bridge: No such file or directory /sys/class/net/virbr0/bridge: No such file or directory /sys/class/net/virbr0/bridge: No such file or directory /sys/class/net/virbr0/bridge: No such file or directory /sys/class/net/virbr0/bridge: No such file or directory /sys/class/net/virbr0/bridge: No such file or directory /sys/class/net/virbr0/bridge: No such file or directory /sys/class/net/virbr0/bridge: No such file or directory /sys/class/net/virbr0/bridge: No such file or directory /sys/class/net/virbr0/bridge: No such file or directory /sys/class/net/virbr0/bridge: No such file or directory /sys/class/net/virbr0/bridge: No such file or directory 8000.000000000000      yes
This problem happens because Red Hat added bridge IGMP snooping support to rhel6 2.6.32 kernel, and also to rhel6 bridge-utils. If you use mainline or custom Linux 2.6.32 kernel with el6 distro then you won't have that bridge IGMP snooping support in the kernel, and bridge-utils (brctl) will give errors like above.
There are two workarounds:
Use Xen dom0 kernel based on actual rhel6 kernel/patches, mayoung does have "xendom0" kernel available for el6 distros based on actual rhel6 kernel, with xen dom0 pvops patches added on top, so it includes bridge IGMP snooping support and the default el6 bridge-utils works OK without errors. See the end of this wiki tutorial page for links to xendom0 kernel rpms.If using custom dom0 kernel (xen.git xen/stable-2.6.32.x) then rebuild the el6 bridge-utils src.rpm and remove the IGMP snooping patch from the spec file:http://lists.xensource.com/archives/html/xen-devel/2011-02/msg00760.html .
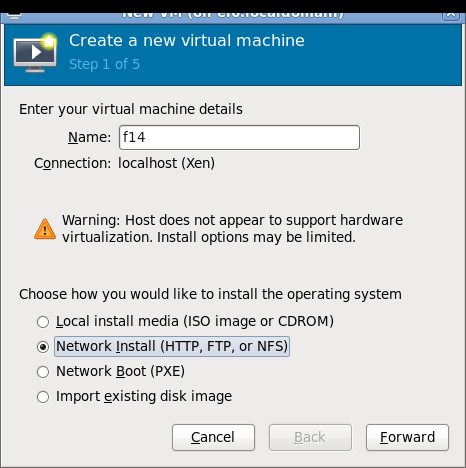
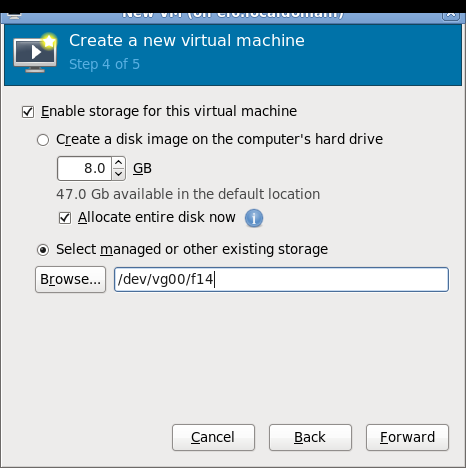
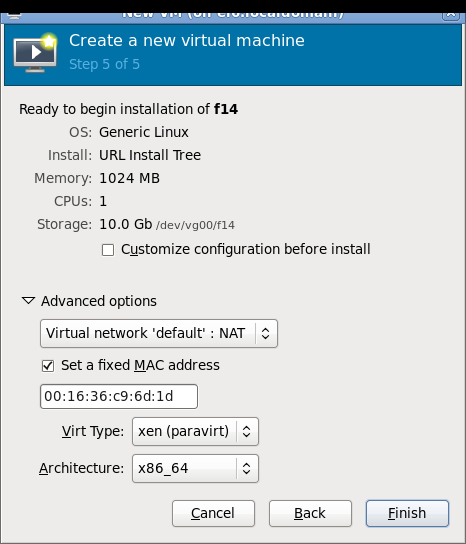
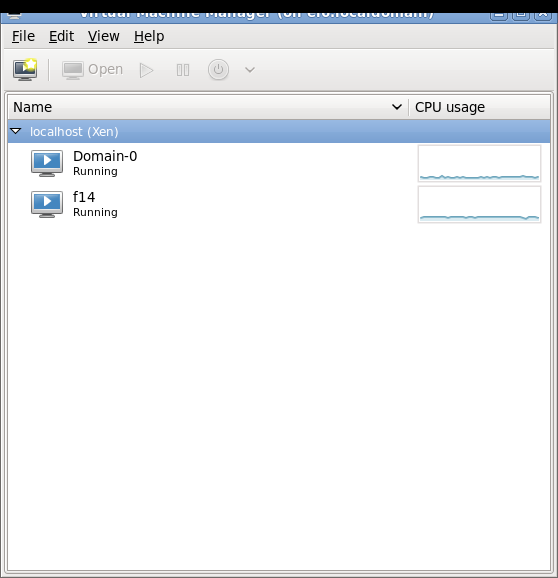
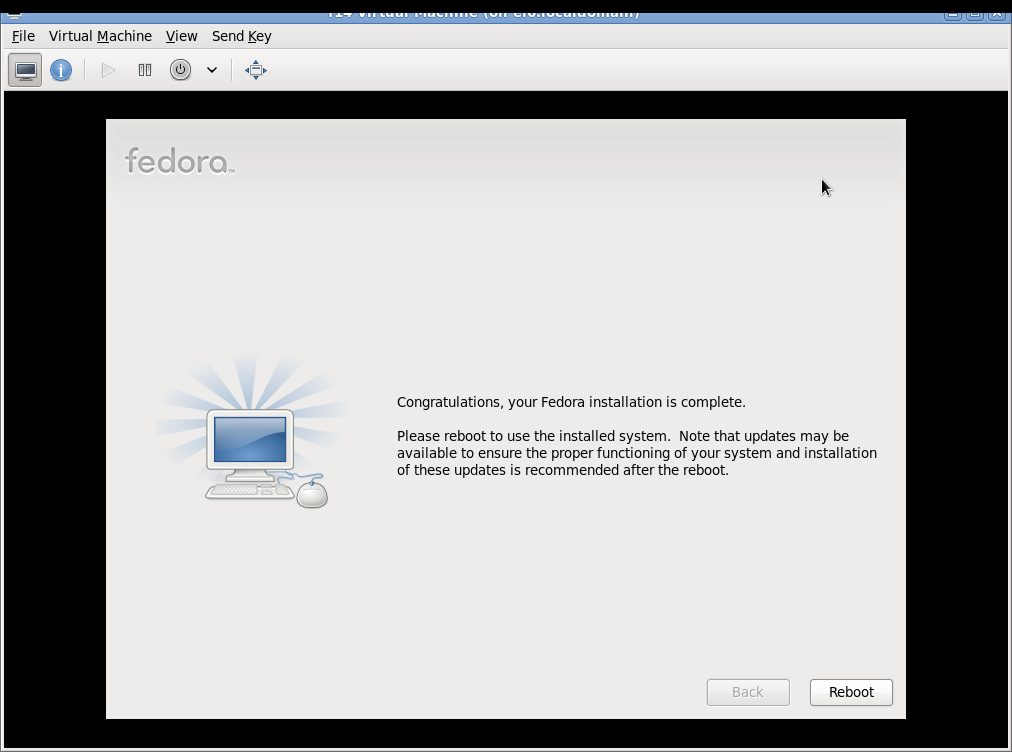
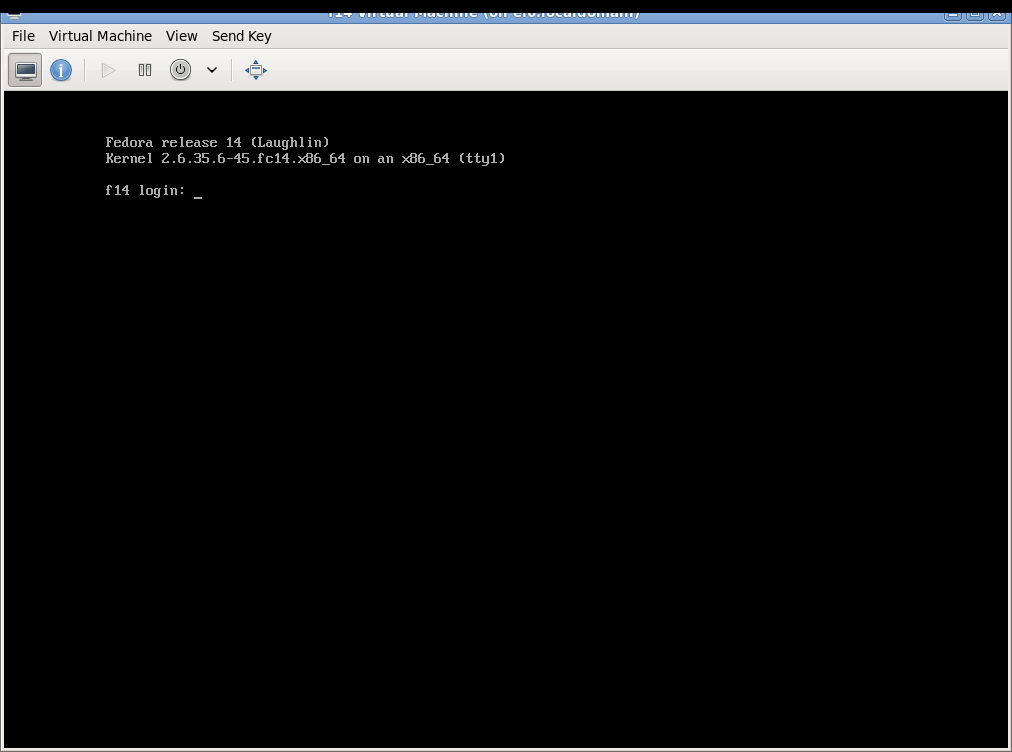
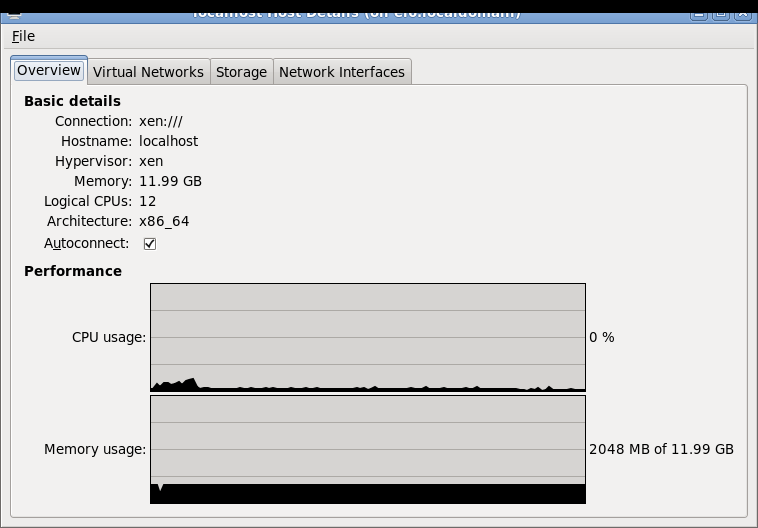
Using graphical virt-manager to manage Xen on RHEL6
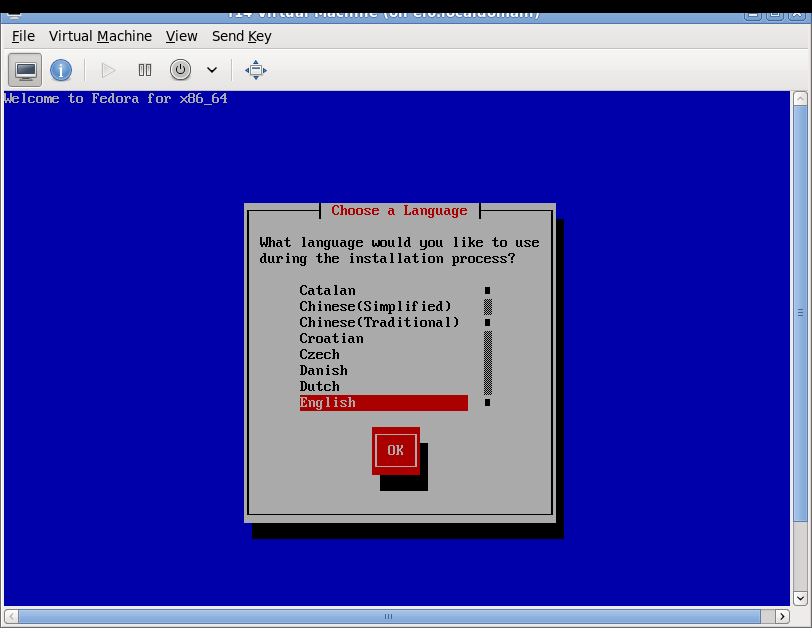
Some screenshots of using virt-manager with Xen on RHEL6 and installing Fedora 14 Xen PV domU. Note that you don't need (and probably shouldn't) run Xserver on dom0! You can use ssh X11 forwarding to run virt-manager on dom0 but display the virt-manager GUI on your local laptop/desktop. See the Fedora 13 tutorial link in the end of this page for more information about using ssh X11 forwarding.

Network setup details and troubleshooting
See Fedora13Xen4Tutorial for more information about virbr0 setup/configuration for NAT/DHCP, routing, firewall rules, et


