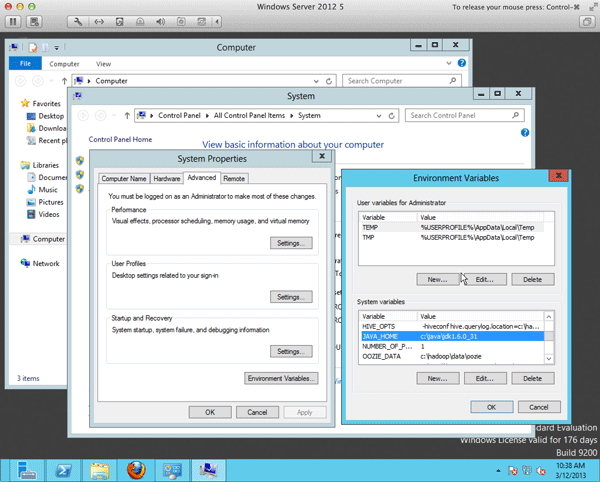
Did you know that you can easily install a simple single-node Hadoop cluster on your Windows PC or laptop? Normally, Hadoop runs on Unix computers. However, thanks to modern virtualization technology, you can run a complete sandbox version of Hadoop within a virtual Linux server on your personal computer, for free. This installation is ideal for learning and exploring how to use Hadoop. I will teach you how to install and run the Hortonworks sandbox version of Hadoop on your Windows computer in this tutorial.
Step 1: Install VMware Player
If you don't already have VMware running on your computer, you'll need to install VMware Player v5 or higher on your Windows computer. This software is free for personal use. I have found that installing VMware Player v5 on my 64-bit Windows 7 computer to be reliable and causes no problems. VMware Player can also be installed on a Linux computer. If you have a Mac, you'll need to purchase and install the VMware Fusion software instead.
Download and install "VMware Player for Windows 32-bit and 64-bit". It took me 4 minutes to download theVMware-player-5.0.1-894247.exeinstaller file, and 2 minutes to install the software on my Windows 7 computer, with no need to reboot. VMware Player requires 150 MB free disk space. Go to your Windows Start Menu and launch VMware Player (you may skip the upgrade to VMware Workstation).
See the full step-by-step instructions on installing VMware Player if you require additional details.
Step 2: Install Hortonworks Hadoop Sandbox
Download the Hortonworks Hadoop Sandbox for VMware. The VMware Fusion and VMware Workstation versions are compatible with the VMware Player that you had just installed in Step 1. It took 1 hour 47 minutes to download the 2 GB "Hortonworks+Sandbox+1.2+1-21-2012-1+vmware.ova" file from the Hortonworks Amazon S3 directory.
While waiting for the VMware OVA file to download, you can watch the below sandbox overview video from Hortonworks (8 minutes 35 seconds) and read the sandbox installation instructions.
Step 3: Run Hadoop!
Within the VMware Player application that you had installed and started running in Step 1, either go to the Player menu, and select "File/Open..", or choose "Open a Virtual Machine" from the welcome screen. Locate the directory where you had downloaded the VMware image Hortonworks sandbox file "Hortonworks+Sandbox+1.2+1-21-2012-1+vmware.ova" and select that OVA file to open. You'll be prompted for the name of the new virtual server instance, and where on your host Windows machine VMware should store the instance image file–okay to accept the defaults. It may take a few minutes for the new virtual machine to be imported. FYI, your Windows computer is the host system, whereas the CentOS 64-bit Linux system, bundled free with the Hortonworks Sandbox, is the virtual guest system from the VMware point of view.

VMware Player Open file menu
You're now ready to click "Play virtual machine" to start running your new sandbox instance.

Your guest Linux system will now start up, along with all necessary software for Hadoop to run including a web server. The beauty of using a virtual server is that 1) you don't need to have another physical computer under your desk along with the associated power and network cables, monitor, and other accessories, to experiment with Hadoop, 2) you can install it on your laptop and run Hadoop there without needing to connect to the network, and 3) your separate virtual server won't mess up anything you have on your main Windows computer, and can be easily uninstalled when no longer needed.

Once everything starts up, then you will see instructions on how to access the Hortonworks Sandbox. Look for the URL with the IP address such as http://192.168.40.128 in the below screenshot. Note that your IP address may be different than mine.
In a web browser such as Firefox or Chrome, go to the Sandbox URL IP address. You should see a Hortonworks Sandbox welcome screen with options to view some overview videos, to start the tutorial, or jump straight into the sandbox. Since we're eager to run Hadoop, let's go straight to the third choice: click on the green Start button under "Use the Sandbox."
You will now see the HUE web-based environment for the sandbox. By default you will start in the Beeswax screen. Let's click on "My Queries" then click on the "Sample: Top salary (copy)" query name.

You will then see the sample Hive query in the Query Editor. If you have used relational databases before, you will notice that the Hive query looks very similar to standard SQL. The other method of querying Hadoop would be via Pig, which is more of a pipeline method of constructing Hadoop queries than Hive, but will require a little steeper learning curve than Hive for those already familiar with SQL. Let's stick with Hive for this initial run. Click on the Execute button to start running the Hive query.
Now your query will start running for a minute or so. The HUE environment will update the log output to the screen for you to see the progress and any error messages. This is a good time to step away from the computer and dosomething healthy while your "Big Data" query is running.
 After a few minutes, your query results will show up on the screen.
Congratulations! You have now installed Hadoop and successfully run your first Hive query. You are on your way to becoming a wizard in Hadoop
 )
)