


rTechIndia
RtechIndia->technology ahead

rtech
rtechindia


Friday, 27 September 2019
Saturday, 24 January 2015
ssl Tunneling
SSL for unsecured Servers
A client can establish an encrypted SSL connection to the Membrane Router. The router terminates the SSL channel and communicates in plain HTTP or SOAP with the server. Using this configuration you can provide SSL encryption and authentication even if your service does not provide SSL. The Membrane Router can also doloadbalancing or access control.
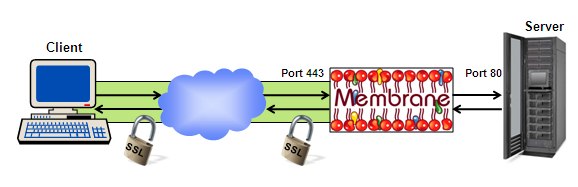
Figure1: SSL Encryption for unsecured Server
See also the example/ssl-server directory of the Membrane distribution for example configuration files for this scenario.
SSL Tunnel to the Server
Membrane Router can enable clients that do not support SSL to communicate with a SSL secured server. To secure the connection the traffic is encrypted by the router before it enters the unsecured network.
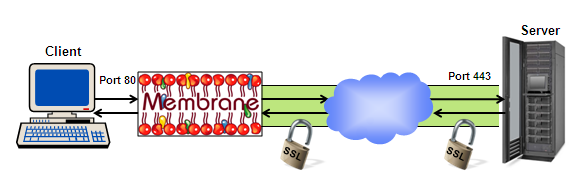
Figure2: Non SSL Client communicates with secured Server
See also the example/ssl-client directory of the Membrane distribution for example configuration files for this scenario.
Monitoring a SSL Connection
Because a SSL connection is encrypted it is not possible to monitor the traffic between the client and the server. By using two SSL connections, one between client and monitor and one between monitor and server, it is possible to analyze and monitor the traffic. So both client and server think they are communicating point to point securely with their peer.
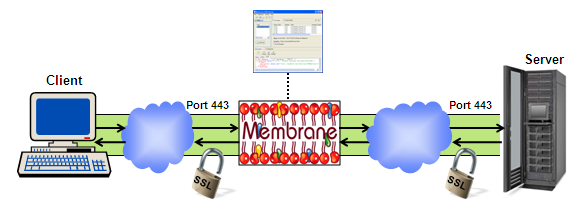
Figure3: Logging SSL encrypted Traffic
SSL Tunnel and VPN
A SSL tunnel can route traffic between an unsecured client and an unsecured server over the hostile internet. At each organisation a Membrane Router can work as SSL termination point and provide the desired encryption and authentication.
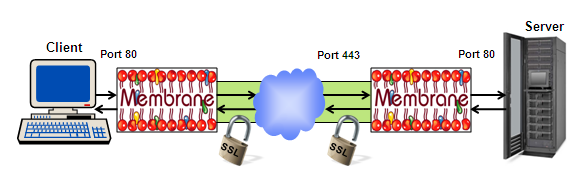
Figure4: SSL VPN Tunnel
Technical Configuration
Inbound and outbound SSL can be configured using thessl element in proxies.xml.
Sunday, 11 January 2015
Customization of ROM on your Android Phone
You might have read or heard people talking about custom ROMs they have installed on their Android devices. Here's how to do it quickly and safely…
One of the main reasons people like to root their devices is to install a new or different version of the operating system. The open source nature of the OS means that it's possible for anyone to view the code that makes up Android and then modify it as they see fit, in a similar way to which the Linux-based desktop operating systems work.
Custom ROMs can offer new features over the standard ones, allowing you to tailor your device to your needs. They also allow developers to port other manufacturers' interfaces to other device makes – for instance, HTC's Sense UI onto Samsung phones – or to remove a heavily customised ROM altogether. Another reason is to hurry along the update process: you are no longer tied to waiting on the phone manufacturers and the mobile operators to push out the latest version of Android. Installing a new ROM is a relatively simple and quick process thanks to the ROM Manager app which can be downloaded for free from the Android Market.
First of all you need to root your phone and there are a few methods for doing so. Some of the most popular are: SuperOneClick, Universal Androot and Z4Root. Check the compatibility with your particular device before attempting to gain root access. Here's how we'll do it:
For this example we'll use Z4 Root. Download it from here, as it isn't available on the Market. You will need to register first. Now, copy the .apk file you've downloaded to your SD card and then install using an app such as 'Easy Installer' or by clicking on the apk in your favourite file manager.
Open Z4Root and in the centre you will see a button saying 'Root'. Click on the button and wait for a short while, for the process to complete; the progress is shown in the bottom bar. After it has finished, the phone will reboot. You now have root access!
Once you've rooted your phone, ROM Manager makes backing up, installing a custom recovery and downloading the new one a breeze – and will even enable you to restore your original ROM if you prefer! This tutorial will take you through the process step by step and help you on the way to a fresh new experience with your phone…
Disclaimer
Rooting your phone and installing ROMs on your device may void your manufacturer warranty. You undertake the procedure outlined in this tutorial at your own risk. Android Magazine and Imagine Publishing Ltd. cannot be held responsible for loss of data or damage to your device.
Words by: Kieron Howard

Installing ROM Manager
First off, you will need to install the ROM Manager app. The good news its that it's a free one (although there is a premium version that offers more features). Open up the Android Market from your apps list and search for 'ROM Manager', then click the icon and install.

Install Clockwork recovery
When you rooted your Android device (see page 68), it's quite likely that at the same time you installed a piece of 'custom recovery' software. ROM Manager will check that you have this installed and that you have the latest version that's available.

Back up your ROM, part 1
Open up ROM Manager, click on the Backup Current ROM button, give the backup a name (perhaps something like 'Standard ROM Backup') and then click OK. You might be asked to allow ROM Manager superuser access and you'll need to grant this.

Back up your ROM, part 2
The phone will now automatically reboot into recovery mode. The backup process can take a little while, so make sure you aren't expecting any important calls! The recovery backs up your current ROM to the microSD card, so it's important not to format this.

Choose your ROM
Back in ROM Manager, click 'Download ROM'. This will bring up a list of available ROMs for your device. In this example we will install CyanogenMod 7, one of the most popular custom versions of Android due to its stability and wide device support.

Download the ROM
Choose the CyanogenMod version you wish to download – the latest version at time of writing is 7.1.0-RC. It's strongly advisable to stay away from the 'Nightly' builds, as these are largely experimental. Google apps don't come as standard, so click to download them.

Installing the ROM, part 1
Once the ROM and Google Apps have finished downloading, reopen ROM Manager and you will see the ROM pre-installation screen. Tick the 'Wipe Dalvik' and 'Wipe Data and Cache' boxes. Click OK and the phone will now reboot into recovery again.

Installing the ROM, part2
The new ROM will now install. This might take a little while. Once complete, the phone will reboot again. The first boot of any new ROM can take a while, sometimes up to 15 minutes, so be patient and don't panic if the device appears to have frozen.

Set up Google account
Once the phone has booted up, you will then be prompted to enter your Google account details. Doing this will automatically download and set up all your contacts, settings and apps back onto the phone. You now have a brand new ROM to explore!

Calibrate battery (optional)
Plug in your Android device while it's on and let it charge fully. Disconnect and turn off, then reconnect the power cable and wait until the LED goes green. Disconnect and turn back on, turn off again and reconnect the charger until the LED goes green again.
Build your Own Kernel with Ubuntu
Create a kernel specifically for your Android device in just 10 steps
One of the reasons Android has been able to do so well in the mobile markets is thanks to the open source, Linux base for the system. Because it has this open system, it means that the development and licensing is a lot cheaper for phone and tablet manufacturers and Google still gets to make its money via advertising revenue and the Google Play store.
While the business model is interesting in itself, it's the core kernel, though, that we're focussing on today. This is the element that bridges the gap between the software and the hardware, which also includes drivers and modules for specific chips in the device. On full-blown Linux distributions, you can get busy changing what modules are compiled along with the kernel, making it smaller and faster to create a speed boost on your system.
When it comes to an Android system, the kernels are quite well optimised for individual devices, however there's always a little bit more you can do to optimise it for the way you use your phone. Removing the bluetooth module or various input drivers are a couple of examples, however you can also add elements to the kernel for if you think you are going to do some physical hacks to the device.
In order to build the kernel, you'll need to use the Linux distribution Ubuntu. You don't have to go to install it though; you just need to have it on some flash storage or a CD so you can live boot it on a PC or laptop. Then you are ready to get kernal building!
This tutorial first appeared in Android Magazine issue 44, which is available from all good shops and to download now.
—

Go to Ubuntu
If you're using Ubuntu 12.04 or later already, you're all good to go. Otherwise, head to the Ubuntu website and download the latest version of the operating system. Once done, burn the ISO to a disc or use Unetbootin in order to create a live-bootable USB stick.

Boot into Ubuntu
Reboot your computer with the USB stick or disc in your system. Look out for an option to open the boot menu right as it turns on and select the medium on which you're accessing Ubuntu from. After a little wait you'll be asked if you want to try or install Ubuntu, so click Try.

Preparing Ubuntu for building
Ubuntu is not quite ready yet for making the kernel, so first you need to install some extra software. Press the Ubuntu logo or the Windows key and search for the terminal and then type in: $ sudo apt-get install build-essential kernel-package libncurses5-dev bzip2

Get your kernel source
Each device has a specific kernel and you'll need to Google your device to get the exact one. There are some general ones on AOSP, and HTC and Samsung have dedicated pages for kernels. Download the appropriate one to the main hard drive and create a new folder for it.

Download the NDK
Head to the Android NDK site and download the 32 or 64-bit Linux version depending on what you're live booting. Put it in the same folder as kernel source code and extract it. If the kernel source was compressed, make sure you extract that as well.

Prepare to configure
Back in the terminal, use cd to navigate to the kernel folder and use:
$ export CROSS_COMPILE=[folder location]/androidkernel/android-ndk-r10b/toolchains/arm-linux-androideabi-4.6/prebuilt/linux-x86_64/bin/arm-linux-androideabi-
In the kernel source, find the defconfig file with your devices code on and rename it to maker.defconfig or maker_defconfig.
Go to the kernel menu
Back in the terminal use the two following commands:
make maker.config
make menuconfig
After the second you'll be shown the kernel configuration menu where you can start making changes to what modules are included in your kernel.
Configure the kernel
It's very important that you know what you're changing in the menu. Removing random modules will likely just result in your phone not booting but some may actually damage your device. Google the options if you don't know what you want to change.

Build your new kernel
Once you're happy with the configurations and have saved what you've done, you can now begin to build your brand new kernel. Use the following command, replacing X with the number of cores in your devices' CPU:
$ make -jX ARCH=arm
Flash to phone
To use the shiny new kernal on your phone, you'll first need to find a flashable kernel zip for your device and then copy the zImage created from the build into the kernel. This is also your chance to add even more modules, such as Wi-Fi, to fully customise your phone to run exactly as you want.
Android Kernel Customization
The kernel, in this regard, is extremely customizable. Not only does the manufacturer have to plug in the necessary drivers to get all of the hardware to work correctly, but there are a lot of variables that they need to set. They can mess with all sorts of things, such as:
- the minimum and maximum frequencies that the CPU can scale up or down to
- how busy the CPU should be before it enables extra cores that it normally has disabled to save battery
- the frequency the CPU should boost to whenever it detects touch input (to ensure a smoother wake up)
- the CPU governor (which determines how quickly it tends to ramp up the frequency or not) that should be used
- change the voltage of the CPU during all possible frequencies
- the maximum frequency of the GPU
- enable USB fast charge (for USB 3.0 ports)
- configure the I/O scheduler that is used
How A Replacement Kernel Benefits You
That's great and all, but what can a custom kernel do for you? There are many different custom kernels for virtually every Android device in existence, so you'll have a lot of options to choose from. Depending on your needs, you can pick kernels that are optimized for performance, or ones that are optimized for power savings. Others have a good balance of both.

There are some developers who switch out some drivers with others (for varying reasons), or develop their own patches for problems they identify. A lot of developers also try to include upstream Linux kernel patches, or use their own toolkits for compilation. For example, for my Nexus 5, there's one developer who uses his own toolkit, which includes the latest version of GCC, a Linaro toolchain with optimizations specifically for the CPU architecture used, and maximum optimization flags for the compiler.
Developers can even add some additional features from other kernels that don't officially exist for your device. For example, there are some kernels for the Nexus 5 that include the "double tap to wake" feature that first appeared on the LG G2.
Most of all, a handful of kernels allow you to access the configurable variables yourself, so that you can use the code that the kernel developers release but tweak it to adjust its behavior to your liking. However, you'll want to research some of the options available before you actually start to change values for them. In other words, a custom kernel can provide improvements, extra features, specialization, and extreme configurability.
Where To Find Android Kernels
It's rather easy to find a kernel for your device. Assuming that you have your device rooted and acustom recovery installed, you can browse through the XDA-Developers forum, look in the subforum for your specific device, search through the threads for any that have a [KERNEL] tag in the thread's title, download one that you like, and flash the .zip file via your custom recovery.

There may also be a sticky thread that may contain a list of popular kernels available for easy searching. Once you've decided on a kernel you'd like to use, just download it (it should be in a .zip file) and flash it using the custom recovery. Be sure to adhere to all instructions that the kernel developer may provide, and any of their instructions would override any of my advice.
Sunday, 21 December 2014
Malicious File Extensions
angerous and malicious file extension list
Group of file extensions, which can be dangerous and harmful for your computer, but it may be also a regular program or data files. You should run a virus scan before opening any unknown file type from this group.
Malicious software, also known as malware, is an application or a file, which is harmful to the computer user. Malicious software includes computer viruses, worms, trojan horses, spyware, adware or rootkits.
Computer virus - virus is a program or programming code, which replicates by being copied or initiating its copying to another program, computer boot sector or document. Viruses can be transmitted as attachments to an e-mail note or in a downloaded file, or can be present on a diskette or CD. Some viruses wreak their effect as soon as their code is executed, other lie dormant until circumstances cause their code to be executed by the computer.
Computer worm - worm is a self-replicating virus, which does not alter files, but resides in active memory and duplicates itself. Worms use parts of the operating system that are automatic and usually invisible to the user. It is common for worms to be noticed only after their uncontrolled replication consumes system resources, slowing or halting other tasks.
Trojan horses - trojan horse (also known as trojan), is non-self-replicating malware, which appears to perform a desirable function for the user, while facilitates unauthorized access to the user's computer system.
Spyware - spyware is any technology, which aids in gathering information about a person or organization without their knowledge. Spyware is a program that is installed in someone's computer to secretly gather information about the user and to relay it to advertisers or other interested parties. Spyware can get in the computer as a software virus or as the result of installing a new program.
Adware - adware is any software package, which automatically plays, displays or downloads advertisements to the computer after the software is installed on it or while the application is being used.
Rootkits - rootkit is a collection of programs that enable administrator-level access to a computer or computer network. Typically, a cracker installs a rootkit on a computer after first obtaining user-level access, either by exploiting a known vulnerability or cracking the password. Once the rootkit is installed, it allows the attacker to mask intrusion and gain root or privileged access to the computer and possibly also to other machines in the network.
| Sort by: Extension | Sort by: File type description |
| file extension gzquar | BitDefender quarantine file |
| CD/DVD binary image file | |
| Email message file | |
| Program executable file | |
| Compressed archive file package for Java classes and data file | |
| Windows Shortcut file | |
| Dynamic Link Library file | |
| Microsoft Windows Shell Scrap Object file | |
| file extension sys | System file |
| WinZix compressed archive file | |
| ShockWave Flash, Animated vector format for the Internet | |
| Microsoft Windows screensaver file | |
| Microsoft Visio diagram document file | |
| Microsoft compiled HTML help file | |
| file extension aru | Autorun.aru malicious file |
| Batch file (executable) | |
| ActiveX control file | |
| file extension vexe | Infected executable file |
| JavaScript file | |
| file extension ozd | Win32.TrojanDownloader.Agent.OZD trojan |
| Text configuration file | |
| Windows metafile format | |
| file extension scr | Script file |
| Microsoft Windows script file | |
| Microsoft Windows Program Information File | |
| Microsoft Windows device driver | |
| file extension ctbl | Malware encrypted file |
| Microsoft Windows Control Panel file | |
| Windows virtual device driver | |
| Command executable file | |
| file extension buk | Malicious file |
| file extension smtmp | Trojan:Win32/FakeSysdef folder |
| PHP version 3 script file | |
| file extension rsc_tmp | Temporary file |
| Java bytecode class file | |
| file extension exe1 | Renamed executable file |
| Visual Basic script file | |
| file extension smm | Ami Pro macro file |
| Microsoft Windows Sound System file | |
| Windows Device Driver file | |
| Visual Basic encoded script file | |
| Microsoft Excel Macro file | |
| Paintbrush bitmap image | |
| Microsoft Windows virtual device driver | |
| Microsoft Windows command script file | |
| file extension wlpginstall | Possible Malware file |
| file extension bkd | Book Library Local Dos exploit file |
| Visual Basic VBA module file | |
| file extension dxz | Trojan backdoor virus file |
| file extension cih | Chernobyl virus file |
| file extension tps | Scam torrent file |
| Help file | |
| file extension kcd | rshiphop.kcd malware file |
| file extension xir | BackDoor.Generic9.XIR trojan file |
| file extension cryptowall | Encrypted file by Cryptowall ransomware |
| file extension sop | Malware word.sop file |
| file extension dyz | Backdoor.Win32.ProRat.dyz trojan file |
| file extension hlw | win32/AMalum.EDHZ file |
| Microsoft Windows scripting file | |
| file extension fnr | Trojan-Dropper.Win32.Flystud.lc. file |
| file extension boo | Microsoft Booasm.arc encoded file archive |
| file extension fjl | Rootkit.Win32.Agent.fjl virus file |
| file extension lik | Trojan.Win32.Agent.lik file |
| file extension s7p | SubSeven trojan file |
| file extension rhk | Backdoor.Win32.Rbot.rhk trojan virus file |
| file extension dlb | Troj/Dloadr-AHT file |
| file extension dom | DomPlayer malicious file |
| file extension tsa | jnana.tsa malware file |
| PHP version 2 script (HyperText PreProcessor) | |
| Portable graymap file format | |
| file extension bll | VBS/European-A worm file |
| Microsoft Visual Studio Visual Basic script file | |
| file extension mjz | Trojan.Win32.Agent.mjz file |
| file extension osa | W32/Sober-AD file |
| file extension fag | Win32.AutoRun.fag |
| Java Class file | |
| file extension nls | Troj/Agent-GIS file |
| file extensionexe_renamed | Renamed EXE file |
| file extension bxz | itaup.bxz malware file |
| file extension mfu | Backdoor.Win32.Agent.mfu virus file |
| Microsoft Visual Basic Extension file | |
| file extension ezt | Worm.Win32.AutoRun.ezt file |
| file extension cryptolocker | CryptoLocker encrypted file |
| file extension iws | Trojan-Downloader.JS.Agent file |
| Microsoft Windows scripting component file | |
| file extension dllx | Backdoor.Bot file |
| file extension dbd | DemoShield project file |
| file extension uzy | Backdoor.Sokacaps file |
| file extension xdu | Backdoor.Win32.PcClient.xdu file |
| file extension tko | Win32/Oficla malware file |
| file extension dyv | WORM_AUTORUN.DYV Worm file |
| file extension oar | HSQLDB database file |
| file extension ska | Happy99 virus file |
| file extension blf | Beast Trojan File |
| file extension mjg | Trojan file |
| file extension txs | Beast Trojan file |
| file extension cc | Trojan Spymaster.A text file |
| file extension cfxxe | Possibly Malware file |
| Troj/ProAgent-A | |
| file extension rna | Malware file |
| file extension tti | Beast Trojan file |
| file extension upa | Fake download file |
| file extension cxq | SillyDl.CXQ downloading trojan file |
| Microsoft Windows Scripting Host file | |
| file extension delf | Malicious or virus file |
| Microsoft Excel VBA module file | |
| file extension lkh | Worm.Generic.LKH virus file |
| file extension ce0 | Winewar worm file |
| file extension dli | Win32.Sober.AD@mm file |
| file extension vzr | Sinowal.vzr malware file |
| file extension spam | Spam e-mail message |
| file extension ceo | Winewar worm file |
| file extension fuj | Worm.Win32.AutoRun.fuj virus file |
| file extension xnt | W32/Sober-AD file |
| file extension bmw | W32/Liji-A virus file |
| file extension ssy | W32/Sober-AD file |
| file extension lok | W32/Rbot-WE log file |
| file extension zvz | Malware file |
| file extension plc | Lotus add-in functions macros applications |
| file extension aepl | Trojan file |
| file extension qit | Backdoor.QIT trojan horse file |
| file extension let | Nuke Randomic Life Generator file |
| file extension pr | W32/Brontok-DP worm file |
| file extension pid | W32/Yayin-A worm data file |
| file extension iva | Dementia.4207 virus file |
| file extension hts | Troj/DelSpy-E file |
| file extension hsq | Qaz Trojan data file |
| file extension cyw | Rbot.CYW worm file |
| file extension bqf | Backdoor.Win32.Ciadoor.bqf trojan file |
| file extension aut | Malware AutoStartup file |
| file extension dx | Win32/Alureon file |
Subscribe to:
Posts (Atom)


