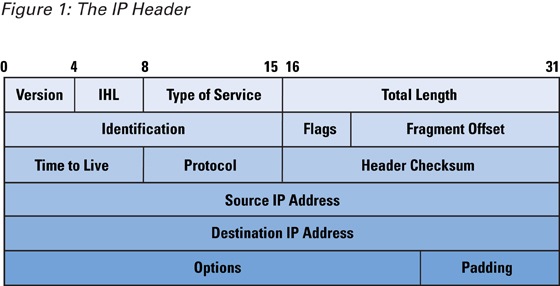
The Internet Protocol, or IP, is the main protocol used to route information across the Internet. The role of IP is to provide best-effort services for the delivery of information to its destination. IP depends on upper-level TCP/IP suite layers to provide accountability and reliability. The heart of IP is the IP datagram, a packet sent over the Internet in a connectionless manner. An IP datagram carries enough information about the network to get forwarded to its destination; it consists of a header followed by bytes of data . The header contains information about the type of IP datagram, how long the datagram should stay on the network (or how many hops it should be forwarded to), special flags indicating any special purpose the datagram is supposed to serve, the destination and source addresses, and several other fields, as shown in Figure 1.
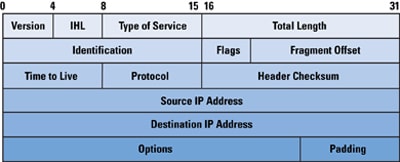
Figure 1: The IP Header
Layers above IP use the source address in an incoming packet to identify the sender. To communicate with the sender, the receiving station sends a reply by using the source address in the datagram. Because IP makes no effort to validate whether the source address in the packet generated by a node is actually the source address of the node, you can spoof the source address and the receiver will think the packet is coming from that spoofed address. Many programs for preparing spoofed IP datagrams are available for free on the Internet; for example, hping lets you prepare spoofed IP datagrams with just a one-line command, and you can send them to almost anybody in the world. You can spoof at various network layers; for example, you can use Address Resolution Protocol (ARP) spoofing to divert the traffic intended for one station to someone else. The Simple Mail Transfer Protocol (SMTP) is also a target for spoofing; because SMTP does not verify the sender's address, you can send any e-mail to anybody pretending to be someone else. This article focuses on the various types of attacks that involve IP spoofing on networks, and the techniques and approaches that experts in the field suggest to contend with this problem.
Spoofing IP datagrams is a well-known problem that has been addressed in various research papers. Most spoofing is done for illegitimate purposes—attackers usually want to hide their own identity and somehow damage the IP packet destination. This article discusses ways of spoofing IP datagrams, various attacks that involve spoofed IP packets, and techniques to detect spoofed packets and trace them back to their original source; spoofing concerns for IPv6 are briefly addressed.
Spoofing an IP Datagram
IP packets are used in applications that use the Internet as their communications medium. Usually they are generated automatically for the user, behind the scenes; the user just sees the information exchange in the application. These IP packets have the proper source and destination addresses for reliable exchange of data between two applications. The IP stack in the operating system takes care of the header for the IP datagram. However, you can override this function by inserting a custom header and informing the operating system that the packet does not need any headers. You can use raw sockets in UNIX-like systems to send spoofed IP datagrams, and you can use packet drivers such asWinPcap on Windows . Some socket programming knowledge is enough to write a program for generating crafted IP packets. You can insert any kind of header, so, for example, you can also create Transmission Control Protocol (TCP) headers. If you do not want to program or have no knowledge of programming, you can use tools such as hping, sendip, and others that are available for free on the Internet, with very detailed documentation to craft any kind of packet. Most of the time, you can send a spoofed address IP packet with just a one-line command.
Why Spoof the IP Source Address?
What is the advantage of sending a spoofed packet? It is that the sender has some kind of malicious intention and does not want to be identified. You can use the source address in the header of an IP datagram to trace the sender's location. Most systems keep logs of Internet activity, so if attackers want to hide their identity, they need to change the source address. The host receiving the spoofed packet responds to the spoofed address, so the attacker receives no reply back from the victim host. But if the spoofed address belongs to a host on the same subnet as the attacker, then the attacker can "sniff" the reply. You can use IP spoofing for several purposes; for some scenarios an attacker might want to inspect the response from the target victim (called "nonblind spoofing"), whereas in other cases the attacker might not care (blind spoofing). Following is a discussion about reasons to spoof an IP packet.
Scanning
An attacker generally wants to connect to a host to gather information about open ports, operating systems, or applications on the host. The replies from the victim host can help the attacker in gathering information about the system.
These replies might indicate open ports, the operating system, or several applications running on open ports. For example, a response for connection at port 80 indicates the host might be running a Web server. The hacker can then try to telnet to this port to see the banner and determine the Web server version and type, and then try to exploit any vulnerability associated with that Web server. In the scanning case, attackers want to examine the replies coming back from the host, so they need to see the returned packet. If the spoofed address is actually an address of a host on the attacker's subnet, then the attacker can use a sniffer to see the packets.
Sequence-Number Prediction
If you establish the connection between two hosts by using TCP, the packets exchanged between the two parties carry sequence numbers for data and acknowledgments. The protocol uses these numbers to determine out-of-order and lost packets, thus ensuring the reliable delivery to the application layer as promised by TCP. These numbers are generated pseudo-randomly in a manner known to both the parties. An attacker might send several spoofed packets to a victim to determine the algorithm generating the sequence numbers and then use that knowledge to intercept an existing session. Again it is important for the attacker to be able to see the replies.
Hijacking an Authorized Session
An attacker who can generate correct sequence numbers can send a reset message to one party in a session informing that party that the session has ended. After taking one of the parties offline, the attacker can use the IP address of that party to connect to the party still online and perform a malicious act on it. The attacker can thus use a trusted communication link to exploit any system vulnerability. Keep in mind that the party that is still online will send the replies back to the legitimate host, which can send a reset to it indicating the invalid session, but by that time the attacker might have already performed the intended actions. Such actions can range from sniffing a packet to presenting a shell from the online host to the attacker's machine.
Determining the State of a Firewall
A firewall is used to protect a network from Internet intruders. Packets entering a firewall are checked against an Access Control List (ACL). TCP packets sent by a source are acknowledged by acknowledgment packets. If a packet seems like an acknowledgement to a request or data from the local network, then a stateful firewall also checks whether a request for which this packet is carrying the acknowledgment was sent from the network. If there is no such request, the packet is dropped, but a stateless firewall lets packets enter the network if they seem to carry an acknowledgment for a packet. Most probably the intended receiver sends some kind of response back to the spoofed address. Again, for this process to work, the attacker should be able to see the traffic returning to the host that has the spoofed address—and the attacker generally knows how to use the returned packet to advantage.
Denial of Service
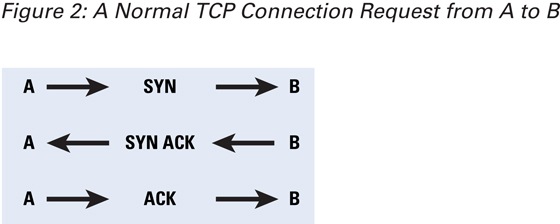
The connection setup phase in a TCP system consists of a three-way handshake . This handshake is done by using special bit combinations in the "flags" fields. If host A wants to establish a TCP connection with host B, it sends a packet with a SYN flag set. Host B replies with a packet that has SYN and ACK flags set in the TCP header. Host A sends back a packet with an ACK flag set, finishing the initial handshake. Then hosts A and B can communicate with each other, as shown in Figure 2.
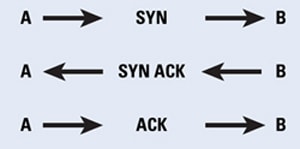
Figure 2: A Normal TCP Connection Request from A to B
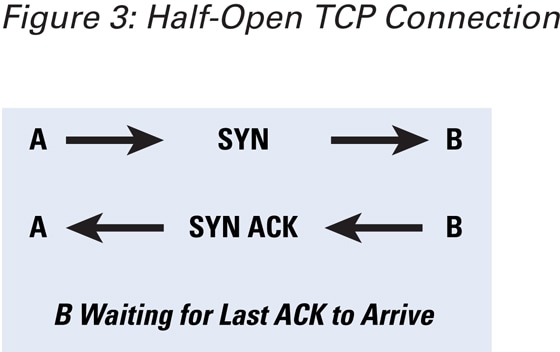
The three-way handshake must be completed in order to establish a connection. Connections that have been initiated but not finished are called half-open connections. A finite-size data structure is used to store the state of the half-open connections. An attacking host can send an initial SYN packet with a spoofed IP address, and then the victim sends the SYN-ACK packet and waits for a final ACK to complete the handshake. If the spoofed address does not belong to a host, then this connection stays in the half-open state indefinitely, thus occupying the data structure. If there are enough half-open connections to fill the state data structure, then the host cannot accept further requests, thus denying service to the legitimate connections (Figure 3).
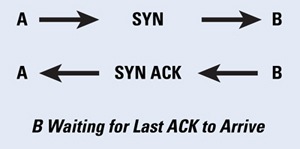
Figure 3: Half-Open TCP Connection
Setting a time limit for half-open connections and then erasing them after the timeout can help with this problem, but the attacker may keep continuously sending the packets. The attacked host will not have space to accept new incoming legitimate connections, but the connection that was established before the attack will have no effect. In this type of attack, the attacker has no interest in examining the responses from the victim. When the spoofed address does belong to a connected host, that host sends a reset to indicate the end of the handshake.
Flooding
In this type of attack an attacker sends a packet with the source address of the victim to multiple hosts. Responses from other machines flood the victim. For example, if an attacker uses the IP address of source A and sends a broadcast message to all the hosts in the network, then all of them will send a reply back to A, hence flooding it. The well-known Smurf and fraggle attacks used this technique.
Countermeasures for IP Spoofing
IP spoofing countermeasures include detecting spoofed IP packets and then tracing them back to the originating source. Detection of spoofed IP packets requires support of routers, host-based methods, and administrative controls, whereas tracing of IP packets involves special traceback equipment or traceback features in routers. The following section discusses both IP spoofing detection and IP spoofing traceback techniques.
Spoofed Packet Detection
Detection of a spoofed packet can start as early as at Layer 2. Switches with the IP Source Guard feature[8] match the MAC address of the host with a Dynamic Host Configuration Protocol (DHCP)-assigned dynamic or administratively assigned static IP address. Packets that do not have the correct IP source address for that particular MAC address are dropped, thereby limiting the ability of hosts connected to such a switch to send a packet with their neighbor's address. The IP Source Guard feature works very well for interfaces with a single IP address, but one interface can be assigned multiple IP addresses, and that may cause problems. The same problems can occur with Network Address Translation (NAT), where hosts might get different IP addresses several times. Routers work at Layer 3 in networks, and they know which interface a network is connected to and what network addresses can be expected to come from that network. If the outgoing packet from an interface does not have the network address of that interface, then the packet is spoofed and the router can stop that packet at that point; however, if the attacker is spoofing an IP address of a host on the same network (most likely in the attacks where they will be sniffing the replies), then this technique is not really helpful. The same logic can be used for an incoming packet; if a packet destined for an interface has a source address of the same network as the interface, then it is a spoofed packet. Routers can detect spoofed packets only when the packets pass through them, and if the target and attacker are both on the same subnet then this technique does not work.
Hosts receiving a suspicious packet can also use certain techniques to determine whether or not the IP address is spoofed. The first (and easiest) one is to send a request to the address of the packet and wait for the response; most of the time the spoofed addressees do not belong to active hosts and hence no response is sent.
Another method is to check the Time to Live (TTL) value of the packet, and then send a request to the spoofed host. If the reply comes, you can compare the TTL of both packets. Most probably the TTL values will not match. But of course it is also possible that these TTL values are the same but the packet is coming from a different source, and conversely. Packets generated by different operating systems differ slightly in values of certain fields; for example, in Internet Control Message Protocol (ICMP) ping packets, you can examine the data payload to determine the operating system. Windows fills the packet with letters of the alphabet, whereas Linux puts numbers in the data portion. If the suspicious packet does not have the same characteristics as the legitimate packet, that is evidence it was not sent from the IP address that is in its source address field. You can also use IP identification numbers to determine whether a packet is actually coming from the said source. For legitimate packets the IP ID is close in value, but this method is not reliable because the attacker can ping the said source and determine the IP ID that it is using, and then craft packets that will seem legitimate. In all these techniques we are trying to determine only whether or not a packet is spoofed, and taking all these steps for all packets would be prohibitive from an overhead standpoint. Thus you should either randomly check packets or determine some suspicious activity that would trigger further investigation for spoofed-packet detection. The next section addresses measures you can take to trace a spoofed packet back to its real source.
Tracing Spoofed IP Packets
IP traceback technology plays an important role in discovering the source of spoofed packets. Hop-by-hop traceback and logging of suspicious packets in routers are the two main methods for tracing the spoofed IP packets back to their source.
When a node detects that it is a victim of flood attack, it can inform the Internet Service Provider (ISP). In flood attacks the ISP can determine the router that is sending this stream to the victim, and then it can determine the next router, and so on. It reaches either to the source of the flood attack or the end of its administrative domain; for this case it can ask the ISP for the next domain to do the same thing. This technique is useful only if the flood is ongoing.
As mentioned earlier, a router has an idea of the IP addresses that should be arriving at its interfaces. If it sees any packet that does not seem to belong to the address range for its interface, it can log the packet as suspicious. Appropriately timed broadcasts among different domains to detect spoofed packets can help administrators of different networks trace spoofed IP packets back to their source.
IP Spoofing and IPv6
IP spoofing detection, or in other words validating the source address of an IPv6 packet, is a little more complicated than the process for IPv4. A host using IPv6 may potentially have multiple addresses. Again the problem inside the Local Area Network is to associate the IPv6 address with the Layer 2 or MAC address. Among peers on the same network, you can use Neighbor Discovery or Secure Neighbor Discovery (SEND) advertisements to verify the source address in a packet. You can verify source addresses of packets arriving from nodes outside the network by using the Authentication Header (AH) in IPv6 datagrams. You can use agreed-upon parameters between source and destination to calculate authenticÂÂÂation information on header fields that does not change during transit. Although this process will not prevent someone from signing a spoofed address, it does provide a means to authenticate the identity of the source.
IPv6 and IPv4 network interÂÂÂconnections will likely face spoofing problems. IPv6 packets are usually encapsulated in IPv4 packets to travel across the non-IPv6 supporting networks. The IPv6 interim mechanism "6to4" [10, 11] uses automatic IPv6-to-IPv4 tunneling to interconnect networks using different IP versions. This mechanism uses 6to4 routers and 6to4 Relay Routers that accept and decapsulate IPv4 traffic from anywhere. There are no constraints on such embedded packets. Relay routers act as bridges between IPv6 and 6to4 networks and can be tricked into sending spoofed traffic anywhere. Also, anyone can send tunneled spoofed traffic to a 6to4 router, and the router will believe that it is coming from a legitimate relay. There is no simple way to prevent such attacks, and longer-term solutions are needed in both IPv6 and IPv4 networks.


 GNOME Tweak Tool Installation
 GNOME Tweak Tool - Home Page
 GNOME Tweak Tool - Desktop Page
 GNOME Tweak Tool - Fonts Page
 GNOME Tweak Tool - Shell Page
 GNOME Tweak Tool - Shell Extensions Page
 GNOME Tweak Tool - Theme Page
 GNOME Tweak Tool - Windows Page
 The Application Switcher
 Which one was I looking for?
 Ah, there it is!
 Hidden Minimize/Maximize Controls

 IMAGE: SARAH JACOBSSON PUREWAL


