Overview
The Web is entering a new phase of evolution. There has been much debate recently about what to call this new phase. Some would prefer to not name it all, while others suggest continuing to call it "Web 2.0". However, this new phase of evolution has quite a different focus from what Web 2.0 has come to mean.
Web 3.0
John Markoff of the New York Timesrecently suggested naming this third-generation of the Web, "Web 3.0". This suggestion has led to quite a bit of debate within the industry. Those who are attached to the Web 2.0 moniker have reacted by claiming that such a term is not warranted while others have responded positively to the term, noting that there is indeed a characteristic difference between the coming new stage of the Web and what Web 2.0 has come to represent.
The term Web 2.0 was never clearly defined and even today if one asks ten people what it means one will likely get ten different definitions. However, most people in the Web industry would agree that Web 2.0 focuses on several major themes, including AJAX, social networking,folksonomies, lightweight collaboration, social bookmarking, and media sharing. While the innovations and practices of Web 2.0 will continue to develop, they are not the final step in the evolution of the Web.
In fact, there is a lot more in store for the Web. We are starting to witness the convergence of several growing technology trends that are outside the scope of what Web 2.0 has come to mean. These trends have been gestating for a decade and will soon reach a tipping point. At this juncture the third-generation of the Web will start.
More Intelligent Web
 The threshold to the third-generation Web will be crossed in 2007. At this juncture the focus of innovation will start shift back from front-end improvements towards back-end infrastructure level upgrades to the Web. This cycle will continue for five to ten years, and will result in making the Web more connected, more open, and more intelligent. It will transform the Web from a network of separately siloed applications and content repositories to a more seamless and interoperable whole.
Because the focus of the third-generation Web is quite different from that of Web 2.0, this new generation of the Web probably does deserve its own name. In keeping with the naming convention established by labeling the second generation of the Web as Web 2.0, I agree with John Markoff that this third-generation of the Web could be called Web 3.0.
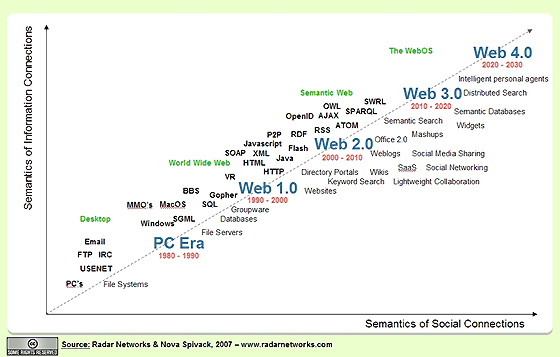
Timeline and Definition
Web 1.0. Web 1.0 was the first generation of the Web. During this phase the focus was primarily on building the Web, making it accessible, and commercializing it for the first time. Key areas of interest centered on protocols such as HTTP, open standard markup languages such as HTML and XML, Internet access through ISPs, the first Web browsers, Web development platforms and tools, Web-centric software languages such as Java and Javascript, the creation of Web sites, the commercialization of the Web and Web business models, and the growth of key portals on the Web.
Web 2.0. According to the Wikipedia, "Web 2.0, a phrase coined by O'Reilly Media in 2004, refers to a supposed second generation of Internet-based services — such as social networking sites, wikis, communication tools, and folksonomies — that emphasize online collaboration and sharing among users."
I would also add to this definition another trend that has been a major factor in Web 2.0 — the emergence of the mobile Internet and mobile devices (including camera phones) as a major new platform driving the adoption and growth of the Web, particularly outside of the United States.
Web 3.0. Using the same pattern as the above Wikipedia definition, Web 3.0 could be defined as: "Web 3.0, a phrase coined by John Markoff of the New York Times in 2006, refers to a supposed third generation of Internet-based services that collectively comprise what might be called 'the intelligent Web' — such as those using semantic web, microformats, natural language search, data-mining, machine learning, recommendation agents, and artificial intelligence technologies — which emphasize machine-facilitated understanding of information in order to provide a more productive and intuitive user experience."
Web 3.0 Expanded Definition. I propose expanding the above definition of Web 3.0 to be a bit more inclusive. There are actually several major technology trends that are about to reach a new level of maturity at the same time. The simultaneous maturity of these trends is mutually reinforcing, and collectively they will drive the third-generation Web. From this broader perspective, Web 3.0 might be defined as a third-generation of the Web enabled by the convergence of several key emerging technology trends:
Ubiquitous Connectivity
Broadband adoptionMobile Internet accessMobile devicesNetwork Computing
Software-as-a-service business modelsWeb services interoperabilityDistributed computing (P2P, grid computing, hosted "cloud computing" server farms such as Amazon S3)Open Technologies
Open APIs and protocolsOpen data formatsOpen-source software platformsOpen data (Creative Commons, Open Data License, etc.)Open Identity
Open identity (OpenID)Open reputationPortable identity and personal data (for example, the ability to port your user account and search history from one service to another)The Intelligent Web
Semantic Web technologies (RDF, OWL,SWRL, SPARQL, Semantic application platforms, and statement-based datastores such as triplestores,tuplestores and associative databases)Distributed databases — or what I call "The World Wide Database" (wide-area distributed database interoperability enabled by Semantic Web technologies)Intelligent applications (natural language processing, machine learning, machine reasoning, autonomous agents)


 As many of you are probably aware, the


 Tap on the big button to root next to the arrow.
 Tap on the button next to the arrow.
 Download Baidu App to Root MT6582 on KitKat/Micromax Unite 2


