Test

Powered by Blogger.

Monday, 15 December 2014

Virtualisation in Red Hat Linux

AT Enterprise Virtualization solution


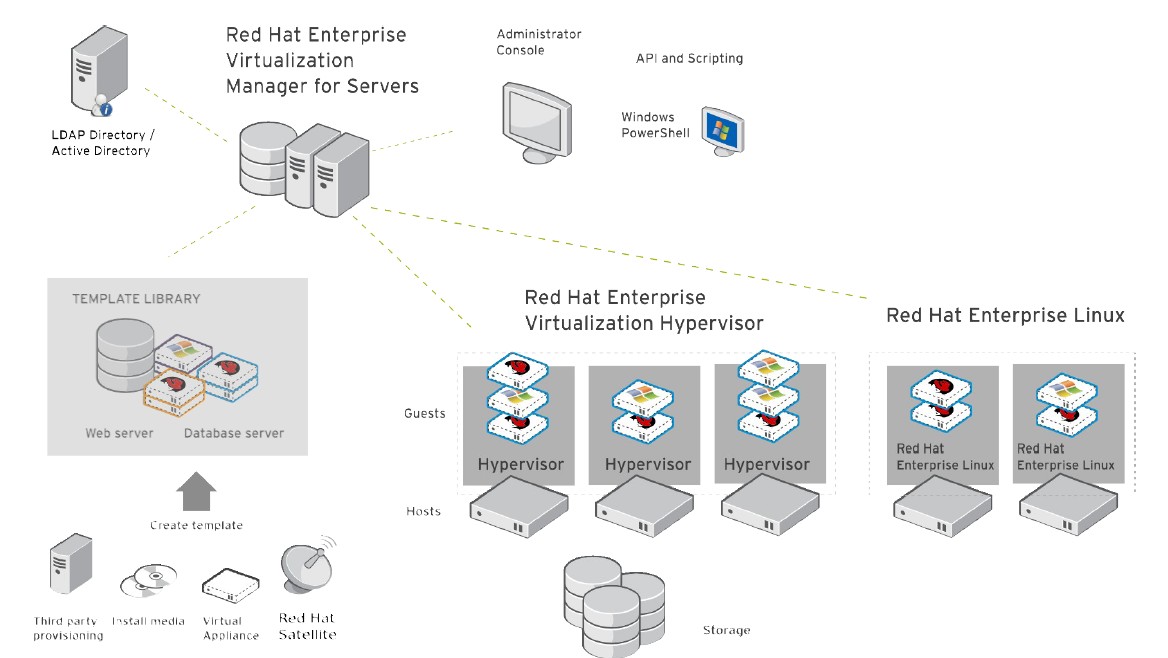
RHEV provides a complete solution for server virtualization management. Red Hat Enterprise Virtualization has been designed from the platform, Red Hat Enterprise Linux, which he extends the functionality, to bring down high barriers facing the ubiquity of virtualization in data centers. Red Hat Enterprise Linux has gained the trust of thousands of organizations and is installed on millions of systems in strategic workloads.


Installing the management console RHEVM

Before installing the management console on the server, verify that the following prerequisites is well respected:


- Operating system: Windows Server 2003 R2 or Windows Server 2008 (recommended)

- The IIS must be installed

- If you are running Windows Server 2003 you must install PowerShell 2.0 available on Windows Update or the Microsoft website.

- Microsoft Frameworks 3.5.1


Once the installation file to launch click Next and accept the terms of use.


Arrived at the above screen make sure all the boxes are checked and click Next.


Select "install a SQL Server 2005 Express Locally" and click next.

Check the installation directory and click next.


Uncheck the box strength SSL and click next


Fill in the requested information


Click next


Port Number: 25285


Click next


Click ignores the Manager installation begins.


 Administration RHEVM


This section shows the procedure to connect to the management console RHEVm


Open your browser enter the address bar:


http: // [ip address or name] / RHEVmanager


If this is not the case install the certificate by clicking the link.


The above screenshot is from the RHEVm authentication interface.


1 Installing RHEV hypervisor.


Boot from ISO hypervisor. After loading the next interface should appear:


Press 1 and input.


Select "configure" grave with the 1 key and confirm with input

Select the disk or hypervisor will install and validate.

Once the task by selecting validate the 3 rdinput (commit configuration).


Once the formatting you complete the wizard redisplay the main menu.

Press 2 (configure authentication)


Select the 1 st entered and enter the root password of the hypervisor.

Do the same for the 2 nd entrance.

Once set select the 3 rd entry to return to the main menu.


Configure the hostname by pressing 3 and then input.

When you ask the interface type the full name of the hypervisor


After configuring the hostname type 4 to configure the network.


Select the network interface configured (usually ETH0)


Type n and then enter


Type n and then enter.


Type S and enter


Configure the IP configuration of the hypervisor by following the instructions on the screen.


Then configure your DNS server in the same way by selecting DNS on the main menu of your hypervisor network configuration.

Do the same for the NTP server.


Select  Save And Return To Menu to return to the main menu.


Then save your RHN machine by pressing 5.

Select 1) Register to public RH n

Perform recording with your Red Hat Account


Once registration is complete RHN press 6 (Configure the host for red hat enterprise).


Type [ip of your server RHEVm]: 80


Then press enter


If communication is established correctly between the 2 machines hypervisor should return the following message:


"The RHEV Manager's address is set"

"The RHEV Manager's harbor is set. Do you even lift


Type [ip RHEVm your server]: 25285

Then press enter.


Once configuration is complete you will be back to the main menu.


Select 8 (install locally and reboot).

Once the installation is complete return on our management console.


If the configuration has been completed, a new HOST should be waiting in your RHEVM interface.

To enable it, right click on it and click approve. The host will be added to the cluster.

If no host is waiting, go to the hypervisor concerned and restarted the VDSM-reg service through the command-reg VDSM Service restart.


2 Configuring the Cluster


Configuring the storage space


Once your hypervisors added to your cluster, you must create a DATASTORE for your hosted VMs.

RHEV is able to manage multipathing fiber channel.

To do this go to the Storage tab and click the New button domain:


Domain Function: DATA

Storage Type: FCP

The list of VMFS will appear. (Do not forget to make the process of creating and VMFS presentation on the interface of the bay).Check VMFS converné and click the ADD button.

Then return to the tab and select DATASTORE on down the STORAGE tab and click the button attach storage.


Then select the VMFS that you have previously set.

This procedure is used to assign to a DataCenter storage esspace.


Repeat the process by creating a storage space with the following parameters:


- Domain function: ISO

- Storage Type: NFS

and attach it to your Data Center. This storage space will store ISO and templates.

The disadvantage is that the storage protocol must be absolutely NFS.


6 Managing ISOs

As we have seen above the ISOs library must have its own dedicated solely DATASTORE using the NFS protocol.

To upload ISOs secure ways REDHAT provides a tool installed with the Manager appointed ISO UPLOADER


ISO UPLOADER automatically detects your DATACENTER parameter is to autonomously for login with your NFS server.

To add an ISO image, click on ADD and select the ISO images you want UPLOADER. Once you have completed your list, click UPLOAD.ISO UPLOADER take charge of incorpérer ISOs directly to your library. We will see below how to exploit it.


On the command line you can also upload a ISO:


rhevm-iso-uploader -iso-domain = ISODomain upload <iso file>


7 Managing VMs


The management of virtual machines is indentique over other virtualisations products.


Create a new VM:


Click the Virtual Machines tab and click New Server:


Here you can set the configuration here "hardware" of your VM.


In this section, you can set the high availabilty system by checking 'Highly Available "

The choices "low", "Medium", "High" to define


In this section, pourez setting boot sequence and assign to your VM ISO you will eventually uploaded through the tool ISO UPLOADER.


After you do this job, click OK.

Once the task of creating the finished vm, it will cause him a disc and a virtual network interface. To do this click on your newly created VM and click "guide me".


Then click on "configure Network Interfaces".Once the parameters indicated as below click OK.

Red Hat Linux xen RHEL

Binary Xen rpm repositories for EL6

Take a look at these repositories:

Michael Young's EL6 Xen rpm repository (also includes xen dom0 capable kernel based on rhel6 2.6.32 kernel):http://xenbits.xen.org/people/mayoung/EL6.xen/http://xenbits.xen.org/people/mayoung/testing/Gitco.de repository is based on this tutorial, but contains xen dom0 capable kernel rpm based on the xen/kernel.org kernel (not rhel6 kernel):http://www.gitco.de/linux/x86_64/centos/6/http://www.gitco.de/linux/x86_64/centos/6/gitco-centos6-x86_64.repo

Additional repositories:

Fedora xendom0 kernel rpms by Michael Young:http://repos.fedorapeople.org/repos/myoung/dom0-kernel/http://wiki.alteeve.com/files/an-cluster/rhel6/

Red Hat Enterprise Linux 6 Xen 4.0 tutorial

This tutorial explains how to install and configure RHEL6 to run as Xen dom0 (host), running Xen hypervisor 4.0. Note that this is unsupported by Red Hat! See the end of this wiki page for more information about RHEL6 Xen binary rpm yum repository. This tutorial explains how to compile Xen and dom0 kernel from sources/srpms.

As a default RHEL6 does NOT:

RHEL6 does not ship Xen hypervisor or tools.RHEL6 does not ship Xen dom0 capable kernel.

As a default RHEL6 DOES:

RHEL6 runs as Xen PV (paravirtual) domU using the pvops framework in the default kernel.RHEL6 runs as Xen HVM (fully virtualized) guest.RHEL6 ships with optimized Xen PV-on-HVM drivers for RHEL6 Xen HVM guests.

Topics in this tutorial:

How to install and configure RHEL6 system for running as Xen dom0 (host).How to get Xen src.rpm from Fedora and rebuild and install it on RHEL6.How to install upstream Xen dom0 capable kernel on RHEL6.How to update the dom0 kernel to a newer version from the upstream git tree.How to use libvirt and virt-manager to manage Xen on RHEL6.Binary rpm repositories for EL6.More information and links.

TODO list for this tutorial:

Fix the src.rpm compilation examples, shouldn't build as root.Make sure everything works with SElinux enabled, and leave it enabled.

RHEL6 installation and configuration

Installation:

Download "rhel-server-6.0-x86_64-dvd.iso" from Red Hat Network (RHN).Burn it to DVDR, or if you have a server with remote management, use virtual media ISO mapping.Boot from the DVD.Install as usual.Choose "Basic Server" install.Disk Partitioning: Create /boot partition as primary, make it ext3 and at least 2 GB in size. Create LVM PV (Physical Volume) and VG (Volume Group) to fill the rest of the disk space. Create root as LVM volume, make it ext4, and at least 36 GB in size. Create swap as LVM volume, make it at least as big as the amount of RAM in your server.IMPORTANT! Make sure you leave FREE space in the LVM volume group. You can use that free space later to create LVM volumes for Xen VM virtual disks.In this tutorial the hostname is set to "el6.localdomain".

Screenshot of disk partitioning: 

Configuration after installation:

First fix networking by editing "/etc/sysconfig/network-scripts/ifcfg-ethX", usually "ifcfg-eth0", and make it look like:

[root@el6 ~]# cat /etc/sysconfig/network-scripts/ifcfg-eth0 DEVICE="eth0" HWADDR="00:11:22:33:44:55" NM_CONTROLLED="no" ONBOOT="yes" BOOTPROTO="dhcp"

ie. make sure NM_CONTROLLED="no" and ONBOOT="yes". Then run "ifup eth0" to activate networking.

Make sure network service is set to start automatically:

[root@el6 ~]# chkconfig --list network

Make sure your Internet connection works OK at this point! Next make sure "/etc/hosts" file has an entry for your hostname:

[root@el6 ~]# cat /etc/hosts 127.0.0.1 localhost localhost.localdomain localhost4 localhost4.localdomain4 ::1 localhost localhost.localdomain localhost6 localhost6.localdomain6 127.0.0.1 el6 el6.localdomain

Full FQDN hostname in this example is "el6.localdomain".

Disable SElinux by editing "/etc/selinux/config" and make it have:

SELINUX=disabled

Then it's time to register your system to RHN, so you can fetch updates and install additional packages using yum.

Run "rhn_register" and fill in your RHN username and password. When registration is OK, there's an important extra step do!

You need to login to RHN website and:

Click "Manage Entitlements & Subscriptions".Click the correct (newly added) system.Click "(Alter Channel Subscriptions)".Select ""RHEL Server Optional (v. 6 64-bit x86_64)" channel.Click "Change Subscriptions".

Some required packages are only available in the "RHEL Server Optional (v. 6 64-bit x86_64)" channel. Failing to add that channel means you won't be able to install some required packages later on.

When you're done with RHN update the system and install latest (security) fixes:

[root@el6 ~]# yum update

Then install some commonly used tools:

[root@el6 ~]# yum install screen vim wget tcpdump ntp ntpdate man smartmontools links lynx ethtool xorg-x11-xauth

Then increase grub timeout from grub.conf, and comment out "hiddenmenu" option:

[root@el6 ~]# cat /boot/grub/grub.conf # grub.conf generated by anaconda # # Note that you do not have to rerun grub after making changes to this file # NOTICE: You have a /boot partition. This means that # all kernel and initrd paths are relative to /boot/, eg. # root (hd0,0) # kernel /vmlinuz-version ro root=/dev/mapper/vg00-lvroot # initrd /initrd-[generic-]version.img #boot=/dev/sda default=0 timeout=10 splashimage=(hd0,0)/grub/splash.xpm.gz #hiddenmenu title Red Hat Enterprise Linux Server (2.6.32-71.7.1.el6.x86_64) root (hd0,0) kernel /vmlinuz-2.6.32-71.7.1.el6.x86_64 ro root=/dev/mapper/vg00-lvroot rd_LVM_LV=vg00/lvroot rd_LVM_LV=vg00/lvswap rd_NO_LUKS rd_NO_MD rd_NO_DM LANG=en_US.UTF-8 SYSFONT=latarcyrheb-sun16 KEYBOARDTYPE=pc KEYTABLE=fi crashkernel=auto rhgb quiet initrd /initramfs-2.6.32-71.7.1.el6.x86_64.img title Red Hat Enterprise Linux (2.6.32-71.el6.x86_64) root (hd0,0) kernel /vmlinuz-2.6.32-71.el6.x86_64 ro root=/dev/mapper/vg00-lvroot rd_LVM_LV=vg00/lvroot rd_LVM_LV=vg00/lvswap rd_NO_LUKS rd_NO_MD rd_NO_DM LANG=en_US.UTF-8 SYSFONT=latarcyrheb-sun16 KEYBOARDTYPE=pc KEYTABLE=fi crashkernel=auto rhgb quiet initrd /initramfs-2.6.32-71.el6.x86_64.img

At this point you should reboot the system to the newest kernel.

Installing required packages to compile Xen rpms

Install packages that are required to rebuild Xen src.rpm (all on one line):

[root@el6 ~]# yum groupinstall "Development tools" "Additional Development" "Debugging Tools" "System administration tools" "Compatibility libraries" "Console internet tools" "Desktop Platform Development"

This is around 212 MB of downloads.

Then install some additional packages that are required to build Xen with all features enabled:

[root@el6 ~]# yum install transfig wget texi2html libaio-devel dev86 glibc-devel e2fsprogs-devel gitk mkinitrd iasl xz-devel bzip2-devel pciutils-libs pciutils-devel SDL-devel libX11-devel gtk2-devel bridge-utils PyXML qemu-common qemu-img mercurial texinfo libuuid-devel

This is around 82 MB of downloads.

And finally 32bit version of glibc-devel is required aswell:

[root@el6 ~]# yum install glibc-devel.i686

Now you have all the basic tools, libraries and headers installed.

Rebuilding and installing Xen src.rpm

Fedora xen-4.0.1-6 rpm package includes some additional patches and fixes backported from upstream Xen 4.0.2-rc*.

[root@el6 ~]# mkdir /root/src && cd /root/src [root@el6 src]# wget http://ftp.funet.fi/pub/mirrors/fedora.redhat.com/pub/fedora/linux/releases/14/Everything/source/SRPMS/xen-4.0.1-6.fc14.src.rpm [root@el6 src]# rpm -i xen-4.0.1-6.fc14.src.rpm [root@el6 src]# cd /root/rpmbuild/SPECS [root@el6 SPECS]# rpmbuild -bb xen.spec

After a while you should see output like:

Wrote: /root/rpmbuild/RPMS/x86_64/xen-4.0.1-6.el6.x86_64.rpm Wrote: /root/rpmbuild/RPMS/x86_64/xen-libs-4.0.1-6.el6.x86_64.rpm Wrote: /root/rpmbuild/RPMS/x86_64/xen-runtime-4.0.1-6.el6.x86_64.rpm Wrote: /root/rpmbuild/RPMS/x86_64/xen-hypervisor-4.0.1-6.el6.x86_64.rpm Wrote: /root/rpmbuild/RPMS/x86_64/xen-doc-4.0.1-6.el6.x86_64.rpm Wrote: /root/rpmbuild/RPMS/x86_64/xen-devel-4.0.1-6.el6.x86_64.rpm Wrote: /root/rpmbuild/RPMS/x86_64/xen-licenses-4.0.1-6.el6.x86_64.rpm Wrote: /root/rpmbuild/RPMS/x86_64/xen-debuginfo-4.0.1-6.el6.x86_64.rpm

Try installing the rpms:

[root@el6 SPECS]# cd /root/rpmbuild/RPMS/x86_64/ [root@el6 x86_64]# rpm -Uvh xen*4.0.1-6*.rpm error: Failed dependencies: /usr/bin/qemu-nbd is needed by xen-runtime-4.0.1-6.el6.x86_64

So what's happening here? It seems RHEL6 does not have "qemu-common" rpm available, which includes "qemu-nbd" binary. So we need to grab qemu src.rpm from Fedora and rebuild it for RHEL6 to get the required "qemu-common" rpm.

Verify the version of "qemu" in RHEL6:

[root@el6 x86_64]# rpm -qa | grep qemu qemu-img-0.12.1.2-2.113.el6.x86_64

Ok, so it's version 0.12.x. Fedora 13 has qemu 0.12.5, so it's close enough:

[root@el6 x86_64]# cd /root/src [root@el6 src]# wget http://ftp.funet.fi/pub/mirrors/fedora.redhat.com/pub/fedora/linux/updates/13/SRPMS/qemu-0.12.5-1.fc13.src.rpm [root@el6 src]# rpm -i qemu-0.12.5-1.fc13.src.rpm [root@el6 src]# cd /root/rpmbuild/SPECS [root@el6 SPECS]# rpmbuild -bb qemu.spec

After a while you'll see:

Wrote: /root/rpmbuild/RPMS/x86_64/qemu-0.12.5-1.el6.x86_64.rpm Wrote: /root/rpmbuild/RPMS/x86_64/qemu-kvm-0.12.5-1.el6.x86_64.rpm Wrote: /root/rpmbuild/RPMS/x86_64/qemu-img-0.12.5-1.el6.x86_64.rpm Wrote: /root/rpmbuild/RPMS/x86_64/qemu-common-0.12.5-1.el6.x86_64.rpm Wrote: /root/rpmbuild/RPMS/x86_64/qemu-user-0.12.5-1.el6.x86_64.rpm Wrote: /root/rpmbuild/RPMS/x86_64/qemu-system-x86-0.12.5-1.el6.x86_64.rpm Wrote: /root/rpmbuild/RPMS/x86_64/qemu-system-ppc-0.12.5-1.el6.x86_64.rpm Wrote: /root/rpmbuild/RPMS/x86_64/qemu-system-sparc-0.12.5-1.el6.x86_64.rpm Wrote: /root/rpmbuild/RPMS/x86_64/qemu-system-arm-0.12.5-1.el6.x86_64.rpm Wrote: /root/rpmbuild/RPMS/x86_64/qemu-system-mips-0.12.5-1.el6.x86_64.rpm Wrote: /root/rpmbuild/RPMS/x86_64/qemu-system-cris-0.12.5-1.el6.x86_64.rpm Wrote: /root/rpmbuild/RPMS/x86_64/qemu-system-m68k-0.12.5-1.el6.x86_64.rpm Wrote: /root/rpmbuild/RPMS/x86_64/qemu-system-sh4-0.12.5-1.el6.x86_64.rpm Wrote: /root/rpmbuild/RPMS/x86_64/qemu-kvm-tools-0.12.5-1.el6.x86_64.rpm Wrote: /root/rpmbuild/RPMS/x86_64/qemu-debuginfo-0.12.5-1.el6.x86_64.rpm

So now we have the required "qemu-common" rpm. Let's install it to satisfy the package dependencies:

[root@el6 SPECS]# cd /root/rpmbuild/RPMS/x86_64 [root@el6 x86_64]# rpm -Uvh qemu-common-0.12.5-1.el6.x86_64.rpm Preparing... ########################################### [100%] 1:qemu-common ########################################### [100%]

Now we can also install Xen rpms:

[root@el6 x86_64]# rpm -Uvh xen*4.0.1-6*.rpm Preparing... ########################################### [100%] 1:xen-licenses ########################################### [ 13%] 2:xen-libs ########################################### [ 25%] 3:xen-hypervisor ########################################### [ 38%] 4:xen-runtime ########################################### [ 50%] 5:xen ########################################### [ 63%] 6:xen-devel ########################################### [ 75%] 7:xen-doc ########################################### [ 88%] 8:xen-debuginfo ########################################### [100%]

Now you're done installing Xen hypervisor, tools and libraries.

Installing upstream Xen dom0 capable kernel

Note that we're installing upstream *Xen* kernel here, which is based on the long-term maintained kernel.org Linux 2.6.32.x kernel. This kernel is different from the RHEL6 kernel. Many drivers are newer versions in Red Hat's kernel, and Red Hat's kernel might have more features than the kernel.org kernel. Due to the driver version differences you might experience problems on some hardware, for example on servers using LSI/DELL RAID adapters. You might need to manually update driver versions to fix these problems on affected systems. See the end of this wiki page for more information about kernel versions.

Clone the kernel git repository from kernel.org and check out the "xen/stable-2.6.32.x" long-term maintained branch.

[root@el6 x86_64]# mkdir /root/kernel && cd /root/kernel [root@el6 kernel]# git clone git://git.kernel.org/pub/scm/linux/kernel/git/jeremy/xen.git linux-2.6-xen [root@el6 kernel]# cd linux-2.6-xen [root@el6 linux-2.6-xen]# git checkout -b xen/stable-2.6.32.x origin/xen/stable-2.6.32.x

Now you have the kernel ready to be configured and compiled. Reference config-file used is for version "2.6.32.25". It should work with newer version aswell, "make oldconfig" takes care of that.

NOTE! The reference .config file has various debugging options enabled, so don't use this kernel config for performance benchmarks!

[root@el6 linux-2.6-xen]# wget -O .config http://pasik.reaktio.net/xen/kernel-config/config-2.6.32.25-pvops-dom0-xen-stable-x86_64 [root@el6 linux-2.6-xen]# make oldconfig [root@el6 linux-2.6-xen]# make -j4 bzImage && make -j4 modules && make modules_install

Then let's install the kernel and generate initrd (initramfs) image for the new kernel. Kernel version in this example is "2.6.32.25":

[root@el6 linux-2.6-xen]# depmod -a 2.6.32.25 [root@el6 linux-2.6-xen]# cp -a arch/x86/boot/bzImage /boot/vmlinuz-2.6.32.25 [root@el6 linux-2.6-xen]# cp -a System.map /boot/System.map-2.6.32.25 [root@el6 linux-2.6-xen]# cp -a .config /boot/config-2.6.32.25 [root@el6 linux-2.6-xen]# cd /boot [root@el6 boot]# dracut initramfs-2.6.32.25.img 2.6.32.25

NOTE! If you're using a system with LSI and/or Dell RAID adapters (using megaraid_sas driver) you need to manually update the driver version at this point! Linux 2.6.32.25 ships with too old driver version, and it wont' work (disks won't get enabled on system startup). See this email for information about updating the driver version:http://lists.xensource.com/archives/html/xen-devel/2010-11/msg00250.html .

Then it's time to modify "grub.conf" and add an entry for the Xen+dom0 combination:

[root@el6 ~]# cat /boot/grub/grub.conf # grub.conf generated by anaconda # # Note that you do not have to rerun grub after making changes to this file # NOTICE: You have a /boot partition. This means that # all kernel and initrd paths are relative to /boot/, eg. # root (hd0,0) # kernel /vmlinuz-version ro root=/dev/mapper/vg00-lvroot # initrd /initrd-[generic-]version.img #boot=/dev/sda default=0 timeout=10 splashimage=(hd0,0)/grub/splash.xpm.gz #hiddenmenu title Red Hat Enterprise Linux Server (2.6.32-71.7.1.el6.x86_64) root (hd0,0) kernel /vmlinuz-2.6.32-71.7.1.el6.x86_64 ro root=/dev/mapper/vg00-lvroot rd_LVM_LV=vg00/lvroot rd_LVM_LV=vg00/lvswap rd_NO_LUKS rd_NO_MD rd_NO_DM LANG=en_US.UTF-8 SYSFONT=latarcyrheb-sun16 KEYBOARDTYPE=pc KEYTABLE=fi crashkernel=auto rhgb quiet initrd /initramfs-2.6.32-71.7.1.el6.x86_64.img title Red Hat Enterprise Linux (2.6.32-71.el6.x86_64) root (hd0,0) kernel /vmlinuz-2.6.32-71.el6.x86_64 ro root=/dev/mapper/vg00-lvroot rd_LVM_LV=vg00/lvroot rd_LVM_LV=vg00/lvswap rd_NO_LUKS rd_NO_MD rd_NO_DM LANG=en_US.UTF-8 SYSFONT=latarcyrheb-sun16 KEYBOARDTYPE=pc KEYTABLE=fi crashkernel=auto rhgb quiet initrd /initramfs-2.6.32-71.el6.x86_64.img title Xen 4.0 with Linux 2.6.32.25 dom0 root (hd0,0) kernel /xen.gz dom0_mem=1024M loglvl=all guest_loglvl=all module /vmlinuz-2.6.32.25 ro root=/dev/mapper/vg00-lvroot rd_LVM_LV=vg00/lvroot nomodeset module /initramfs-2.6.32.25.img

Then let's disable KSM services, those don't work with Xen currently:

[root@el6 ~]# chkconfig ksm off [root@el6 ~]# chkconfig ksmtuned off

And then it's time to reboot into Xen ! Remember to choose the Xen entry from grub:

[root@el6 ~]# reboot

Verifying Xen after reboot

[root@el6 ~]# xm list Name ID Mem VCPUs State Time(s) Domain-0 0 1024 4 r----- 93.9 [root@el6 ~]# xm info host  : el6.localdomain release  : 2.6.32.25 version  : #1 SMP Sun Nov 14 21:50:39 EET 2010 machine  : x86_64 nr_cpus  : 4 nr_nodes  : 1 cores_per_socket  : 4 threads_per_core  : 1 cpu_mhz  : 2826 hw_caps  : bfebfbff:20100800:00000000:00000940:0008e3fd:00000000:00000001:00000000 virt_caps  : hvm total_memory  : 8190 free_memory  : 7070 node_to_cpu  : node0:0-3 node_to_memory  : node0:7070 node_to_dma32_mem  : node0:3259 max_node_id  : 0 xen_major  : 4 xen_minor  : 0 xen_extra  : .1 xen_caps  : xen-3.0-x86_64 xen-3.0-x86_32p hvm-3.0-x86_32 hvm-3.0-x86_32p hvm-3.0-x86_64 xen_scheduler  : credit xen_pagesize  : 4096 platform_params  : virt_start=0xffff800000000000 xen_changeset  : unavailable xen_commandline  : dom0_mem=1024M loglvl=all guest_loglvl=all cc_compiler  : gcc version 4.4.4 20100726 (Red Hat 4.4.4-13) (GCC) cc_compile_by  : root cc_compile_domain  : cc_compile_date  : Sun Nov 14 21:41:09 EET 2010 xend_config_format  : 4 [root@el6 ~]# uname -a Linux el6.localdomain 2.6.32.25 #1 SMP Sun Nov 14 21:50:39 EET 2010 x86_64 x86_64 x86_64 GNU/Linux

From the output above we can see we're running Xen hypervisor version 4.0.1 (xen_major, xen_minor, xen_extra) with Linux 2.6.32.25 dom0 kernel.

Updating the dom0 kernel

Linux 2.6.32.x is the long-term supported and maintained kernel from both kernel.org and xen.org, so it gets pretty frequent updates. Here are the steps to update your kernel tree so you don't have to clone the whole tree again.

Clean up and update the git tree, then check the changelog for the recent changes:

[root@el6 ~]# mkdir /root/kernel/linux-2.6-xen [root@el6 linux-2.6-xen]# make clean [root@el6 linux-2.6-xen]# git pull [root@el6 linux-2.6-xen]# git log | less

And then follow the steps in the previous chapters to build and install the new kernel version.

Online changelog for the "xen/stable-2.6.32.x" branch of the kernel git tree is located here: http://git.kernel.org/?p=linux/kernel/git/jeremy/xen.git;a=shortlog;h=xen/stable-2.6.32.x .

Using libvirt and virt-manager with Xen

Install libvirt and virt-manager:

[root@el6 ~]# yum install libvirt virt-manager xorg-x11-xauth

The default version of libvirt in RHEL6 is not compiled with Xen support. You can verify this by using ssh with X11 forwarding from your laptop/desktop to your dom0, and trying to run "virt-manager":

[root@el6 ~]# virt-manager & [1] 2867 Unable to open connection to hypervisor URI 'xen:///': no connection driver available for xen:/// Traceback (most recent call last): File "/usr/share/virt-manager/virtManager/connection.py", line 992, in _try_open None], flags) File "/usr/lib64/python2.6/site-packages/libvirt.py", line 111, in openAuth if ret is None:raise libvirtError('virConnectOpenAuth() failed') libvirtError: no connection driver available for xen:///

This can be fixed by rebuilding libvirt rpms with Xen support enabled.

NOTE! Before rebuilding libvirt src.rpm you need to boot into non-Xen environment! This is because some of the automated RHEL6 libvirt Xen-specific tests seem to fail in Xen dom0 environment, but work OK in baremetal.

Verify libvirt version in RHEL6:

[root@el6 ~]# rpm -qa | grep libvirt

RHEL 6.0 seems to have libvirt version 0.8.1.

Let's download the src.rpm from Red Hat ftp server, patch the spec file to enable Xen support, and try rebuilding it.

[root@el6 ~]# cd /root/src [root@el6 src]# wget ftp://ftp.redhat.com/pub/redhat/linux/enterprise/6Server/en/os/SRPMS/libvirt-0.8.1-27.el6.src.rpm [root@el6 src]# rpm -i libvirt-0.8.1-27.el6.src.rpm [root@el6 src]# wget http://pasik.reaktio.net/xen/patches/libvirt-spec-rhel6-enable-xen.patch [root@el6 src]# cd /root/rpmbuild/SPECS [root@el6 SPECS]# cp -a libvirt.spec libvirt.spec.orig [root@el6 SPECS]# patch -p0 < ~/src/libvirt-spec-rhel6-enable-xen.patch patching file libvirt.spec [root@el6 SPECS]# rpmbuild -bb libvirt.spec error: Failed build dependencies: libnl-devel >= 1.1 is needed by libvirt-0.8.1-27.el6.x86_64 xhtml1-dtds is needed by libvirt-0.8.1-27.el6.x86_64 libudev-devel >= 145 is needed by libvirt-0.8.1-27.el6.x86_64 libpciaccess-devel >= 0.10.9 is needed by libvirt-0.8.1-27.el6.x86_64 yajl-devel is needed by libvirt-0.8.1-27.el6.x86_64 libpcap-devel is needed by libvirt-0.8.1-27.el6.x86_64 avahi-devel is needed by libvirt-0.8.1-27.el6.x86_64 parted-devel is needed by libvirt-0.8.1-27.el6.x86_64 device-mapper-devel is needed by libvirt-0.8.1-27.el6.x86_64 numactl-devel is needed by libvirt-0.8.1-27.el6.x86_64 netcf-devel >= 0.1.4 is needed by libvirt-0.8.1-27.el6.x86_64

Ok, so we need more packages installed:

[root@el6 SPECS]# yum install libnl-devel xhtml1-dtds libudev-devel libpciaccess-devel yajl-devel libpcap-devel avahi-devel parted-devel device-mapper-devel numactl-devel netcf-devel

After that let's try again:

[root@el6 SPECS]# rpmbuild -bb libvirt.spec

After a while you'll see:

Wrote: /root/rpmbuild/RPMS/x86_64/libvirt-0.8.1-27.el6.x86_64.rpm Wrote: /root/rpmbuild/RPMS/x86_64/libvirt-client-0.8.1-27.el6.x86_64.rpm Wrote: /root/rpmbuild/RPMS/x86_64/libvirt-devel-0.8.1-27.el6.x86_64.rpm Wrote: /root/rpmbuild/RPMS/x86_64/libvirt-python-0.8.1-27.el6.x86_64.rpm Wrote: /root/rpmbuild/RPMS/x86_64/libvirt-debuginfo-0.8.1-27.el6.x86_64.rpm

Then let's install the xen-enabled rpms (note you need to use --force because the same version of libvirt is already installed):

[root@el6 ~]# cd /root/rpmbuild/RPMS/x86_64/ [root@el6 x86_64]# rpm -Uvh --force libvirt-0.8.1-27.el6.x86_64.rpm libvirt-client-0.8.1-27.el6.x86_64.rpm libvirt-python-0.8.1-27.el6.x86_64.rpm Preparing... ########################################### [100%] 1:libvirt-client ########################################### [ 33%] 2:libvirt ########################################### [ 67%] 3:libvirt-python ########################################### [100%]

Now make sure "libvirtd" is set to automatically start on boot:

[root@el6 ~]# chkconfig --list libvirtd libvirtd 0:off 1:off 2:off 3:on 4:on 5:on 6:off

Then it's time to reboot back to Xen !

Verifying libvirt with Xen

[root@el6 ~]# virsh list Id Name State ---------------------------------- 0 Domain-0 running [root@el6 ~]# xm list Name ID Mem VCPUs State Time(s) Domain-0 0 1024 4 r----- 52.8

So it seems to work. Now you're also able to use graphical "virt-manager" to manage Xen on RHEL6.

Bridge problems and errors with custom dom0 kernel

# brctl show bridge name    bridge id              STP enabled    interfaces virbr0         /sys/class/net/virbr0/bridge: No such file or directory /sys/class/net/virbr0/bridge: No such file or directory /sys/class/net/virbr0/bridge: No such file or directory /sys/class/net/virbr0/bridge: No such file or directory /sys/class/net/virbr0/bridge: No such file or directory /sys/class/net/virbr0/bridge: No such file or directory /sys/class/net/virbr0/bridge: No such file or directory /sys/class/net/virbr0/bridge: No such file or directory /sys/class/net/virbr0/bridge: No such file or directory /sys/class/net/virbr0/bridge: No such file or directory /sys/class/net/virbr0/bridge: No such file or directory /sys/class/net/virbr0/bridge: No such file or directory 8000.000000000000      yes

This problem happens because Red Hat added bridge IGMP snooping support to rhel6 2.6.32 kernel, and also to rhel6 bridge-utils. If you use mainline or custom Linux 2.6.32 kernel with el6 distro then you won't have that bridge IGMP snooping support in the kernel, and bridge-utils (brctl) will give errors like above.

There are two workarounds:

Use Xen dom0 kernel based on actual rhel6 kernel/patches, mayoung does have "xendom0" kernel available for el6 distros based on actual rhel6 kernel, with xen dom0 pvops patches added on top, so it includes bridge IGMP snooping support and the default el6 bridge-utils works OK without errors. See the end of this wiki tutorial page for links to xendom0 kernel rpms.If using custom dom0 kernel (xen.git xen/stable-2.6.32.x) then rebuild the el6 bridge-utils src.rpm and remove the IGMP snooping patch from the spec file:http://lists.xensource.com/archives/html/xen-devel/2011-02/msg00760.html .

Using graphical virt-manager to manage Xen on RHEL6

Some screenshots of using virt-manager with Xen on RHEL6 and installing Fedora 14 Xen PV domU. Note that you don't need (and probably shouldn't) run Xserver on dom0! You can use ssh X11 forwarding to run virt-manager on dom0 but display the virt-manager GUI on your local laptop/desktop. See the Fedora 13 tutorial link in the end of this page for more information about using ssh X11 forwarding.

Network setup details and troubleshooting

See Fedora13Xen4Tutorial for more information about virbr0 setup/configuration for NAT/DHCP, routing, firewall rules, et

Virtualization basics

Virtualization

Virtualization is a technique, which allows to share single physical instance of an application or resource among multiple organizations or tenants (customers). It does so by assigning a logical name to a physical resource and providing a pointer to that physical resourcewhen demanded.

Virtualization Concept

Creating a virtual machine over existing operating system and hardware is referred as Hardware Virtualization. Virtual Machines provide an environment that is logically separated from the underlying hardware.

The machine on which the virtual machine is created is known as host machine and virtual machine is referred as a guest machine. This virtual machine is managed by a software or firmware, which is known as hypervisor.

HYPERVISOR

Hypervisor is a firmware or low-level program that acts as a Virtual Machine Manager. There are two types of hypervisor:

Type 1 hypervisor runs on bare system.LynxSecure, RTS Hypervisor, Oracle VM, Sun xVM Server, VirtualLogic VLX are examples of Type 1 hypervisor. The following diagram shows the Type 1 hypervisor.

The type1 hypervisor does not have any host operating system because they are installed on a bare system.


Type 2 hypervisor is a software interface that emulates the devices with which a system normally interacts. Containers, KVM, Microsoft Hyper V, VMWare Fusion, Virtual Server 2005 R2, Windows Virtual PC and VMWare workstation 6.0 are examples of Type 2 hypervisor. The following diagram shows the Type 2 hypervisor.

Types of Hardware Virtualization

Here are the three types of hardware virtualization:

Full Virtualization

Emulation Virtualization

Paravirtualization

FULL VIRTUALIZATION

In Full Virtualization, the underlying hardware is completely simulated. Guest software does not require any modification to run.

EMULATION VIRTUALIZATION

In Emulation, the virtual machine simulates the hardware and hence become independent of the it. In this, the guest operating system does not require modification.

PARAVIRTUALIZATION

In Paravirtualization, the hardware is not simulated. The guest software run their own isolated domains.

VMware vSphere is highly developed infrastructure that offers a management infrastructure framework for virtualization. It virtualizes the system, storage and networking hardware.


Saturday, 13 December 2014

Network mapper Nmap in linux distribution-kali linux

 is an open source and a very versatile tool for Linux system/network administrators. Nmap is used for exploring networksperform security scansnetwork audit and finding open portson remote machine. It scans for Live hosts, Operating systems, packet filters and open ports running on remote hosts.

Nmap Commands and Examples

I'll be covering most of NMAP usage in two different parts and this is the first part of nmap serious. Here in this setup, I have used two servers without firewall to test the working of the Nmap command.

192.168.0.100 – server1.tecmint.com192.168.0.101 – server2.tecmint.com

Nmap command usage

# nmap [Scan Type(s)] [Options] {target specification}

How to Install NMAP in Linux

Most of the today's Linux distributions like Red HatCentOSFedoroDebian and Ubuntu have included Nmap in their default package management repositories called Yum and APT. The both tools are used to install and manage software packages and updates. To installNmap on distribution specific use the following command.

# yum install nmap [on Red Hat based systems] $ sudo apt-get install nmap [on Debian based systems]

Once you've install latest nmap application, you can follow the example instructions provided in this article.

1. Scan a System with Hostname and IP Address

The Nmap tool offers various methods to scan a system. In this example, I am performing a scan using hostname as server2.tecmint.comto find out all open ports, services and MAC address on the system.

Scan using Hostname

[root@server1 ~]# nmap server2.tecmint.com Starting Nmap 4.11 ( http://www.insecure.org/nmap/ ) at 2013-11-11 15:42 EST Interesting ports on server2.tecmint.com (192.168.0.101): Not shown: 1674 closed ports PORT STATE SERVICE 22/tcp open ssh 80/tcp open http 111/tcp open rpcbind 957/tcp open unknown 3306/tcp open mysql 8888/tcp open sun-answerbook MAC Address: 08:00:27:D9:8E:D7 (Cadmus Computer Systems) Nmap finished: 1 IP address (1 host up) scanned in 0.415 seconds You have new mail in /var/spool/mail/root

Scan using IP Address

[root@server1 ~]# nmap 192.168.0.101 Starting Nmap 4.11 ( http://www.insecure.org/nmap/ ) at 2013-11-18 11:04 EST Interesting ports on server2.tecmint.com (192.168.0.101): Not shown: 1674 closed ports PORT STATE SERVICE 22/tcp open ssh 80/tcp open http 111/tcp open rpcbind 958/tcp open unknown 3306/tcp open mysql 8888/tcp open sun-answerbook MAC Address: 08:00:27:D9:8E:D7 (Cadmus Computer Systems) Nmap finished: 1 IP address (1 host up) scanned in 0.465 seconds You have new mail in /var/spool/mail/root

2. Scan using "-v" option

You can see that the below command with "-v" option is giving more detailed information about the remote machine.

[root@server1 ~]# nmap -v server2.tecmint.com Starting Nmap 4.11 ( http://www.insecure.org/nmap/ ) at 2013-11-11 15:43 EST Initiating ARP Ping Scan against 192.168.0.101 [1 port] at 15:43 The ARP Ping Scan took 0.01s to scan 1 total hosts. Initiating SYN Stealth Scan against server2.tecmint.com (192.168.0.101) [1680 ports] at 15:43 Discovered open port 22/tcp on 192.168.0.101 Discovered open port 80/tcp on 192.168.0.101 Discovered open port 8888/tcp on 192.168.0.101 Discovered open port 111/tcp on 192.168.0.101 Discovered open port 3306/tcp on 192.168.0.101 Discovered open port 957/tcp on 192.168.0.101 The SYN Stealth Scan took 0.30s to scan 1680 total ports. Host server2.tecmint.com (192.168.0.101) appears to be up ... good. Interesting ports on server2.tecmint.com (192.168.0.101): Not shown: 1674 closed ports PORT STATE SERVICE 22/tcp open ssh 80/tcp open http 111/tcp open rpcbind 957/tcp open unknown 3306/tcp open mysql 8888/tcp open sun-answerbook MAC Address: 08:00:27:D9:8E:D7 (Cadmus Computer Systems) Nmap finished: 1 IP address (1 host up) scanned in 0.485 seconds Raw packets sent: 1681 (73.962KB) | Rcvd: 1681 (77.322KB)

Scan Multiple Hosts

You can scan multiple hosts by simply writing their IP addresses or hostnames with Nmap.

[root@server1 ~]# nmap 192.168.0.101 192.168.0.102 192.168.0.103 Starting Nmap 4.11 ( http://www.insecure.org/nmap/ ) at 2013-11-11 16:06 EST Interesting ports on server2.tecmint.com (192.168.0.101): Not shown: 1674 closed ports PORT STATE SERVICE 22/tcp open ssh 80/tcp open http 111/tcp open rpcbind 957/tcp open unknown 3306/tcp open mysql 8888/tcp open sun-answerbook MAC Address: 08:00:27:D9:8E:D7 (Cadmus Computer Systems) Nmap finished: 3 IP addresses (1 host up) scanned in 0.580 seconds

4. Scan a whole Subnet

You can scan a whole subnet or IP range with Nmap by providing * wildcard with it.

[root@server1 ~]# nmap 192.168.0.* Starting Nmap 4.11 ( http://www.insecure.org/nmap/ ) at 2013-11-11 16:11 EST Interesting ports on server1.tecmint.com (192.168.0.100): Not shown: 1677 closed ports PORT STATE SERVICE 22/tcp open ssh 111/tcp open rpcbind 851/tcp open unknown Interesting ports on server2.tecmint.com (192.168.0.101): Not shown: 1674 closed ports PORT STATE SERVICE 22/tcp open ssh 80/tcp open http 111/tcp open rpcbind 957/tcp open unknown 3306/tcp open mysql 8888/tcp open sun-answerbook MAC Address: 08:00:27:D9:8E:D7 (Cadmus Computer Systems) Nmap finished: 256 IP addresses (2 hosts up) scanned in 5.550 seconds You have new mail in /var/spool/mail/root

On above output you can see that nmap scanned a whole subnet and gave the information about those hosts which are Up in the Network.

5. Scan Multiple Servers using last octet of IP address

You can perform scans on multiple IP address by simple specifying last octet of IP address. For example, here I performing a scan on IP addresses 192.168.0.101, 192.168.0.102 and 192.168.0.103.

[root@server1 ~]# nmap 192.168.0.101,102,103 Starting Nmap 4.11 ( http://www.insecure.org/nmap/ ) at 2013-11-11 16:09 EST Interesting ports on server2.tecmint.com (192.168.0.101): Not shown: 1674 closed ports PORT STATE SERVICE 22/tcp open ssh 80/tcp open http 111/tcp open rpcbind 957/tcp open unknown 3306/tcp open mysql 8888/tcp open sun-answerbook MAC Address: 08:00:27:D9:8E:D7 (Cadmus Computer Systems) Nmap finished: 3 IP addresses (1 host up) scanned in 0.552 seconds You have new mail in /var/spool/mail/root

6. Scan list of Hosts from a File

If you have more hosts to scan and all host details are written in a file , you can directly ask nmap to read that file and perform scans. Let's see how to do that.

Create a text file called "nmaptest.txt" and define all the IP addresses or hostname of the server that you want to do a scan.

[root@server1 ~]# cat > nmaptest.txt localhost server2.tecmint.com 192.168.0.101

Next, run the following command with "iL" option with nmap command to scan all listed IP address in the file.

[root@server1 ~]# nmap -iL nmaptest.txt Starting Nmap 4.11 ( http://www.insecure.org/nmap/ ) at 2013-11-18 10:58 EST Interesting ports on localhost.localdomain (127.0.0.1): Not shown: 1675 closed ports PORT STATE SERVICE 22/tcp open ssh 25/tcp open smtp 111/tcp open rpcbind 631/tcp open ipp 857/tcp open unknown Interesting ports on server2.tecmint.com (192.168.0.101): Not shown: 1674 closed ports PORT STATE SERVICE 22/tcp open ssh 80/tcp open http 111/tcp open rpcbind 958/tcp open unknown 3306/tcp open mysql 8888/tcp open sun-answerbook MAC Address: 08:00:27:D9:8E:D7 (Cadmus Computer Systems) Interesting ports on server2.tecmint.com (192.168.0.101): Not shown: 1674 closed ports PORT STATE SERVICE 22/tcp open ssh 80/tcp open http 111/tcp open rpcbind 958/tcp open unknown 3306/tcp open mysql 8888/tcp open sun-answerbook MAC Address: 08:00:27:D9:8E:D7 (Cadmus Computer Systems) Nmap finished: 3 IP addresses (3 hosts up) scanned in 2.047 seconds

7. Scan an IP Address Range

You can specify an IP range while performing scan with Nmap.

[root@server1 ~]# nmap 192.168.0.101-110 Starting Nmap 4.11 ( http://www.insecure.org/nmap/ ) at 2013-11-11 16:09 EST Interesting ports on server2.tecmint.com (192.168.0.101): Not shown: 1674 closed ports PORT STATE SERVICE 22/tcp open ssh 80/tcp open http 111/tcp open rpcbind 957/tcp open unknown 3306/tcp open mysql 8888/tcp open sun-answerbook MAC Address: 08:00:27:D9:8E:D7 (Cadmus Computer Systems) Nmap finished: 10 IP addresses (1 host up) scanned in 0.542 seconds

8. Scan Network Excluding Remote Hosts

You can exclude some hosts while performing a full network scan or when you are scanning with wildcards with "–exclude" option.

[root@server1 ~]# nmap 192.168.0.* --exclude 192.168.0.100 Starting Nmap 4.11 ( http://www.insecure.org/nmap/ ) at 2013-11-11 16:16 EST Interesting ports on server2.tecmint.com (192.168.0.101): Not shown: 1674 closed ports PORT STATE SERVICE 22/tcp open ssh 80/tcp open http 111/tcp open rpcbind 957/tcp open unknown 3306/tcp open mysql 8888/tcp open sun-answerbook MAC Address: 08:00:27:D9:8E:D7 (Cadmus Computer Systems) Nmap finished: 255 IP addresses (1 host up) scanned in 5.313 seconds You have new mail in /var/spool/mail/root

9. Scan OS information and Traceroute

With Nmap, you can detect which OS and version is running on the remote host. To enable OS & version detection, script scanning and traceroute, we can use "-A" option with NMAP.

[root@server1 ~]# nmap -A 192.168.0.101 Starting Nmap 4.11 ( http://www.insecure.org/nmap/ ) at 2013-11-11 16:25 EST Interesting ports on server2.tecmint.com (192.168.0.101): Not shown: 1674 closed ports PORT STATE SERVICE VERSION 22/tcp open ssh OpenSSH 4.3 (protocol 2.0) 80/tcp open http Apache httpd 2.2.3 ((CentOS)) 111/tcp open rpcbind 2 (rpc #100000) 957/tcp open status 1 (rpc #100024) 3306/tcp open mysql MySQL (unauthorized) 8888/tcp open http lighttpd 1.4.32 MAC Address: 08:00:27:D9:8E:D7 (Cadmus Computer Systems) No exact OS matches for host (If you know what OS is running on it, see http://www.insecure.org/cgi-bin/nmap-submit.cgi). TCP/IP fingerprint: SInfo(V=4.11%P=i686-redhat-linux-gnu%D=11/11%Tm=52814B66%O=22%C=1%M=080027) TSeq(Class=TR%IPID=Z%TS=1000HZ) T1(Resp=Y%DF=Y%W=16A0%ACK=S++%Flags=AS%Ops=MNNTNW) T2(Resp=N) T3(Resp=Y%DF=Y%W=16A0%ACK=S++%Flags=AS%Ops=MNNTNW) T4(Resp=Y%DF=Y%W=0%ACK=O%Flags=R%Ops=) T5(Resp=Y%DF=Y%W=0%ACK=S++%Flags=AR%Ops=) T6(Resp=Y%DF=Y%W=0%ACK=O%Flags=R%Ops=) T7(Resp=Y%DF=Y%W=0%ACK=S++%Flags=AR%Ops=) PU(Resp=Y%DF=N%TOS=C0%IPLEN=164%RIPTL=148%RID=E%RIPCK=E%UCK=E%ULEN=134%DAT=E) Uptime 0.169 days (since Mon Nov 11 12:22:15 2013) Nmap finished: 1 IP address (1 host up) scanned in 22.271 seconds You have new mail in /var/spool/mail/root

In above Output, you can see that nmap is came up with TCP/IP fingerprint of the OSrunning on remote hosts and being more specific about the port and services running on the remote hosts.

10. Enable OS Detection with Nmap

Use the option "-O" and "-osscan-guess" also helps to discover OS information.

[root@server1 ~]# nmap -O server2.tecmint.com Starting Nmap 4.11 ( http://www.insecure.org/nmap/ ) at 2013-11-11 17:40 EST Interesting ports on server2.tecmint.com (192.168.0.101): Not shown: 1674 closed ports PORT STATE SERVICE 22/tcp open ssh 80/tcp open http 111/tcp open rpcbind 957/tcp open unknown 3306/tcp open mysql 8888/tcp open sun-answerbook MAC Address: 08:00:27:D9:8E:D7 (Cadmus Computer Systems) No exact OS matches for host (If you know what OS is running on it, see http://www.insecure.org/cgi-bin/nmap-submit.cgi). TCP/IP fingerprint: SInfo(V=4.11%P=i686-redhat-linux-gnu%D=11/11%Tm=52815CF4%O=22%C=1%M=080027) TSeq(Class=TR%IPID=Z%TS=1000HZ) T1(Resp=Y%DF=Y%W=16A0%ACK=S++%Flags=AS%Ops=MNNTNW) T2(Resp=N) T3(Resp=Y%DF=Y%W=16A0%ACK=S++%Flags=AS%Ops=MNNTNW) T4(Resp=Y%DF=Y%W=0%ACK=O%Flags=Option -O and -osscan-guess also helps to discover OS R%Ops=) T5(Resp=Y%DF=Y%W=0%ACK=S++%Flags=AR%Ops=) T6(Resp=Y%DF=Y%W=0%ACK=O%Flags=R%Ops=) T7(Resp=Y%DF=Y%W=0%ACK=S++%Flags=AR%Ops=) PU(Resp=Y%DF=N%TOS=C0%IPLEN=164%RIPTL=148%RID=E%RIPCK=E%UCK=E%ULEN=134%DAT=E) Uptime 0.221 days (since Mon Nov 11 12:22:16 2013) Nmap finished: 1 IP address (1 host up) scanned in 11.064 seconds You have new mail in /var/spool/mail/root

Monday, 8 December 2014

Installing Hadoop in vmware in windows7

Did you know that you can easily install a simple single-node Hadoop cluster on your Windows PC or laptop?  Normally, Hadoop runs on Unix computers.  However, thanks to modern virtualization technology, you can run a complete sandbox version of Hadoop within a virtual Linux server on your personal computer, for free.  This installation is ideal for learning and exploring how to use Hadoop.  I will teach you how to install and run the Hortonworks sandbox version of Hadoop on your Windows computer in this tutorial.

Step 1: Install VMware Player

If you don't already have VMware running on your computer, you'll need to install VMware Player v5 or higher on your Windows computer.  This software is free for personal use.  I have found that installing VMware Player v5 on my 64-bit Windows 7 computer to be reliable and causes no problems.  VMware Player can also be installed on a Linux computer.  If you have a Mac, you'll need to purchase and install the VMware Fusion software instead.

Download and install "VMware Player for Windows 32-bit and 64-bit".  It took me 4 minutes to download theVMware-player-5.0.1-894247.exeinstaller file, and 2 minutes to install the software on my Windows 7 computer, with no need to reboot.  VMware Player requires 150 MB free disk space.  Go to your Windows Start Menu and launch VMware Player (you may skip the upgrade to VMware Workstation).

See the full step-by-step instructions on installing VMware Player if you require additional details.

Step 2: Install Hortonworks Hadoop Sandbox

Download the Hortonworks Hadoop Sandbox for VMware.  The VMware Fusion and VMware Workstation versions are compatible with the VMware Player that you had just installed in Step 1.  It took 1 hour 47 minutes to download the 2 GB "Hortonworks+Sandbox+1.2+1-21-2012-1+vmware.ova" file from the Hortonworks Amazon S3 directory.

While waiting for the VMware OVA file to download, you can watch the below sandbox overview video from Hortonworks (8 minutes 35 seconds) and read the sandbox installation instructions.

Step 3: Run Hadoop!

Within the VMware Player application that you had installed and started running in Step 1, either go to the Player menu, and select "File/Open..", or choose "Open a Virtual Machine" from the welcome screen.  Locate the directory where you had downloaded the VMware image Hortonworks sandbox file "Hortonworks+Sandbox+1.2+1-21-2012-1+vmware.ova" and select that OVA file to open.  You'll be prompted for the name of the new virtual server instance, and where on your host Windows machine VMware should store the instance image file–okay to accept the defaults.  It may take a few minutes for the new virtual machine to be imported.  FYI, your Windows computer is the host system, whereas the CentOS 64-bit Linux system, bundled free with the Hortonworks Sandbox, is the virtual guest system from the VMware point of view.

VMware Player Open file menu

You're now ready to click "Play virtual machine" to start running your new sandbox instance.

Your guest Linux system will now start up, along with all necessary software for Hadoop to run including a web server.  The beauty of using a virtual server is that 1) you don't need to have another physical computer under your desk along with the associated power and network cables, monitor, and other accessories, to experiment with Hadoop, 2) you can install it on your laptop and run Hadoop there without needing to connect to the network, and 3) your separate virtual server won't mess up anything you have on your main Windows computer, and can be easily uninstalled when no longer needed.

Once everything starts up, then you will see instructions on how to access the Hortonworks Sandbox.  Look for the URL with the IP address such as http://192.168.40.128 in the below screenshot.  Note that your IP address may be different than mine.

In a web browser such as Firefox or Chrome, go to the Sandbox URL IP address.  You should see a Hortonworks Sandbox welcome screen with options to view some overview videos, to start the tutorial, or jump straight into the sandbox.  Since we're eager to run Hadoop, let's go straight to the third choice: click on the green Start button under "Use the Sandbox."

You will now see the HUE web-based environment for the sandbox.  By default you will start in the Beeswax screen.  Let's click on "My Queries" then click on the "Sample: Top salary (copy)" query name.

You will then see the sample Hive query in the Query Editor.  If you have used relational databases before, you will notice that the Hive query looks very similar to standard SQL.  The other method of querying Hadoop would be via Pig, which is more of a pipeline method of constructing Hadoop queries than Hive, but will require a little steeper learning curve than Hive for those already familiar with SQL.  Let's stick with Hive for this initial run.  Click on the Execute button to start running the Hive query.

Now your query will start running for a minute or so.  The HUE environment will update the log output to the screen for you to see the progress and any error messages.  This is a good time to step away from the computer and dosomething healthy while your "Big Data" query is running.

  After a few minutes, your query results will show up on the screen.

Congratulations!  You have now installed Hadoop and successfully run your first Hive query.  You are on your way to becoming a wizard in Hadoop

RSS

Categories

Followers

Blog Archive

rTechIndia

RtechIndia->technology ahead

rtech

rtechindia

RtechIndia

Go rtechindia

Go rtechindia

RtechIndia

Monday, 15 December 2014

Virtualisation in Red Hat Linux

AT Enterprise Virtualization solution


RHEV provides a complete solution for server virtualization management. Red Hat Enterprise Virtualization has been designed from the platform, Red Hat Enterprise Linux, which he extends the functionality, to bring down high barriers facing the ubiquity of virtualization in data centers. Red Hat Enterprise Linux has gained the trust of thousands of organizations and is installed on millions of systems in strategic workloads.


Installing the management console RHEVM

Before installing the management console on the server, verify that the following prerequisites is well respected:


- Operating system: Windows Server 2003 R2 or Windows Server 2008 (recommended)

- The IIS must be installed

- If you are running Windows Server 2003 you must install PowerShell 2.0 available on Windows Update or the Microsoft website.

- Microsoft Frameworks 3.5.1


Once the installation file to launch click Next and accept the terms of use.


Arrived at the above screen make sure all the boxes are checked and click Next.


Select "install a SQL Server 2005 Express Locally" and click next.

Check the installation directory and click next.


Uncheck the box strength SSL and click next


Fill in the requested information


Click next


Port Number: 25285


Click next


Click ignores the Manager installation begins.


 Administration RHEVM


This section shows the procedure to connect to the management console RHEVm


Open your browser enter the address bar:


http: // [ip address or name] / RHEVmanager


If this is not the case install the certificate by clicking the link.


The above screenshot is from the RHEVm authentication interface.


1 Installing RHEV hypervisor.


Boot from ISO hypervisor. After loading the next interface should appear:


Press 1 and input.


Select "configure" grave with the 1 key and confirm with input

Select the disk or hypervisor will install and validate.

Once the task by selecting validate the 3 rdinput (commit configuration).


Once the formatting you complete the wizard redisplay the main menu.

Press 2 (configure authentication)


Select the 1 st entered and enter the root password of the hypervisor.

Do the same for the 2 nd entrance.

Once set select the 3 rd entry to return to the main menu.


Configure the hostname by pressing 3 and then input.

When you ask the interface type the full name of the hypervisor


After configuring the hostname type 4 to configure the network.


Select the network interface configured (usually ETH0)


Type n and then enter


Type n and then enter.


Type S and enter


Configure the IP configuration of the hypervisor by following the instructions on the screen.


Then configure your DNS server in the same way by selecting DNS on the main menu of your hypervisor network configuration.

Do the same for the NTP server.


Select  Save And Return To Menu to return to the main menu.


Then save your RHN machine by pressing 5.

Select 1) Register to public RH n

Perform recording with your Red Hat Account


Once registration is complete RHN press 6 (Configure the host for red hat enterprise).


Type [ip of your server RHEVm]: 80


Then press enter


If communication is established correctly between the 2 machines hypervisor should return the following message:


"The RHEV Manager's address is set"

"The RHEV Manager's harbor is set. Do you even lift


Type [ip RHEVm your server]: 25285

Then press enter.


Once configuration is complete you will be back to the main menu.


Select 8 (install locally and reboot).

Once the installation is complete return on our management console.


If the configuration has been completed, a new HOST should be waiting in your RHEVM interface.

To enable it, right click on it and click approve. The host will be added to the cluster.

If no host is waiting, go to the hypervisor concerned and restarted the VDSM-reg service through the command-reg VDSM Service restart.


2 Configuring the Cluster


Configuring the storage space


Once your hypervisors added to your cluster, you must create a DATASTORE for your hosted VMs.

RHEV is able to manage multipathing fiber channel.

To do this go to the Storage tab and click the New button domain:


Domain Function: DATA

Storage Type: FCP

The list of VMFS will appear. (Do not forget to make the process of creating and VMFS presentation on the interface of the bay).Check VMFS converné and click the ADD button.

Then return to the tab and select DATASTORE on down the STORAGE tab and click the button attach storage.


Then select the VMFS that you have previously set.

This procedure is used to assign to a DataCenter storage esspace.


Repeat the process by creating a storage space with the following parameters:


- Domain function: ISO

- Storage Type: NFS

and attach it to your Data Center. This storage space will store ISO and templates.

The disadvantage is that the storage protocol must be absolutely NFS.


6 Managing ISOs

As we have seen above the ISOs library must have its own dedicated solely DATASTORE using the NFS protocol.

To upload ISOs secure ways REDHAT provides a tool installed with the Manager appointed ISO UPLOADER


ISO UPLOADER automatically detects your DATACENTER parameter is to autonomously for login with your NFS server.

To add an ISO image, click on ADD and select the ISO images you want UPLOADER. Once you have completed your list, click UPLOAD.ISO UPLOADER take charge of incorpérer ISOs directly to your library. We will see below how to exploit it.


On the command line you can also upload a ISO:


rhevm-iso-uploader -iso-domain = ISODomain upload <iso file>


7 Managing VMs


The management of virtual machines is indentique over other virtualisations products.


Create a new VM:


Click the Virtual Machines tab and click New Server:


Here you can set the configuration here "hardware" of your VM.


In this section, you can set the high availabilty system by checking 'Highly Available "

The choices "low", "Medium", "High" to define


In this section, pourez setting boot sequence and assign to your VM ISO you will eventually uploaded through the tool ISO UPLOADER.


After you do this job, click OK.

Once the task of creating the finished vm, it will cause him a disc and a virtual network interface. To do this click on your newly created VM and click "guide me".


Then click on "configure Network Interfaces".Once the parameters indicated as below click OK.

Red Hat Linux xen RHEL

Binary Xen rpm repositories for EL6

Take a look at these repositories:

Michael Young's EL6 Xen rpm repository (also includes xen dom0 capable kernel based on rhel6 2.6.32 kernel):http://xenbits.xen.org/people/mayoung/EL6.xen/http://xenbits.xen.org/people/mayoung/testing/Gitco.de repository is based on this tutorial, but contains xen dom0 capable kernel rpm based on the xen/kernel.org kernel (not rhel6 kernel):http://www.gitco.de/linux/x86_64/centos/6/http://www.gitco.de/linux/x86_64/centos/6/gitco-centos6-x86_64.repo

Additional repositories:

Fedora xendom0 kernel rpms by Michael Young:http://repos.fedorapeople.org/repos/myoung/dom0-kernel/http://wiki.alteeve.com/files/an-cluster/rhel6/

Red Hat Enterprise Linux 6 Xen 4.0 tutorial

This tutorial explains how to install and configure RHEL6 to run as Xen dom0 (host), running Xen hypervisor 4.0. Note that this is unsupported by Red Hat! See the end of this wiki page for more information about RHEL6 Xen binary rpm yum repository. This tutorial explains how to compile Xen and dom0 kernel from sources/srpms.

As a default RHEL6 does NOT:

RHEL6 does not ship Xen hypervisor or tools.RHEL6 does not ship Xen dom0 capable kernel.

As a default RHEL6 DOES:

RHEL6 runs as Xen PV (paravirtual) domU using the pvops framework in the default kernel.RHEL6 runs as Xen HVM (fully virtualized) guest.RHEL6 ships with optimized Xen PV-on-HVM drivers for RHEL6 Xen HVM guests.

Topics in this tutorial:

How to install and configure RHEL6 system for running as Xen dom0 (host).How to get Xen src.rpm from Fedora and rebuild and install it on RHEL6.How to install upstream Xen dom0 capable kernel on RHEL6.How to update the dom0 kernel to a newer version from the upstream git tree.How to use libvirt and virt-manager to manage Xen on RHEL6.Binary rpm repositories for EL6.More information and links.

TODO list for this tutorial:

Fix the src.rpm compilation examples, shouldn't build as root.Make sure everything works with SElinux enabled, and leave it enabled.

RHEL6 installation and configuration

Installation:

Download "rhel-server-6.0-x86_64-dvd.iso" from Red Hat Network (RHN).Burn it to DVDR, or if you have a server with remote management, use virtual media ISO mapping.Boot from the DVD.Install as usual.Choose "Basic Server" install.Disk Partitioning: Create /boot partition as primary, make it ext3 and at least 2 GB in size. Create LVM PV (Physical Volume) and VG (Volume Group) to fill the rest of the disk space. Create root as LVM volume, make it ext4, and at least 36 GB in size. Create swap as LVM volume, make it at least as big as the amount of RAM in your server.IMPORTANT! Make sure you leave FREE space in the LVM volume group. You can use that free space later to create LVM volumes for Xen VM virtual disks.In this tutorial the hostname is set to "el6.localdomain".

Screenshot of disk partitioning: 

Configuration after installation:

First fix networking by editing "/etc/sysconfig/network-scripts/ifcfg-ethX", usually "ifcfg-eth0", and make it look like:

[root@el6 ~]# cat /etc/sysconfig/network-scripts/ifcfg-eth0 DEVICE="eth0" HWADDR="00:11:22:33:44:55" NM_CONTROLLED="no" ONBOOT="yes" BOOTPROTO="dhcp"

ie. make sure NM_CONTROLLED="no" and ONBOOT="yes". Then run "ifup eth0" to activate networking.

Make sure network service is set to start automatically:

[root@el6 ~]# chkconfig --list network

Make sure your Internet connection works OK at this point! Next make sure "/etc/hosts" file has an entry for your hostname:

[root@el6 ~]# cat /etc/hosts 127.0.0.1 localhost localhost.localdomain localhost4 localhost4.localdomain4 ::1 localhost localhost.localdomain localhost6 localhost6.localdomain6 127.0.0.1 el6 el6.localdomain

Full FQDN hostname in this example is "el6.localdomain".

Disable SElinux by editing "/etc/selinux/config" and make it have:

SELINUX=disabled

Then it's time to register your system to RHN, so you can fetch updates and install additional packages using yum.

Run "rhn_register" and fill in your RHN username and password. When registration is OK, there's an important extra step do!

You need to login to RHN website and:

Click "Manage Entitlements & Subscriptions".Click the correct (newly added) system.Click "(Alter Channel Subscriptions)".Select ""RHEL Server Optional (v. 6 64-bit x86_64)" channel.Click "Change Subscriptions".

Some required packages are only available in the "RHEL Server Optional (v. 6 64-bit x86_64)" channel. Failing to add that channel means you won't be able to install some required packages later on.

When you're done with RHN update the system and install latest (security) fixes:

[root@el6 ~]# yum update

Then install some commonly used tools:

[root@el6 ~]# yum install screen vim wget tcpdump ntp ntpdate man smartmontools links lynx ethtool xorg-x11-xauth

Then increase grub timeout from grub.conf, and comment out "hiddenmenu" option:

[root@el6 ~]# cat /boot/grub/grub.conf # grub.conf generated by anaconda # # Note that you do not have to rerun grub after making changes to this file # NOTICE: You have a /boot partition. This means that # all kernel and initrd paths are relative to /boot/, eg. # root (hd0,0) # kernel /vmlinuz-version ro root=/dev/mapper/vg00-lvroot # initrd /initrd-[generic-]version.img #boot=/dev/sda default=0 timeout=10 splashimage=(hd0,0)/grub/splash.xpm.gz #hiddenmenu title Red Hat Enterprise Linux Server (2.6.32-71.7.1.el6.x86_64) root (hd0,0) kernel /vmlinuz-2.6.32-71.7.1.el6.x86_64 ro root=/dev/mapper/vg00-lvroot rd_LVM_LV=vg00/lvroot rd_LVM_LV=vg00/lvswap rd_NO_LUKS rd_NO_MD rd_NO_DM LANG=en_US.UTF-8 SYSFONT=latarcyrheb-sun16 KEYBOARDTYPE=pc KEYTABLE=fi crashkernel=auto rhgb quiet initrd /initramfs-2.6.32-71.7.1.el6.x86_64.img title Red Hat Enterprise Linux (2.6.32-71.el6.x86_64) root (hd0,0) kernel /vmlinuz-2.6.32-71.el6.x86_64 ro root=/dev/mapper/vg00-lvroot rd_LVM_LV=vg00/lvroot rd_LVM_LV=vg00/lvswap rd_NO_LUKS rd_NO_MD rd_NO_DM LANG=en_US.UTF-8 SYSFONT=latarcyrheb-sun16 KEYBOARDTYPE=pc KEYTABLE=fi crashkernel=auto rhgb quiet initrd /initramfs-2.6.32-71.el6.x86_64.img

At this point you should reboot the system to the newest kernel.

Installing required packages to compile Xen rpms

Install packages that are required to rebuild Xen src.rpm (all on one line):

[root@el6 ~]# yum groupinstall "Development tools" "Additional Development" "Debugging Tools" "System administration tools" "Compatibility libraries" "Console internet tools" "Desktop Platform Development"

This is around 212 MB of downloads.

Then install some additional packages that are required to build Xen with all features enabled:

[root@el6 ~]# yum install transfig wget texi2html libaio-devel dev86 glibc-devel e2fsprogs-devel gitk mkinitrd iasl xz-devel bzip2-devel pciutils-libs pciutils-devel SDL-devel libX11-devel gtk2-devel bridge-utils PyXML qemu-common qemu-img mercurial texinfo libuuid-devel

This is around 82 MB of downloads.

And finally 32bit version of glibc-devel is required aswell:

[root@el6 ~]# yum install glibc-devel.i686

Now you have all the basic tools, libraries and headers installed.

Rebuilding and installing Xen src.rpm

Fedora xen-4.0.1-6 rpm package includes some additional patches and fixes backported from upstream Xen 4.0.2-rc*.

[root@el6 ~]# mkdir /root/src && cd /root/src [root@el6 src]# wget http://ftp.funet.fi/pub/mirrors/fedora.redhat.com/pub/fedora/linux/releases/14/Everything/source/SRPMS/xen-4.0.1-6.fc14.src.rpm [root@el6 src]# rpm -i xen-4.0.1-6.fc14.src.rpm [root@el6 src]# cd /root/rpmbuild/SPECS [root@el6 SPECS]# rpmbuild -bb xen.spec

After a while you should see output like:

Wrote: /root/rpmbuild/RPMS/x86_64/xen-4.0.1-6.el6.x86_64.rpm Wrote: /root/rpmbuild/RPMS/x86_64/xen-libs-4.0.1-6.el6.x86_64.rpm Wrote: /root/rpmbuild/RPMS/x86_64/xen-runtime-4.0.1-6.el6.x86_64.rpm Wrote: /root/rpmbuild/RPMS/x86_64/xen-hypervisor-4.0.1-6.el6.x86_64.rpm Wrote: /root/rpmbuild/RPMS/x86_64/xen-doc-4.0.1-6.el6.x86_64.rpm Wrote: /root/rpmbuild/RPMS/x86_64/xen-devel-4.0.1-6.el6.x86_64.rpm Wrote: /root/rpmbuild/RPMS/x86_64/xen-licenses-4.0.1-6.el6.x86_64.rpm Wrote: /root/rpmbuild/RPMS/x86_64/xen-debuginfo-4.0.1-6.el6.x86_64.rpm

Try installing the rpms:

[root@el6 SPECS]# cd /root/rpmbuild/RPMS/x86_64/ [root@el6 x86_64]# rpm -Uvh xen*4.0.1-6*.rpm error: Failed dependencies: /usr/bin/qemu-nbd is needed by xen-runtime-4.0.1-6.el6.x86_64

So what's happening here? It seems RHEL6 does not have "qemu-common" rpm available, which includes "qemu-nbd" binary. So we need to grab qemu src.rpm from Fedora and rebuild it for RHEL6 to get the required "qemu-common" rpm.

Verify the version of "qemu" in RHEL6:

[root@el6 x86_64]# rpm -qa | grep qemu qemu-img-0.12.1.2-2.113.el6.x86_64

Ok, so it's version 0.12.x. Fedora 13 has qemu 0.12.5, so it's close enough:

[root@el6 x86_64]# cd /root/src [root@el6 src]# wget http://ftp.funet.fi/pub/mirrors/fedora.redhat.com/pub/fedora/linux/updates/13/SRPMS/qemu-0.12.5-1.fc13.src.rpm [root@el6 src]# rpm -i qemu-0.12.5-1.fc13.src.rpm [root@el6 src]# cd /root/rpmbuild/SPECS [root@el6 SPECS]# rpmbuild -bb qemu.spec

After a while you'll see:

Wrote: /root/rpmbuild/RPMS/x86_64/qemu-0.12.5-1.el6.x86_64.rpm Wrote: /root/rpmbuild/RPMS/x86_64/qemu-kvm-0.12.5-1.el6.x86_64.rpm Wrote: /root/rpmbuild/RPMS/x86_64/qemu-img-0.12.5-1.el6.x86_64.rpm Wrote: /root/rpmbuild/RPMS/x86_64/qemu-common-0.12.5-1.el6.x86_64.rpm Wrote: /root/rpmbuild/RPMS/x86_64/qemu-user-0.12.5-1.el6.x86_64.rpm Wrote: /root/rpmbuild/RPMS/x86_64/qemu-system-x86-0.12.5-1.el6.x86_64.rpm Wrote: /root/rpmbuild/RPMS/x86_64/qemu-system-ppc-0.12.5-1.el6.x86_64.rpm Wrote: /root/rpmbuild/RPMS/x86_64/qemu-system-sparc-0.12.5-1.el6.x86_64.rpm Wrote: /root/rpmbuild/RPMS/x86_64/qemu-system-arm-0.12.5-1.el6.x86_64.rpm Wrote: /root/rpmbuild/RPMS/x86_64/qemu-system-mips-0.12.5-1.el6.x86_64.rpm Wrote: /root/rpmbuild/RPMS/x86_64/qemu-system-cris-0.12.5-1.el6.x86_64.rpm Wrote: /root/rpmbuild/RPMS/x86_64/qemu-system-m68k-0.12.5-1.el6.x86_64.rpm Wrote: /root/rpmbuild/RPMS/x86_64/qemu-system-sh4-0.12.5-1.el6.x86_64.rpm Wrote: /root/rpmbuild/RPMS/x86_64/qemu-kvm-tools-0.12.5-1.el6.x86_64.rpm Wrote: /root/rpmbuild/RPMS/x86_64/qemu-debuginfo-0.12.5-1.el6.x86_64.rpm

So now we have the required "qemu-common" rpm. Let's install it to satisfy the package dependencies:

[root@el6 SPECS]# cd /root/rpmbuild/RPMS/x86_64 [root@el6 x86_64]# rpm -Uvh qemu-common-0.12.5-1.el6.x86_64.rpm Preparing... ########################################### [100%] 1:qemu-common ########################################### [100%]

Now we can also install Xen rpms:

[root@el6 x86_64]# rpm -Uvh xen*4.0.1-6*.rpm Preparing... ########################################### [100%] 1:xen-licenses ########################################### [ 13%] 2:xen-libs ########################################### [ 25%] 3:xen-hypervisor ########################################### [ 38%] 4:xen-runtime ########################################### [ 50%] 5:xen ########################################### [ 63%] 6:xen-devel ########################################### [ 75%] 7:xen-doc ########################################### [ 88%] 8:xen-debuginfo ########################################### [100%]

Now you're done installing Xen hypervisor, tools and libraries.

Installing upstream Xen dom0 capable kernel

Note that we're installing upstream *Xen* kernel here, which is based on the long-term maintained kernel.org Linux 2.6.32.x kernel. This kernel is different from the RHEL6 kernel. Many drivers are newer versions in Red Hat's kernel, and Red Hat's kernel might have more features than the kernel.org kernel. Due to the driver version differences you might experience problems on some hardware, for example on servers using LSI/DELL RAID adapters. You might need to manually update driver versions to fix these problems on affected systems. See the end of this wiki page for more information about kernel versions.

Clone the kernel git repository from kernel.org and check out the "xen/stable-2.6.32.x" long-term maintained branch.

[root@el6 x86_64]# mkdir /root/kernel && cd /root/kernel [root@el6 kernel]# git clone git://git.kernel.org/pub/scm/linux/kernel/git/jeremy/xen.git linux-2.6-xen [root@el6 kernel]# cd linux-2.6-xen [root@el6 linux-2.6-xen]# git checkout -b xen/stable-2.6.32.x origin/xen/stable-2.6.32.x

Now you have the kernel ready to be configured and compiled. Reference config-file used is for version "2.6.32.25". It should work with newer version aswell, "make oldconfig" takes care of that.

NOTE! The reference .config file has various debugging options enabled, so don't use this kernel config for performance benchmarks!

[root@el6 linux-2.6-xen]# wget -O .config http://pasik.reaktio.net/xen/kernel-config/config-2.6.32.25-pvops-dom0-xen-stable-x86_64 [root@el6 linux-2.6-xen]# make oldconfig [root@el6 linux-2.6-xen]# make -j4 bzImage && make -j4 modules && make modules_install

Then let's install the kernel and generate initrd (initramfs) image for the new kernel. Kernel version in this example is "2.6.32.25":

[root@el6 linux-2.6-xen]# depmod -a 2.6.32.25 [root@el6 linux-2.6-xen]# cp -a arch/x86/boot/bzImage /boot/vmlinuz-2.6.32.25 [root@el6 linux-2.6-xen]# cp -a System.map /boot/System.map-2.6.32.25 [root@el6 linux-2.6-xen]# cp -a .config /boot/config-2.6.32.25 [root@el6 linux-2.6-xen]# cd /boot [root@el6 boot]# dracut initramfs-2.6.32.25.img 2.6.32.25

NOTE! If you're using a system with LSI and/or Dell RAID adapters (using megaraid_sas driver) you need to manually update the driver version at this point! Linux 2.6.32.25 ships with too old driver version, and it wont' work (disks won't get enabled on system startup). See this email for information about updating the driver version:http://lists.xensource.com/archives/html/xen-devel/2010-11/msg00250.html .

Then it's time to modify "grub.conf" and add an entry for the Xen+dom0 combination:

[root@el6 ~]# cat /boot/grub/grub.conf # grub.conf generated by anaconda # # Note that you do not have to rerun grub after making changes to this file # NOTICE: You have a /boot partition. This means that # all kernel and initrd paths are relative to /boot/, eg. # root (hd0,0) # kernel /vmlinuz-version ro root=/dev/mapper/vg00-lvroot # initrd /initrd-[generic-]version.img #boot=/dev/sda default=0 timeout=10 splashimage=(hd0,0)/grub/splash.xpm.gz #hiddenmenu title Red Hat Enterprise Linux Server (2.6.32-71.7.1.el6.x86_64) root (hd0,0) kernel /vmlinuz-2.6.32-71.7.1.el6.x86_64 ro root=/dev/mapper/vg00-lvroot rd_LVM_LV=vg00/lvroot rd_LVM_LV=vg00/lvswap rd_NO_LUKS rd_NO_MD rd_NO_DM LANG=en_US.UTF-8 SYSFONT=latarcyrheb-sun16 KEYBOARDTYPE=pc KEYTABLE=fi crashkernel=auto rhgb quiet initrd /initramfs-2.6.32-71.7.1.el6.x86_64.img title Red Hat Enterprise Linux (2.6.32-71.el6.x86_64) root (hd0,0) kernel /vmlinuz-2.6.32-71.el6.x86_64 ro root=/dev/mapper/vg00-lvroot rd_LVM_LV=vg00/lvroot rd_LVM_LV=vg00/lvswap rd_NO_LUKS rd_NO_MD rd_NO_DM LANG=en_US.UTF-8 SYSFONT=latarcyrheb-sun16 KEYBOARDTYPE=pc KEYTABLE=fi crashkernel=auto rhgb quiet initrd /initramfs-2.6.32-71.el6.x86_64.img title Xen 4.0 with Linux 2.6.32.25 dom0 root (hd0,0) kernel /xen.gz dom0_mem=1024M loglvl=all guest_loglvl=all module /vmlinuz-2.6.32.25 ro root=/dev/mapper/vg00-lvroot rd_LVM_LV=vg00/lvroot nomodeset module /initramfs-2.6.32.25.img

Then let's disable KSM services, those don't work with Xen currently:

[root@el6 ~]# chkconfig ksm off [root@el6 ~]# chkconfig ksmtuned off

And then it's time to reboot into Xen ! Remember to choose the Xen entry from grub:

[root@el6 ~]# reboot

Verifying Xen after reboot

[root@el6 ~]# xm list Name ID Mem VCPUs State Time(s) Domain-0 0 1024 4 r----- 93.9 [root@el6 ~]# xm info host  : el6.localdomain release  : 2.6.32.25 version  : #1 SMP Sun Nov 14 21:50:39 EET 2010 machine  : x86_64 nr_cpus  : 4 nr_nodes  : 1 cores_per_socket  : 4 threads_per_core  : 1 cpu_mhz  : 2826 hw_caps  : bfebfbff:20100800:00000000:00000940:0008e3fd:00000000:00000001:00000000 virt_caps  : hvm total_memory  : 8190 free_memory  : 7070 node_to_cpu  : node0:0-3 node_to_memory  : node0:7070 node_to_dma32_mem  : node0:3259 max_node_id  : 0 xen_major  : 4 xen_minor  : 0 xen_extra  : .1 xen_caps  : xen-3.0-x86_64 xen-3.0-x86_32p hvm-3.0-x86_32 hvm-3.0-x86_32p hvm-3.0-x86_64 xen_scheduler  : credit xen_pagesize  : 4096 platform_params  : virt_start=0xffff800000000000 xen_changeset  : unavailable xen_commandline  : dom0_mem=1024M loglvl=all guest_loglvl=all cc_compiler  : gcc version 4.4.4 20100726 (Red Hat 4.4.4-13) (GCC) cc_compile_by  : root cc_compile_domain  : cc_compile_date  : Sun Nov 14 21:41:09 EET 2010 xend_config_format  : 4 [root@el6 ~]# uname -a Linux el6.localdomain 2.6.32.25 #1 SMP Sun Nov 14 21:50:39 EET 2010 x86_64 x86_64 x86_64 GNU/Linux

From the output above we can see we're running Xen hypervisor version 4.0.1 (xen_major, xen_minor, xen_extra) with Linux 2.6.32.25 dom0 kernel.

Updating the dom0 kernel

Linux 2.6.32.x is the long-term supported and maintained kernel from both kernel.org and xen.org, so it gets pretty frequent updates. Here are the steps to update your kernel tree so you don't have to clone the whole tree again.

Clean up and update the git tree, then check the changelog for the recent changes:

[root@el6 ~]# mkdir /root/kernel/linux-2.6-xen [root@el6 linux-2.6-xen]# make clean [root@el6 linux-2.6-xen]# git pull [root@el6 linux-2.6-xen]# git log | less

And then follow the steps in the previous chapters to build and install the new kernel version.

Online changelog for the "xen/stable-2.6.32.x" branch of the kernel git tree is located here: http://git.kernel.org/?p=linux/kernel/git/jeremy/xen.git;a=shortlog;h=xen/stable-2.6.32.x .

Using libvirt and virt-manager with Xen

Install libvirt and virt-manager:

[root@el6 ~]# yum install libvirt virt-manager xorg-x11-xauth

The default version of libvirt in RHEL6 is not compiled with Xen support. You can verify this by using ssh with X11 forwarding from your laptop/desktop to your dom0, and trying to run "virt-manager":

[root@el6 ~]# virt-manager & [1] 2867 Unable to open connection to hypervisor URI 'xen:///': no connection driver available for xen:/// Traceback (most recent call last): File "/usr/share/virt-manager/virtManager/connection.py", line 992, in _try_open None], flags) File "/usr/lib64/python2.6/site-packages/libvirt.py", line 111, in openAuth if ret is None:raise libvirtError('virConnectOpenAuth() failed') libvirtError: no connection driver available for xen:///

This can be fixed by rebuilding libvirt rpms with Xen support enabled.

NOTE! Before rebuilding libvirt src.rpm you need to boot into non-Xen environment! This is because some of the automated RHEL6 libvirt Xen-specific tests seem to fail in Xen dom0 environment, but work OK in baremetal.

Verify libvirt version in RHEL6:

[root@el6 ~]# rpm -qa | grep libvirt

RHEL 6.0 seems to have libvirt version 0.8.1.

Let's download the src.rpm from Red Hat ftp server, patch the spec file to enable Xen support, and try rebuilding it.

[root@el6 ~]# cd /root/src [root@el6 src]# wget ftp://ftp.redhat.com/pub/redhat/linux/enterprise/6Server/en/os/SRPMS/libvirt-0.8.1-27.el6.src.rpm [root@el6 src]# rpm -i libvirt-0.8.1-27.el6.src.rpm [root@el6 src]# wget http://pasik.reaktio.net/xen/patches/libvirt-spec-rhel6-enable-xen.patch [root@el6 src]# cd /root/rpmbuild/SPECS [root@el6 SPECS]# cp -a libvirt.spec libvirt.spec.orig [root@el6 SPECS]# patch -p0 < ~/src/libvirt-spec-rhel6-enable-xen.patch patching file libvirt.spec [root@el6 SPECS]# rpmbuild -bb libvirt.spec error: Failed build dependencies: libnl-devel >= 1.1 is needed by libvirt-0.8.1-27.el6.x86_64 xhtml1-dtds is needed by libvirt-0.8.1-27.el6.x86_64 libudev-devel >= 145 is needed by libvirt-0.8.1-27.el6.x86_64 libpciaccess-devel >= 0.10.9 is needed by libvirt-0.8.1-27.el6.x86_64 yajl-devel is needed by libvirt-0.8.1-27.el6.x86_64 libpcap-devel is needed by libvirt-0.8.1-27.el6.x86_64 avahi-devel is needed by libvirt-0.8.1-27.el6.x86_64 parted-devel is needed by libvirt-0.8.1-27.el6.x86_64 device-mapper-devel is needed by libvirt-0.8.1-27.el6.x86_64 numactl-devel is needed by libvirt-0.8.1-27.el6.x86_64 netcf-devel >= 0.1.4 is needed by libvirt-0.8.1-27.el6.x86_64

Ok, so we need more packages installed:

[root@el6 SPECS]# yum install libnl-devel xhtml1-dtds libudev-devel libpciaccess-devel yajl-devel libpcap-devel avahi-devel parted-devel device-mapper-devel numactl-devel netcf-devel

After that let's try again:

[root@el6 SPECS]# rpmbuild -bb libvirt.spec

After a while you'll see:

Wrote: /root/rpmbuild/RPMS/x86_64/libvirt-0.8.1-27.el6.x86_64.rpm Wrote: /root/rpmbuild/RPMS/x86_64/libvirt-client-0.8.1-27.el6.x86_64.rpm Wrote: /root/rpmbuild/RPMS/x86_64/libvirt-devel-0.8.1-27.el6.x86_64.rpm Wrote: /root/rpmbuild/RPMS/x86_64/libvirt-python-0.8.1-27.el6.x86_64.rpm Wrote: /root/rpmbuild/RPMS/x86_64/libvirt-debuginfo-0.8.1-27.el6.x86_64.rpm

Then let's install the xen-enabled rpms (note you need to use --force because the same version of libvirt is already installed):

[root@el6 ~]# cd /root/rpmbuild/RPMS/x86_64/ [root@el6 x86_64]# rpm -Uvh --force libvirt-0.8.1-27.el6.x86_64.rpm libvirt-client-0.8.1-27.el6.x86_64.rpm libvirt-python-0.8.1-27.el6.x86_64.rpm Preparing... ########################################### [100%] 1:libvirt-client ########################################### [ 33%] 2:libvirt ########################################### [ 67%] 3:libvirt-python ########################################### [100%]

Now make sure "libvirtd" is set to automatically start on boot:

[root@el6 ~]# chkconfig --list libvirtd libvirtd 0:off 1:off 2:off 3:on 4:on 5:on 6:off

Then it's time to reboot back to Xen !

Verifying libvirt with Xen

[root@el6 ~]# virsh list Id Name State ---------------------------------- 0 Domain-0 running [root@el6 ~]# xm list Name ID Mem VCPUs State Time(s) Domain-0 0 1024 4 r----- 52.8

So it seems to work. Now you're also able to use graphical "virt-manager" to manage Xen on RHEL6.

Bridge problems and errors with custom dom0 kernel

# brctl show bridge name    bridge id              STP enabled    interfaces virbr0         /sys/class/net/virbr0/bridge: No such file or directory /sys/class/net/virbr0/bridge: No such file or directory /sys/class/net/virbr0/bridge: No such file or directory /sys/class/net/virbr0/bridge: No such file or directory /sys/class/net/virbr0/bridge: No such file or directory /sys/class/net/virbr0/bridge: No such file or directory /sys/class/net/virbr0/bridge: No such file or directory /sys/class/net/virbr0/bridge: No such file or directory /sys/class/net/virbr0/bridge: No such file or directory /sys/class/net/virbr0/bridge: No such file or directory /sys/class/net/virbr0/bridge: No such file or directory /sys/class/net/virbr0/bridge: No such file or directory 8000.000000000000      yes

This problem happens because Red Hat added bridge IGMP snooping support to rhel6 2.6.32 kernel, and also to rhel6 bridge-utils. If you use mainline or custom Linux 2.6.32 kernel with el6 distro then you won't have that bridge IGMP snooping support in the kernel, and bridge-utils (brctl) will give errors like above.

There are two workarounds:

Use Xen dom0 kernel based on actual rhel6 kernel/patches, mayoung does have "xendom0" kernel available for el6 distros based on actual rhel6 kernel, with xen dom0 pvops patches added on top, so it includes bridge IGMP snooping support and the default el6 bridge-utils works OK without errors. See the end of this wiki tutorial page for links to xendom0 kernel rpms.If using custom dom0 kernel (xen.git xen/stable-2.6.32.x) then rebuild the el6 bridge-utils src.rpm and remove the IGMP snooping patch from the spec file:http://lists.xensource.com/archives/html/xen-devel/2011-02/msg00760.html .

Using graphical virt-manager to manage Xen on RHEL6

Some screenshots of using virt-manager with Xen on RHEL6 and installing Fedora 14 Xen PV domU. Note that you don't need (and probably shouldn't) run Xserver on dom0! You can use ssh X11 forwarding to run virt-manager on dom0 but display the virt-manager GUI on your local laptop/desktop. See the Fedora 13 tutorial link in the end of this page for more information about using ssh X11 forwarding.

Network setup details and troubleshooting

See Fedora13Xen4Tutorial for more information about virbr0 setup/configuration for NAT/DHCP, routing, firewall rules, et

Virtualization basics

Virtualization

Virtualization is a technique, which allows to share single physical instance of an application or resource among multiple organizations or tenants (customers). It does so by assigning a logical name to a physical resource and providing a pointer to that physical resourcewhen demanded.

Virtualization Concept

Creating a virtual machine over existing operating system and hardware is referred as Hardware Virtualization. Virtual Machines provide an environment that is logically separated from the underlying hardware.

The machine on which the virtual machine is created is known as host machine and virtual machine is referred as a guest machine. This virtual machine is managed by a software or firmware, which is known as hypervisor.

HYPERVISOR

Hypervisor is a firmware or low-level program that acts as a Virtual Machine Manager. There are two types of hypervisor:

Type 1 hypervisor runs on bare system.LynxSecure, RTS Hypervisor, Oracle VM, Sun xVM Server, VirtualLogic VLX are examples of Type 1 hypervisor. The following diagram shows the Type 1 hypervisor.

The type1 hypervisor does not have any host operating system because they are installed on a bare system.


Type 2 hypervisor is a software interface that emulates the devices with which a system normally interacts. Containers, KVM, Microsoft Hyper V, VMWare Fusion, Virtual Server 2005 R2, Windows Virtual PC and VMWare workstation 6.0 are examples of Type 2 hypervisor. The following diagram shows the Type 2 hypervisor.

Types of Hardware Virtualization

Here are the three types of hardware virtualization:

Full Virtualization

Emulation Virtualization

Paravirtualization

FULL VIRTUALIZATION

In Full Virtualization, the underlying hardware is completely simulated. Guest software does not require any modification to run.

EMULATION VIRTUALIZATION

In Emulation, the virtual machine simulates the hardware and hence become independent of the it. In this, the guest operating system does not require modification.

PARAVIRTUALIZATION

In Paravirtualization, the hardware is not simulated. The guest software run their own isolated domains.

VMware vSphere is highly developed infrastructure that offers a management infrastructure framework for virtualization. It virtualizes the system, storage and networking hardware.


Saturday, 13 December 2014

Network mapper Nmap in linux distribution-kali linux

 is an open source and a very versatile tool for Linux system/network administrators. Nmap is used for exploring networksperform security scansnetwork audit and finding open portson remote machine. It scans for Live hosts, Operating systems, packet filters and open ports running on remote hosts.

Nmap Commands and Examples

I'll be covering most of NMAP usage in two different parts and this is the first part of nmap serious. Here in this setup, I have used two servers without firewall to test the working of the Nmap command.

192.168.0.100 – server1.tecmint.com192.168.0.101 – server2.tecmint.com

Nmap command usage

# nmap [Scan Type(s)] [Options] {target specification}

How to Install NMAP in Linux

Most of the today's Linux distributions like Red HatCentOSFedoroDebian and Ubuntu have included Nmap in their default package management repositories called Yum and APT. The both tools are used to install and manage software packages and updates. To installNmap on distribution specific use the following command.

# yum install nmap [on Red Hat based systems] $ sudo apt-get install nmap [on Debian based systems]

Once you've install latest nmap application, you can follow the example instructions provided in this article.

1. Scan a System with Hostname and IP Address

The Nmap tool offers various methods to scan a system. In this example, I am performing a scan using hostname as server2.tecmint.comto find out all open ports, services and MAC address on the system.

Scan using Hostname

[root@server1 ~]# nmap server2.tecmint.com Starting Nmap 4.11 ( http://www.insecure.org/nmap/ ) at 2013-11-11 15:42 EST Interesting ports on server2.tecmint.com (192.168.0.101): Not shown: 1674 closed ports PORT STATE SERVICE 22/tcp open ssh 80/tcp open http 111/tcp open rpcbind 957/tcp open unknown 3306/tcp open mysql 8888/tcp open sun-answerbook MAC Address: 08:00:27:D9:8E:D7 (Cadmus Computer Systems) Nmap finished: 1 IP address (1 host up) scanned in 0.415 seconds You have new mail in /var/spool/mail/root

Scan using IP Address

[root@server1 ~]# nmap 192.168.0.101 Starting Nmap 4.11 ( http://www.insecure.org/nmap/ ) at 2013-11-18 11:04 EST Interesting ports on server2.tecmint.com (192.168.0.101): Not shown: 1674 closed ports PORT STATE SERVICE 22/tcp open ssh 80/tcp open http 111/tcp open rpcbind 958/tcp open unknown 3306/tcp open mysql 8888/tcp open sun-answerbook MAC Address: 08:00:27:D9:8E:D7 (Cadmus Computer Systems) Nmap finished: 1 IP address (1 host up) scanned in 0.465 seconds You have new mail in /var/spool/mail/root

2. Scan using "-v" option

You can see that the below command with "-v" option is giving more detailed information about the remote machine.

[root@server1 ~]# nmap -v server2.tecmint.com Starting Nmap 4.11 ( http://www.insecure.org/nmap/ ) at 2013-11-11 15:43 EST Initiating ARP Ping Scan against 192.168.0.101 [1 port] at 15:43 The ARP Ping Scan took 0.01s to scan 1 total hosts. Initiating SYN Stealth Scan against server2.tecmint.com (192.168.0.101) [1680 ports] at 15:43 Discovered open port 22/tcp on 192.168.0.101 Discovered open port 80/tcp on 192.168.0.101 Discovered open port 8888/tcp on 192.168.0.101 Discovered open port 111/tcp on 192.168.0.101 Discovered open port 3306/tcp on 192.168.0.101 Discovered open port 957/tcp on 192.168.0.101 The SYN Stealth Scan took 0.30s to scan 1680 total ports. Host server2.tecmint.com (192.168.0.101) appears to be up ... good. Interesting ports on server2.tecmint.com (192.168.0.101): Not shown: 1674 closed ports PORT STATE SERVICE 22/tcp open ssh 80/tcp open http 111/tcp open rpcbind 957/tcp open unknown 3306/tcp open mysql 8888/tcp open sun-answerbook MAC Address: 08:00:27:D9:8E:D7 (Cadmus Computer Systems) Nmap finished: 1 IP address (1 host up) scanned in 0.485 seconds Raw packets sent: 1681 (73.962KB) | Rcvd: 1681 (77.322KB)

Scan Multiple Hosts

You can scan multiple hosts by simply writing their IP addresses or hostnames with Nmap.

[root@server1 ~]# nmap 192.168.0.101 192.168.0.102 192.168.0.103 Starting Nmap 4.11 ( http://www.insecure.org/nmap/ ) at 2013-11-11 16:06 EST Interesting ports on server2.tecmint.com (192.168.0.101): Not shown: 1674 closed ports PORT STATE SERVICE 22/tcp open ssh 80/tcp open http 111/tcp open rpcbind 957/tcp open unknown 3306/tcp open mysql 8888/tcp open sun-answerbook MAC Address: 08:00:27:D9:8E:D7 (Cadmus Computer Systems) Nmap finished: 3 IP addresses (1 host up) scanned in 0.580 seconds

4. Scan a whole Subnet

You can scan a whole subnet or IP range with Nmap by providing * wildcard with it.

[root@server1 ~]# nmap 192.168.0.* Starting Nmap 4.11 ( http://www.insecure.org/nmap/ ) at 2013-11-11 16:11 EST Interesting ports on server1.tecmint.com (192.168.0.100): Not shown: 1677 closed ports PORT STATE SERVICE 22/tcp open ssh 111/tcp open rpcbind 851/tcp open unknown Interesting ports on server2.tecmint.com (192.168.0.101): Not shown: 1674 closed ports PORT STATE SERVICE 22/tcp open ssh 80/tcp open http 111/tcp open rpcbind 957/tcp open unknown 3306/tcp open mysql 8888/tcp open sun-answerbook MAC Address: 08:00:27:D9:8E:D7 (Cadmus Computer Systems) Nmap finished: 256 IP addresses (2 hosts up) scanned in 5.550 seconds You have new mail in /var/spool/mail/root

On above output you can see that nmap scanned a whole subnet and gave the information about those hosts which are Up in the Network.

5. Scan Multiple Servers using last octet of IP address

You can perform scans on multiple IP address by simple specifying last octet of IP address. For example, here I performing a scan on IP addresses 192.168.0.101, 192.168.0.102 and 192.168.0.103.

[root@server1 ~]# nmap 192.168.0.101,102,103 Starting Nmap 4.11 ( http://www.insecure.org/nmap/ ) at 2013-11-11 16:09 EST Interesting ports on server2.tecmint.com (192.168.0.101): Not shown: 1674 closed ports PORT STATE SERVICE 22/tcp open ssh 80/tcp open http 111/tcp open rpcbind 957/tcp open unknown 3306/tcp open mysql 8888/tcp open sun-answerbook MAC Address: 08:00:27:D9:8E:D7 (Cadmus Computer Systems) Nmap finished: 3 IP addresses (1 host up) scanned in 0.552 seconds You have new mail in /var/spool/mail/root

6. Scan list of Hosts from a File

If you have more hosts to scan and all host details are written in a file , you can directly ask nmap to read that file and perform scans. Let's see how to do that.

Create a text file called "nmaptest.txt" and define all the IP addresses or hostname of the server that you want to do a scan.

[root@server1 ~]# cat > nmaptest.txt localhost server2.tecmint.com 192.168.0.101

Next, run the following command with "iL" option with nmap command to scan all listed IP address in the file.

[root@server1 ~]# nmap -iL nmaptest.txt Starting Nmap 4.11 ( http://www.insecure.org/nmap/ ) at 2013-11-18 10:58 EST Interesting ports on localhost.localdomain (127.0.0.1): Not shown: 1675 closed ports PORT STATE SERVICE 22/tcp open ssh 25/tcp open smtp 111/tcp open rpcbind 631/tcp open ipp 857/tcp open unknown Interesting ports on server2.tecmint.com (192.168.0.101): Not shown: 1674 closed ports PORT STATE SERVICE 22/tcp open ssh 80/tcp open http 111/tcp open rpcbind 958/tcp open unknown 3306/tcp open mysql 8888/tcp open sun-answerbook MAC Address: 08:00:27:D9:8E:D7 (Cadmus Computer Systems) Interesting ports on server2.tecmint.com (192.168.0.101): Not shown: 1674 closed ports PORT STATE SERVICE 22/tcp open ssh 80/tcp open http 111/tcp open rpcbind 958/tcp open unknown 3306/tcp open mysql 8888/tcp open sun-answerbook MAC Address: 08:00:27:D9:8E:D7 (Cadmus Computer Systems) Nmap finished: 3 IP addresses (3 hosts up) scanned in 2.047 seconds

7. Scan an IP Address Range

You can specify an IP range while performing scan with Nmap.

[root@server1 ~]# nmap 192.168.0.101-110 Starting Nmap 4.11 ( http://www.insecure.org/nmap/ ) at 2013-11-11 16:09 EST Interesting ports on server2.tecmint.com (192.168.0.101): Not shown: 1674 closed ports PORT STATE SERVICE 22/tcp open ssh 80/tcp open http 111/tcp open rpcbind 957/tcp open unknown 3306/tcp open mysql 8888/tcp open sun-answerbook MAC Address: 08:00:27:D9:8E:D7 (Cadmus Computer Systems) Nmap finished: 10 IP addresses (1 host up) scanned in 0.542 seconds

8. Scan Network Excluding Remote Hosts

You can exclude some hosts while performing a full network scan or when you are scanning with wildcards with "–exclude" option.

[root@server1 ~]# nmap 192.168.0.* --exclude 192.168.0.100 Starting Nmap 4.11 ( http://www.insecure.org/nmap/ ) at 2013-11-11 16:16 EST Interesting ports on server2.tecmint.com (192.168.0.101): Not shown: 1674 closed ports PORT STATE SERVICE 22/tcp open ssh 80/tcp open http 111/tcp open rpcbind 957/tcp open unknown 3306/tcp open mysql 8888/tcp open sun-answerbook MAC Address: 08:00:27:D9:8E:D7 (Cadmus Computer Systems) Nmap finished: 255 IP addresses (1 host up) scanned in 5.313 seconds You have new mail in /var/spool/mail/root

9. Scan OS information and Traceroute

With Nmap, you can detect which OS and version is running on the remote host. To enable OS & version detection, script scanning and traceroute, we can use "-A" option with NMAP.

[root@server1 ~]# nmap -A 192.168.0.101 Starting Nmap 4.11 ( http://www.insecure.org/nmap/ ) at 2013-11-11 16:25 EST Interesting ports on server2.tecmint.com (192.168.0.101): Not shown: 1674 closed ports PORT STATE SERVICE VERSION 22/tcp open ssh OpenSSH 4.3 (protocol 2.0) 80/tcp open http Apache httpd 2.2.3 ((CentOS)) 111/tcp open rpcbind 2 (rpc #100000) 957/tcp open status 1 (rpc #100024) 3306/tcp open mysql MySQL (unauthorized) 8888/tcp open http lighttpd 1.4.32 MAC Address: 08:00:27:D9:8E:D7 (Cadmus Computer Systems) No exact OS matches for host (If you know what OS is running on it, see http://www.insecure.org/cgi-bin/nmap-submit.cgi). TCP/IP fingerprint: SInfo(V=4.11%P=i686-redhat-linux-gnu%D=11/11%Tm=52814B66%O=22%C=1%M=080027) TSeq(Class=TR%IPID=Z%TS=1000HZ) T1(Resp=Y%DF=Y%W=16A0%ACK=S++%Flags=AS%Ops=MNNTNW) T2(Resp=N) T3(Resp=Y%DF=Y%W=16A0%ACK=S++%Flags=AS%Ops=MNNTNW) T4(Resp=Y%DF=Y%W=0%ACK=O%Flags=R%Ops=) T5(Resp=Y%DF=Y%W=0%ACK=S++%Flags=AR%Ops=) T6(Resp=Y%DF=Y%W=0%ACK=O%Flags=R%Ops=) T7(Resp=Y%DF=Y%W=0%ACK=S++%Flags=AR%Ops=) PU(Resp=Y%DF=N%TOS=C0%IPLEN=164%RIPTL=148%RID=E%RIPCK=E%UCK=E%ULEN=134%DAT=E) Uptime 0.169 days (since Mon Nov 11 12:22:15 2013) Nmap finished: 1 IP address (1 host up) scanned in 22.271 seconds You have new mail in /var/spool/mail/root

In above Output, you can see that nmap is came up with TCP/IP fingerprint of the OSrunning on remote hosts and being more specific about the port and services running on the remote hosts.

10. Enable OS Detection with Nmap

Use the option "-O" and "-osscan-guess" also helps to discover OS information.

[root@server1 ~]# nmap -O server2.tecmint.com Starting Nmap 4.11 ( http://www.insecure.org/nmap/ ) at 2013-11-11 17:40 EST Interesting ports on server2.tecmint.com (192.168.0.101): Not shown: 1674 closed ports PORT STATE SERVICE 22/tcp open ssh 80/tcp open http 111/tcp open rpcbind 957/tcp open unknown 3306/tcp open mysql 8888/tcp open sun-answerbook MAC Address: 08:00:27:D9:8E:D7 (Cadmus Computer Systems) No exact OS matches for host (If you know what OS is running on it, see http://www.insecure.org/cgi-bin/nmap-submit.cgi). TCP/IP fingerprint: SInfo(V=4.11%P=i686-redhat-linux-gnu%D=11/11%Tm=52815CF4%O=22%C=1%M=080027) TSeq(Class=TR%IPID=Z%TS=1000HZ) T1(Resp=Y%DF=Y%W=16A0%ACK=S++%Flags=AS%Ops=MNNTNW) T2(Resp=N) T3(Resp=Y%DF=Y%W=16A0%ACK=S++%Flags=AS%Ops=MNNTNW) T4(Resp=Y%DF=Y%W=0%ACK=O%Flags=Option -O and -osscan-guess also helps to discover OS R%Ops=) T5(Resp=Y%DF=Y%W=0%ACK=S++%Flags=AR%Ops=) T6(Resp=Y%DF=Y%W=0%ACK=O%Flags=R%Ops=) T7(Resp=Y%DF=Y%W=0%ACK=S++%Flags=AR%Ops=) PU(Resp=Y%DF=N%TOS=C0%IPLEN=164%RIPTL=148%RID=E%RIPCK=E%UCK=E%ULEN=134%DAT=E) Uptime 0.221 days (since Mon Nov 11 12:22:16 2013) Nmap finished: 1 IP address (1 host up) scanned in 11.064 seconds You have new mail in /var/spool/mail/root

Monday, 8 December 2014

Installing Hadoop in vmware in windows7

Did you know that you can easily install a simple single-node Hadoop cluster on your Windows PC or laptop?  Normally, Hadoop runs on Unix computers.  However, thanks to modern virtualization technology, you can run a complete sandbox version of Hadoop within a virtual Linux server on your personal computer, for free.  This installation is ideal for learning and exploring how to use Hadoop.  I will teach you how to install and run the Hortonworks sandbox version of Hadoop on your Windows computer in this tutorial.

Step 1: Install VMware Player

If you don't already have VMware running on your computer, you'll need to install VMware Player v5 or higher on your Windows computer.  This software is free for personal use.  I have found that installing VMware Player v5 on my 64-bit Windows 7 computer to be reliable and causes no problems.  VMware Player can also be installed on a Linux computer.  If you have a Mac, you'll need to purchase and install the VMware Fusion software instead.

Download and install "VMware Player for Windows 32-bit and 64-bit".  It took me 4 minutes to download theVMware-player-5.0.1-894247.exeinstaller file, and 2 minutes to install the software on my Windows 7 computer, with no need to reboot.  VMware Player requires 150 MB free disk space.  Go to your Windows Start Menu and launch VMware Player (you may skip the upgrade to VMware Workstation).

See the full step-by-step instructions on installing VMware Player if you require additional details.

Step 2: Install Hortonworks Hadoop Sandbox

Download the Hortonworks Hadoop Sandbox for VMware.  The VMware Fusion and VMware Workstation versions are compatible with the VMware Player that you had just installed in Step 1.  It took 1 hour 47 minutes to download the 2 GB "Hortonworks+Sandbox+1.2+1-21-2012-1+vmware.ova" file from the Hortonworks Amazon S3 directory.

While waiting for the VMware OVA file to download, you can watch the below sandbox overview video from Hortonworks (8 minutes 35 seconds) and read the sandbox installation instructions.

Step 3: Run Hadoop!

Within the VMware Player application that you had installed and started running in Step 1, either go to the Player menu, and select "File/Open..", or choose "Open a Virtual Machine" from the welcome screen.  Locate the directory where you had downloaded the VMware image Hortonworks sandbox file "Hortonworks+Sandbox+1.2+1-21-2012-1+vmware.ova" and select that OVA file to open.  You'll be prompted for the name of the new virtual server instance, and where on your host Windows machine VMware should store the instance image file–okay to accept the defaults.  It may take a few minutes for the new virtual machine to be imported.  FYI, your Windows computer is the host system, whereas the CentOS 64-bit Linux system, bundled free with the Hortonworks Sandbox, is the virtual guest system from the VMware point of view.

VMware Player Open file menu

You're now ready to click "Play virtual machine" to start running your new sandbox instance.

Your guest Linux system will now start up, along with all necessary software for Hadoop to run including a web server.  The beauty of using a virtual server is that 1) you don't need to have another physical computer under your desk along with the associated power and network cables, monitor, and other accessories, to experiment with Hadoop, 2) you can install it on your laptop and run Hadoop there without needing to connect to the network, and 3) your separate virtual server won't mess up anything you have on your main Windows computer, and can be easily uninstalled when no longer needed.

Once everything starts up, then you will see instructions on how to access the Hortonworks Sandbox.  Look for the URL with the IP address such as http://192.168.40.128 in the below screenshot.  Note that your IP address may be different than mine.

In a web browser such as Firefox or Chrome, go to the Sandbox URL IP address.  You should see a Hortonworks Sandbox welcome screen with options to view some overview videos, to start the tutorial, or jump straight into the sandbox.  Since we're eager to run Hadoop, let's go straight to the third choice: click on the green Start button under "Use the Sandbox."

You will now see the HUE web-based environment for the sandbox.  By default you will start in the Beeswax screen.  Let's click on "My Queries" then click on the "Sample: Top salary (copy)" query name.

You will then see the sample Hive query in the Query Editor.  If you have used relational databases before, you will notice that the Hive query looks very similar to standard SQL.  The other method of querying Hadoop would be via Pig, which is more of a pipeline method of constructing Hadoop queries than Hive, but will require a little steeper learning curve than Hive for those already familiar with SQL.  Let's stick with Hive for this initial run.  Click on the Execute button to start running the Hive query.

Now your query will start running for a minute or so.  The HUE environment will update the log output to the screen for you to see the progress and any error messages.  This is a good time to step away from the computer and dosomething healthy while your "Big Data" query is running.

  After a few minutes, your query results will show up on the screen.

Congratulations!  You have now installed Hadoop and successfully run your first Hive query.  You are on your way to becoming a wizard in Hadoop